🎬 A MetaHuman in a Finished Cinematic Shot
This is the capstone, and it belongs to two tracks at once. Across the advanced track you built a digital human piece by piece: you met the shared rig, put your own mesh onto it, captured a face performance, and finished the body with motion and grooms. Across the intermediate track you learned the craft of a shot: staging, Sequencer, cameras, lighting, and rendering. This lesson brings both together. You will stand the finished digital human inside a real cinematic shot, plan it, stage it, give it its performance, frame it, light it, and render it, so that everything you have built becomes a single directed frame.
🧬 Advanced Track · Digital Humans
This is the fifth and final lesson of the Digital Humans with MetaHuman track. Lesson 1 mapped the shared-rig system, Lesson 2 put your own character onto it, Lesson 3 made the face act, and Lesson 4 finished the body with retargeted motion and grooms. Now the digital human is complete, so this capstone leans hard on the intermediate track, the shot craft that turns a finished character into a finished frame.
🎯 Learning Objectives
By the end of this lesson, you will be able to:
- Plan a cinematic shot around a finished digital human: subject, camera move, beat, and length
- Stage a completed MetaHuman in a level, grounded and oriented toward the camera
- Layer a captured Face track and a retargeted Body track on one MetaHuman in Sequencer
- Assemble the shot with a Cine Camera and a Camera Cuts track
- Light the digital human for the camera and lock exposure so the frame stays stable
- Render the finished shot through Movie Render Queue, threading every step of both tracks
Estimated Time: 55-70 minutes
Prerequisites: Body, Grooms, and Retargeting (this capstone stands the finished digital human that track built into a shot), plus the whole intermediate track, whose Sequencer, lighting, and rendering lessons are the craft this shot is built from. A working Unreal Engine 5.8 install with the MetaHuman plugin enabled.
In This Lesson
Thinking in Shots: Everything in One Frame
A capstone is not a new tool. It is the moment every tool you have learned meets in one place. By now you have built two things in parallel. The advanced track built the character itself: the shared rig, your mesh made into a MetaHuman, a captured face performance, and a retargeted body with grooms. The intermediate track taught the craft of a shot: staging a character, assembling a Sequencer timeline, framing with a camera, lighting for the lens, and rendering to disk. This lesson is where the finished digital human walks onto the finished stage.
Before you touch the engine, think in shots. A shot is a single continuous view: one subject, one camera move, one beat of action, a handful of seconds. Decide those four things first. Who is the subject, and what does the digital human do in this shot? Where does the camera sit, and does it move? What is the single beat the audience should read? How long does it run? A shot planned in a sentence renders far more cleanly than one discovered by trial and error in the viewport. The rest of this lesson is the order of operations that turns that sentence into a frame.
Figure: The capstone map · the advanced track built a complete digital human, the intermediate track taught the craft of a shot, and this lesson brings them together. Every piece you have made converges on one directed frame.
Stage the Digital Human
Staging comes first, and it is the least MetaHuman-specific step in the whole shot, which is exactly the point. The digital human arrives at this stage already complete: built as a MetaHuman in Lesson 2, face ready from Lesson 3, body and grooms from Lesson 4. Once it is built, you stage it the same way you staged any skeletal character back in the first intermediate lesson: drop it into the level, ground its feet on the surface, and orient it toward where the camera will sit.
That sameness is the reward for all the work behind you. A MetaHuman on the stage is not a special case the engine treats differently. It is a rigged character with a place to stand, and the moment it is grounded and facing the lens, it is ready to perform. Get the feet planted and the facing right now, because a character that floats or turns away from camera is the most common thing a first render exposes.
💡 From a finished character to a staged one
flowchart LR
    MH[The finished MetaHuman
built, face and body ready] --> PLACE[Place it in the level]
    PLACE --> GROUND[Ground the feet
on the surface]
    GROUND --> FACE[Orient toward
where the camera sits]
    FACE --> READY[Staged and ready
to perform]
    style MH fill:#e8eaf6,stroke:#3949ab
    style READY fill:#e8f5e9,stroke:#4CAF50
The digital human comes to the stage already complete. Staging is the ordinary work of placing, grounding, and orienting a character, the same steps any skeletal figure needs.
✅ Pro Tip: plant the feet before anything else
Ground contact is the first thing a viewer reads and the first thing a bad stage betrays. Before you add a single track, confirm the digital human's feet sit on the surface, not hovering above it or sunk into it. The staging discipline you learned with SK_Anya in the intermediate track applies unchanged here.
Give It Its Performance: Two Tracks, One Character
Here is the heart of the shot, and the one part that is genuinely about the MetaHuman. In Sequencer the character carries its performance as two separate animation tracks, the exact two you built in the advanced track. The Face track plays the captured performance from MetaHuman Animator. The Body track plays the retargeted and Control-Rig-polished motion from Lesson 4. The grooms ride the head, bound to the face rig, so the hair moves with the performance.
They are separate on purpose. Keeping the face and the body on their own tracks is what lets you fix a line reading without disturbing a walk, or adjust a stride without touching an expression. And they layer on a single MetaHuman, so when the timeline plays, the character speaks and moves at once, as one performance. This two-track stack is the whole payoff of the advanced track, gathered onto one character in one timeline.
Figure: The two-track stack · a captured Face track and a retargeted Body track layer on one MetaHuman, with the grooms bound to the head. They stay separate so you can refine each independently, and play together as a single performance in the shot.
Assemble the Shot in Sequencer
With the character performing, build the shot around it. This is Sequencer exactly as you learned it. Add a Cine Camera and set its lens: the focal length that decides how tight or wide the frame reads, the aperture that sets depth of field, and the focus that lands on the digital human's eyes. Add a Camera Cuts track so the render looks through your camera rather than the free viewport. If the shot moves, key the camera's transform across the timeline for the push, pan, or orbit you planned.
The Level Sequence is now the single source of truth for the whole shot. It holds the MetaHuman with its Face and Body tracks, the Cine Camera, the Camera Cuts track, and, once you light the scene, the lights. Everything the render needs lives on one timeline, which is why a shot assembled in Sequencer is a shot you can hand off, re-render, and trust.
💡 One timeline holds the whole shot
flowchart TD
    SEQ[Level Sequence
the shot, on one timeline] --> MH[MetaHuman
Face track and Body track]
    SEQ --> CAM[Cine Camera
focal length, aperture, focus]
    SEQ --> CUT[Camera Cuts track
render sees your camera]
    SEQ --> LIT[Lights
added in the next step]
    style SEQ fill:#e3f2fd,stroke:#2196F3
    style MH fill:#e8eaf6,stroke:#3949ab
    style CAM fill:#f3eefb,stroke:#7e57c2
Sequencer gathers the performing character, the camera, the cuts, and the lights onto one timeline. That timeline is what Movie Render Queue will render at the end.
✅ Pro Tip: focus on the eyes
A digital human lives or dies on its eyes, so land the Cine Camera's focus there. With the face performance you captured in Lesson 3 driving the eyes and brows, a shallow depth of field that keeps them sharp while the background falls soft is what makes the shot read as cinematic rather than as a game view.
Light It for the Camera
A staged, performing, framed digital human still looks flat until you light it, and lighting is where the cinematic lighting lesson pays off. Light the person, not the room. Set a three-point rig on the digital human: a key light to define the form, a fill to lift the shadow side to the ratio you want, and a rim to separate the character from the background. The key-to-fill ratio is where the mood lives, tight and bright for a clean look, wide and dark for something dramatic.
Then do the one step a moving character makes essential: lock the exposure. An unbound Post Process Volume with a fixed exposure stops the engine's auto-exposure from pumping brighter and darker as the digital human moves through the frame. Without it, a walk toward camera can wash out or dim shot to shot; with it, every frame is exposed the same, and the render is a render you can trust. Lighting and locked exposure are the difference between a lit character and a stable, camera-ready one.
Figure: Lighting the digital human for the camera · a three-point rig defines form, lifts shadows, and separates the character from the background, while a locked exposure keeps the frame stable as the character moves. This is the intermediate lighting lesson applied to a MetaHuman.
Render the Finished Shot
Everything is staged, performing, framed, and lit. The last step is Movie Render Queue, the same tool that closed the intermediate track. Add the Level Sequence as a render job and set the output the shot deserves: the resolution and frame rate, the file format, and enough anti-aliasing samples to give clean edges and, crucially for a digital human, smooth hair strands. Render to an image sequence so the frames can go on to post. A viewport grab was never the finished frame; this is.
What comes out is the whole of both tracks in a single image. A digital human you built from your own mesh, performing with a captured face and a retargeted body, hair and all, staged and framed and lit and rendered. Below is a genuine finished shot from this course's project, a lit and composed hero frame standing in for exactly the kind of frame a MetaHuman would render into: a single figure lit with a warm key and a cool rim, set on the right third against a dark backdrop with a long cast shadow. It is the destination this whole track has been walking toward.
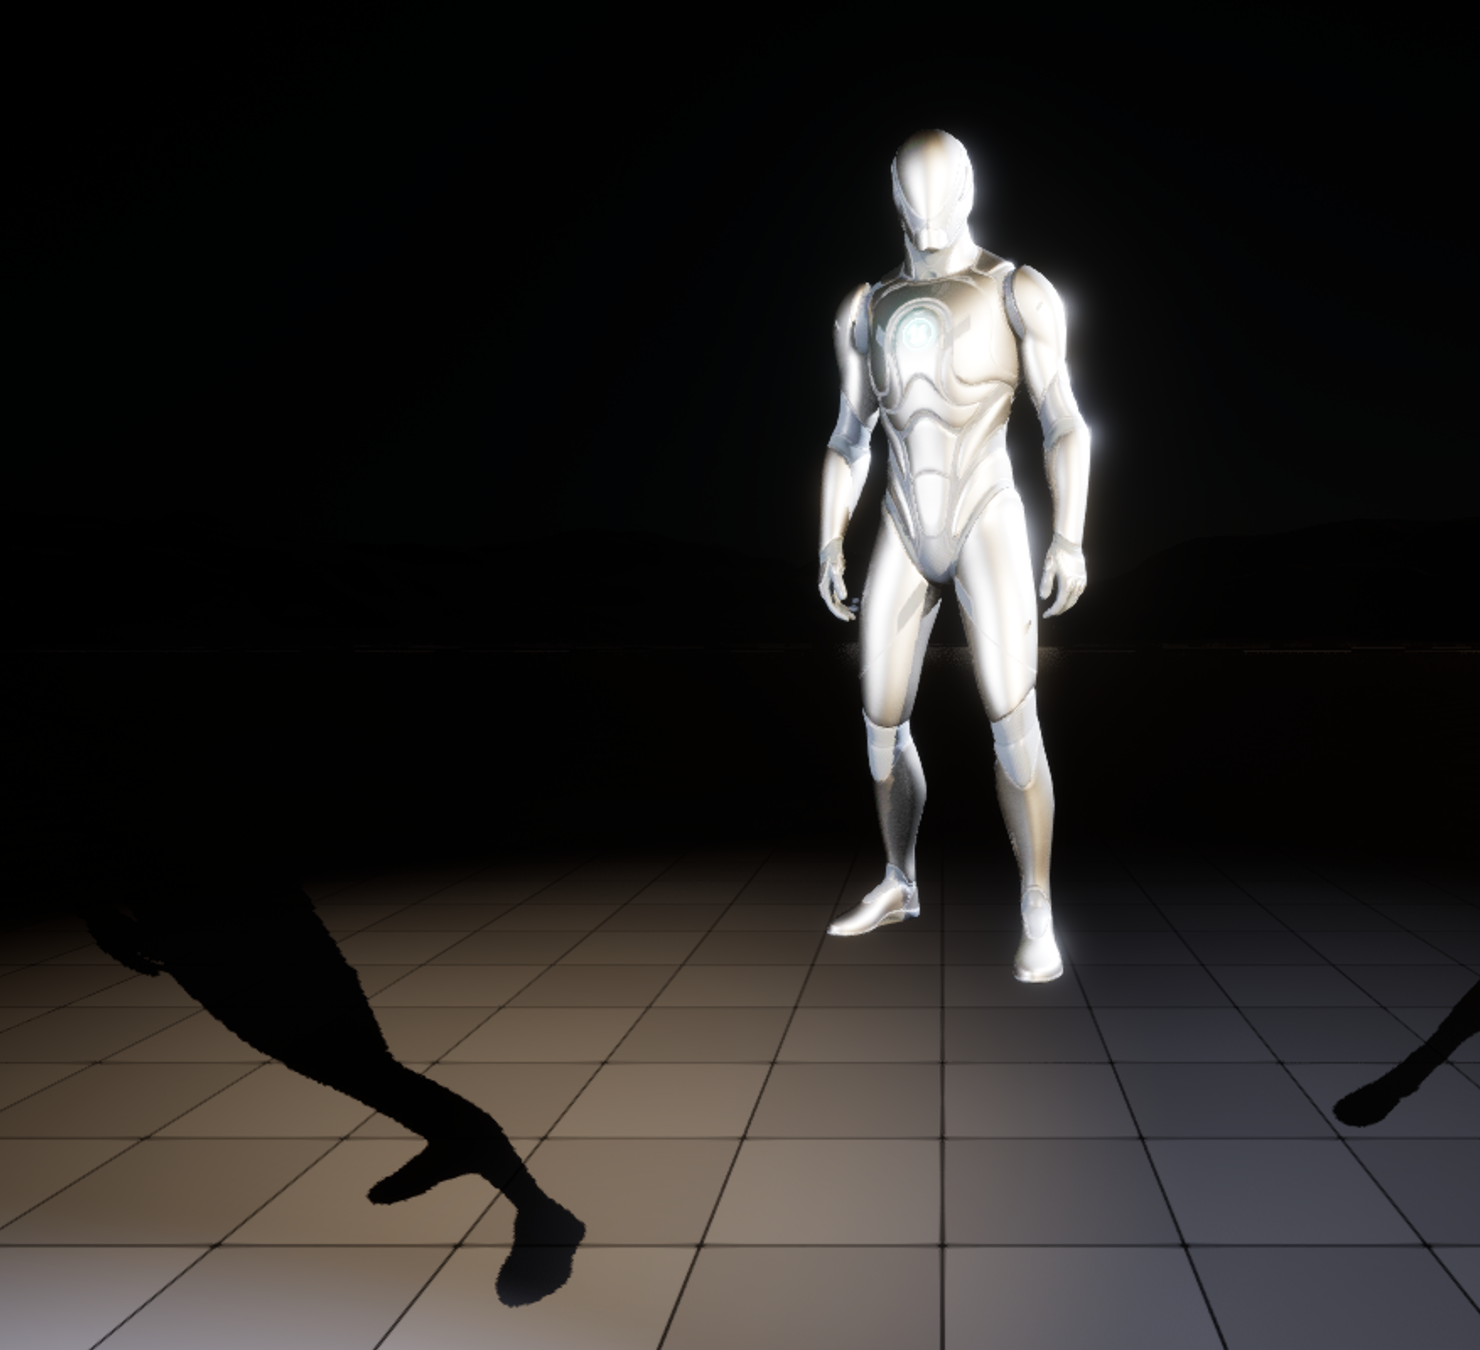
Figure: A finished cinematic frame, captured live in the ClaudeTest project · a three-point-lit, deliberately composed hero shot with a locked exposure and a long cast shadow. It stands in for the kind of finished frame a fully built MetaHuman would render into once it is staged, performed, framed, lit, and sent through Movie Render Queue.
💡 Both tracks, in one render
flowchart LR
    ADV[Built MetaHuman
face, body, grooms] --> SEQ[Sequencer
two tracks, camera, lights]
    INT[Staging, camera,
and lighting craft] --> SEQ
    SEQ --> MRQ[Movie Render Queue
resolution, samples, format]
    MRQ --> OUT[The finished
cinematic shot]
    style ADV fill:#e8eaf6,stroke:#3949ab
    style INT fill:#f3eefb,stroke:#7e57c2
    style SEQ fill:#e3f2fd,stroke:#2196F3
    style OUT fill:#e8f5e9,stroke:#4CAF50
The character from the advanced track and the craft from the intermediate track meet in Sequencer, and Movie Render Queue turns that timeline into the finished frame.
Step back and look at what you can now do. You can take a bespoke mesh, turn it into a rigged MetaHuman, capture a real face performance onto it, give it a retargeted body and grooms, then stage, frame, light, and render it as a directed cinematic shot. That is the full arc of both tracks, from a character that did not exist to a finished frame. This is the end of the advanced track, and the end of the road you started when you first opened Sequencer.
Hands-On: Direct a MetaHuman Shot
Put the whole pipeline together in one short shot. The goal is not a perfect render, it is to feel every track you have learned meet on one timeline. If you do not yet have a fully built MetaHuman, use any rigged character you staged in the intermediate track and layer what tracks you have; the order of operations is identical.
🎬 Exercise: a five-second shot of a digital human
- Plan it in a sentence. Name the subject, the camera move, the single beat, and the length. For example: a slow push-in on the digital human as it delivers one line and turns its head.
- Stage the character. Place your MetaHuman in the level, ground the feet, and orient it toward where the camera will sit, exactly as in the staging lesson.
- Give it its performance. In Sequencer, add a Body track with your retargeted motion, and if you captured one in Lesson 3, a Face track too, so the character moves and speaks.
- Frame it. Add a Cine Camera, set the lens and focus on the eyes, and add a Camera Cuts track. Key the push-in if the shot moves.
- Light it and lock exposure. Set a three-point rig on the character, choose your key-to-fill ratio, and lock exposure with an unbound Post Process Volume.
- Render it. Send the Level Sequence through Movie Render Queue, set resolution, samples, and format, and render an image sequence. That sequence is your finished shot.
💡 Hint: the render looks worse than the viewport?
That is almost always exposure or samples. If the character flares bright or goes dim across the shot, your exposure is not locked, so add or fix the unbound Post Process Volume. If edges shimmer or the hair looks noisy, raise the anti-aliasing sample count in Movie Render Queue. A viewport preview hides both problems; the render is the honest test, which is exactly why this step is last.
✅ Reach exercise: the same character, two shots
Render your digital human twice from the same staged performance: once as a wide establishing shot with a long lens and even light, once as a tight dramatic close-up with a shallow focus and a high key-to-fill ratio. Watching one built character carry two completely different shots is the clearest proof of the capstone's lesson: the character is finished, and the shot is a separate craft you now command.
Knowledge Check
Question 1
What does it mean to plan a shot before building it in the engine?
Correct answer: B · A shot is one subject, one camera move, one beat, and a length. Deciding those four things in a sentence up front gives the rest of the pipeline a clear target, and renders far more cleanly than discovering the shot by trial and error in the viewport.
Question 2
Why is staging a finished MetaHuman almost the same as staging any other character?
Correct answer: B · All the MetaHuman-specific work happened while you built the character. On the stage it is simply a rigged character: you drop it in the level, ground the feet, and turn it toward the camera, exactly the staging you learned in the intermediate track.
Question 3
How does a MetaHuman carry its performance in Sequencer?
Correct answer: B · The captured Face track and the retargeted Body track stay separate so you can refine each without disturbing the other, and they play together on one MetaHuman with the grooms riding the head. That two-track stack is the payoff of the whole advanced track.
Question 4
Why is locking exposure especially important for a shot with a moving digital human?
Correct answer: B · The engine's auto-exposure reacts to what fills the frame, so a character walking toward camera can wash out or dim between frames. An unbound Post Process Volume with a fixed exposure holds every frame to the same level, which is what makes the render trustworthy.
Question 5
What does Movie Render Queue produce at the end of this capstone, and why is it the last step?
Correct answer: B · Movie Render Queue turns the Sequencer timeline into finished frames, usually an image sequence for post, with enough samples for clean edges and smooth hair. It comes last because a viewport grab hides exposure and sampling problems that only the real render exposes.
Summary
You stood a finished digital human inside a finished cinematic shot, threading every lesson of both tracks into one directed frame. Here is what to carry forward:
A capstone is order of operations, not a new tool. Plan the shot in a sentence, then stage the character, give it its performance, frame it, light it, and render it. The digital human arrives complete from the advanced track, and the shot is built with the craft from the intermediate track. Staging a built MetaHuman is the ordinary work of placing, grounding, and orienting a rigged character.
The performance is two tracks on one character. A captured Face track and a retargeted, Control-Rig-polished Body track layer on one MetaHuman in Sequencer, with the grooms bound to the head. They stay separate so you can refine each independently, and play together as a single performance. Around them, a Cine Camera, a Camera Cuts track, and the lights all live on the same Level Sequence.
Light for the camera, lock exposure, then render. A three-point rig defines form, lifts shadows, and separates the character, while a locked exposure keeps a moving figure even across the shot. Movie Render Queue turns the timeline into finished frames, and that render, not a viewport grab, is the shot. You can now take a bespoke mesh all the way to a rendered digital human in a cinematic frame.
🔑 Key Takeaways
- A cinematic shot is planned in a sentence: subject, camera move, beat, and length
- A finished MetaHuman is staged like any rigged character: placed, grounded, and oriented to camera
- Its performance is a separate Face track and Body track layered on one character in Sequencer
- Light the character with a three-point rig and lock exposure so a moving figure stays stable
- Movie Render Queue produces the finished frames, threading both tracks into a single shot
👆 A note on this lesson's figures
The finished-frame image is a genuine live capture from the ClaudeTest project: a three-point-lit, deliberately composed hero shot with a locked exposure, standing in for the kind of frame a fully built MetaHuman would render into. The capstone map, staging flow, two-track stack, Sequencer contents, lighting diagram, and end-to-end pipeline are labeled illustrations, because this project contains no MetaHuman asset and the assembly steps shown are workflows the automation bridge used for the course's captures cannot drive directly. The relationships they show are exactly the ones you follow in the tools, and every craft step in this shot, staging, Sequencer, the Cine Camera, three-point lighting, and Movie Render Queue, was done for real across the intermediate track.
Where this fits
This capstone closes the advanced track by running the whole Story-to-Screen pipeline on a finished digital human as a single directed shot: character finalization, animation and retargeting, shot assembly, cinematography, and output. It is the natural sequel to the intermediate track's own capstone, Direct and Render a Complete Shot, with the character being directed now a full MetaHuman: built from your own mesh, performing with a captured face and a retargeted body, and rendered into a finished frame. That is the end of both tracks, and the whole of what Unreal contributes to a cinematic pipeline.