🏔️ The Modern Environment Pipeline
The advanced track you just finished built a character. This one builds the world that character stands in. For most of real-time history, environment art meant fighting budgets: polygon counts, hand-authored levels of detail, baked lighting that took hours to compute, and thousands of assets placed by hand. Unreal Engine 5 removed those constraints one by one. This lesson is the map of that change. You will meet the three pillars of the modern environment pipeline, Nanite for geometry, Lumen for light, and PCG for populating a world, and see how Landscape, World Partition, and the Fab Megascans library fit around them into a single real-time world. Everything here is a preview: each pillar gets its own lesson next. First, the shape of the whole thing.
🏔️ Advanced Track · Environment Art
This is the opening lesson of the Environment Art with Nanite, Lumen & PCG track, the world-building counterpart to the Digital Humans with MetaHuman track. Where that track built the character you send down the cinematic pipeline, this one builds the environment that character inhabits. This overview maps the whole domain; the lessons that follow go deep, one pillar at a time: Nanite in Lesson 2, Lumen in Lesson 3, PCG in Lesson 4, and a complete assembled environment in the Lesson 5 capstone.
🎯 Learning Objectives
By the end of this lesson, you will be able to:
- Explain what the old real-time environment pipeline had to budget for, and why those budgets existed
- Name the three pillars of the modern pipeline, Nanite, Lumen, and PCG, and the constraint each one removes
- Describe Nanite virtualized geometry at a high level and what it changes for an environment artist
- Describe Lumen dynamic global illumination and why real-time light transforms iteration
- Explain how PCG, Landscape, World Partition, and Fab Megascans assets combine to populate a world
- Place the whole environment pipeline in order and see how a finished world becomes the stage for a cinematic shot
Estimated Time: 45-60 minutes
Prerequisites: Comfort with the Unreal editor and levels from the beginner modules. This is an overview, so no single earlier lesson is required, but it pays off the Cinematic Production track, whose lighting and staging lessons this world is built to serve. A working Unreal Engine 5.8 install with the Nanite, Lumen, and PCG features available.
In This Lesson
From Baking to Building in Real Time
To understand why the modern pipeline matters, it helps to know what it replaced. For most of real-time history, an environment artist worked inside a set of hard budgets, and much of the craft was managing them. Geometry had a polygon budget, so every rock and wall was modeled twice, once at full detail and again as a series of cheaper levels of detail that swapped in as the camera pulled away. Lighting was baked: the engine spent minutes or hours precomputing how light bounced through a static scene into texture maps, and if you moved a single light you paid that cost again. Surfaces leaned on tiling textures because unique detail everywhere was too expensive. And a large world was filled by hand, one placed asset at a time, or was carved into streaming sublevels an artist loaded and unloaded manually.
None of that was wrong. It was the honest cost of drawing a world sixty times a second on the hardware of the day. But every one of those budgets shaped the work: time went into optimization rather than into the world itself, and iteration was slow because the expensive steps, the LOD chains and the light bakes, sat between you and seeing a change. The modern pipeline attacks exactly these costs. Its goal is simple to state and hard to deliver: let the artist build the world they want, at the detail they want, lit the way they want, and see it immediately.
Figure: The shift · the old pipeline spent the artist's time managing polygon, lighting, texture, and streaming budgets. The modern pipeline removes those budgets one by one, so the time goes into the world instead.
The Three Pillars: Nanite, Lumen, PCG
Three technologies carry most of that change, and it is worth holding all three in your head at once before going deep on any one. Each removes a different budget from the old list. Nanite is virtualized geometry: it draws meshes of almost any detail without a polygon budget and without hand-made levels of detail. Lumen is dynamic global illumination and reflections: it lights a scene in real time with no baking, so light bounces the moment you place it. PCG, Procedural Content Generation, populates a world by rules rather than by hand, scattering and placing assets across terrain and along splines from a graph you author once.
They are pillars because they hold up the same roof. Nanite lets you use the high-detail, photo-scanned assets that a modern world is built from. Lumen lights those assets convincingly as you move them. PCG places thousands of them across a landscape you would never populate by hand. You can use any one alone, but together they are what makes it practical to build a large, detailed, believable world and still iterate on it in an afternoon. The rest of this lesson previews each pillar in turn, then puts them back together.
💡 Three budgets removed, one world built
flowchart TD
    N[Nanite
virtualized geometry
no polycount budget] --> W[One real-time world
detailed, lit, populated]
    L[Lumen
dynamic global illumination
no light baking] --> W
    P[PCG
procedural generation
no hand placement] --> W
    style N fill:#faf0e6,stroke:#c1662f
    style L fill:#faf0e6,stroke:#c1662f
    style P fill:#faf0e6,stroke:#c1662f
    style W fill:#e8f5e9,stroke:#4CAF50
Each pillar removes one of the old budgets. Detailed geometry, dynamic light, and rule-driven placement meet in a single world you can keep changing.
Geometry Without Budgets: Nanite
Start with the geometry. Nanite is Unreal's system for virtualized micropolygon geometry. The short version is that it lets you drop a mesh with millions of triangles straight into a scene and render it efficiently, with no separate low-poly version and no hand-authored levels of detail. Nanite breaks a mesh into small clusters of triangles and streams only the clusters the camera can actually see, at only the detail the screen can actually resolve, so a boulder that fills the frame draws its fine surface and the same boulder far away draws a fraction of it. That decision happens automatically, per frame, cluster by cluster.
For an environment artist this changes the daily job. The photo-scanned rocks and cliffs from a library like Megascans arrive at film resolution, and with Nanite you use them as they are, no retopology, no LOD chain to build and babysit. The old polygon budget, the one that shaped every model, mostly stops being the thing you plan around. There are edges to know: Nanite began as an opaque and masked surface system, and while Unreal has extended it to foliage and added tessellation, it is not the tool for everything, animated skeletal characters still render the classic way. Lesson 2 goes deep on how Nanite works and where its edges are. For now, hold onto the headline: detailed geometry, without the budget.
Figure: Nanite in one picture · a single high-detail mesh is stored as small clusters, and each frame the engine streams and draws only the clusters the camera needs at the detail the screen can show. No hand-authored levels of detail, no low-poly copy.
Light Without Baking: Lumen
Detailed geometry is only half a believable world; the other half is how it is lit. Lumen is Unreal's system for fully dynamic global illumination and reflections. Global illumination is the indirect light, the bounce: sunlight striking sand and filling the shaded side of a dune with warm light, a red wall tinting the floor beside it, the sky itself acting as a soft blue source. Older pipelines got that bounce by baking it into textures ahead of time, which looked good but froze the lighting in place. Lumen computes it live, every frame, so there is nothing to bake and nothing to wait for.
The image below is a real frame from this course's project, a desert landscape lit entirely by Lumen: the low sun rakes across the dunes, the sky fills the shadows with soft light, and the horizon hazes into atmospheric distance, all computed in real time with no baked lightmaps. The payoff is iteration. Because nothing is baked, you can drag the sun from noon to sunset and watch the whole world relight as you move it, bounce and all. That feedback loop, change and see, is what makes lighting a world feel like art direction instead of a render queue. Lesson 3 is devoted to Lumen; here, notice only that this vista carries no baking step at all.
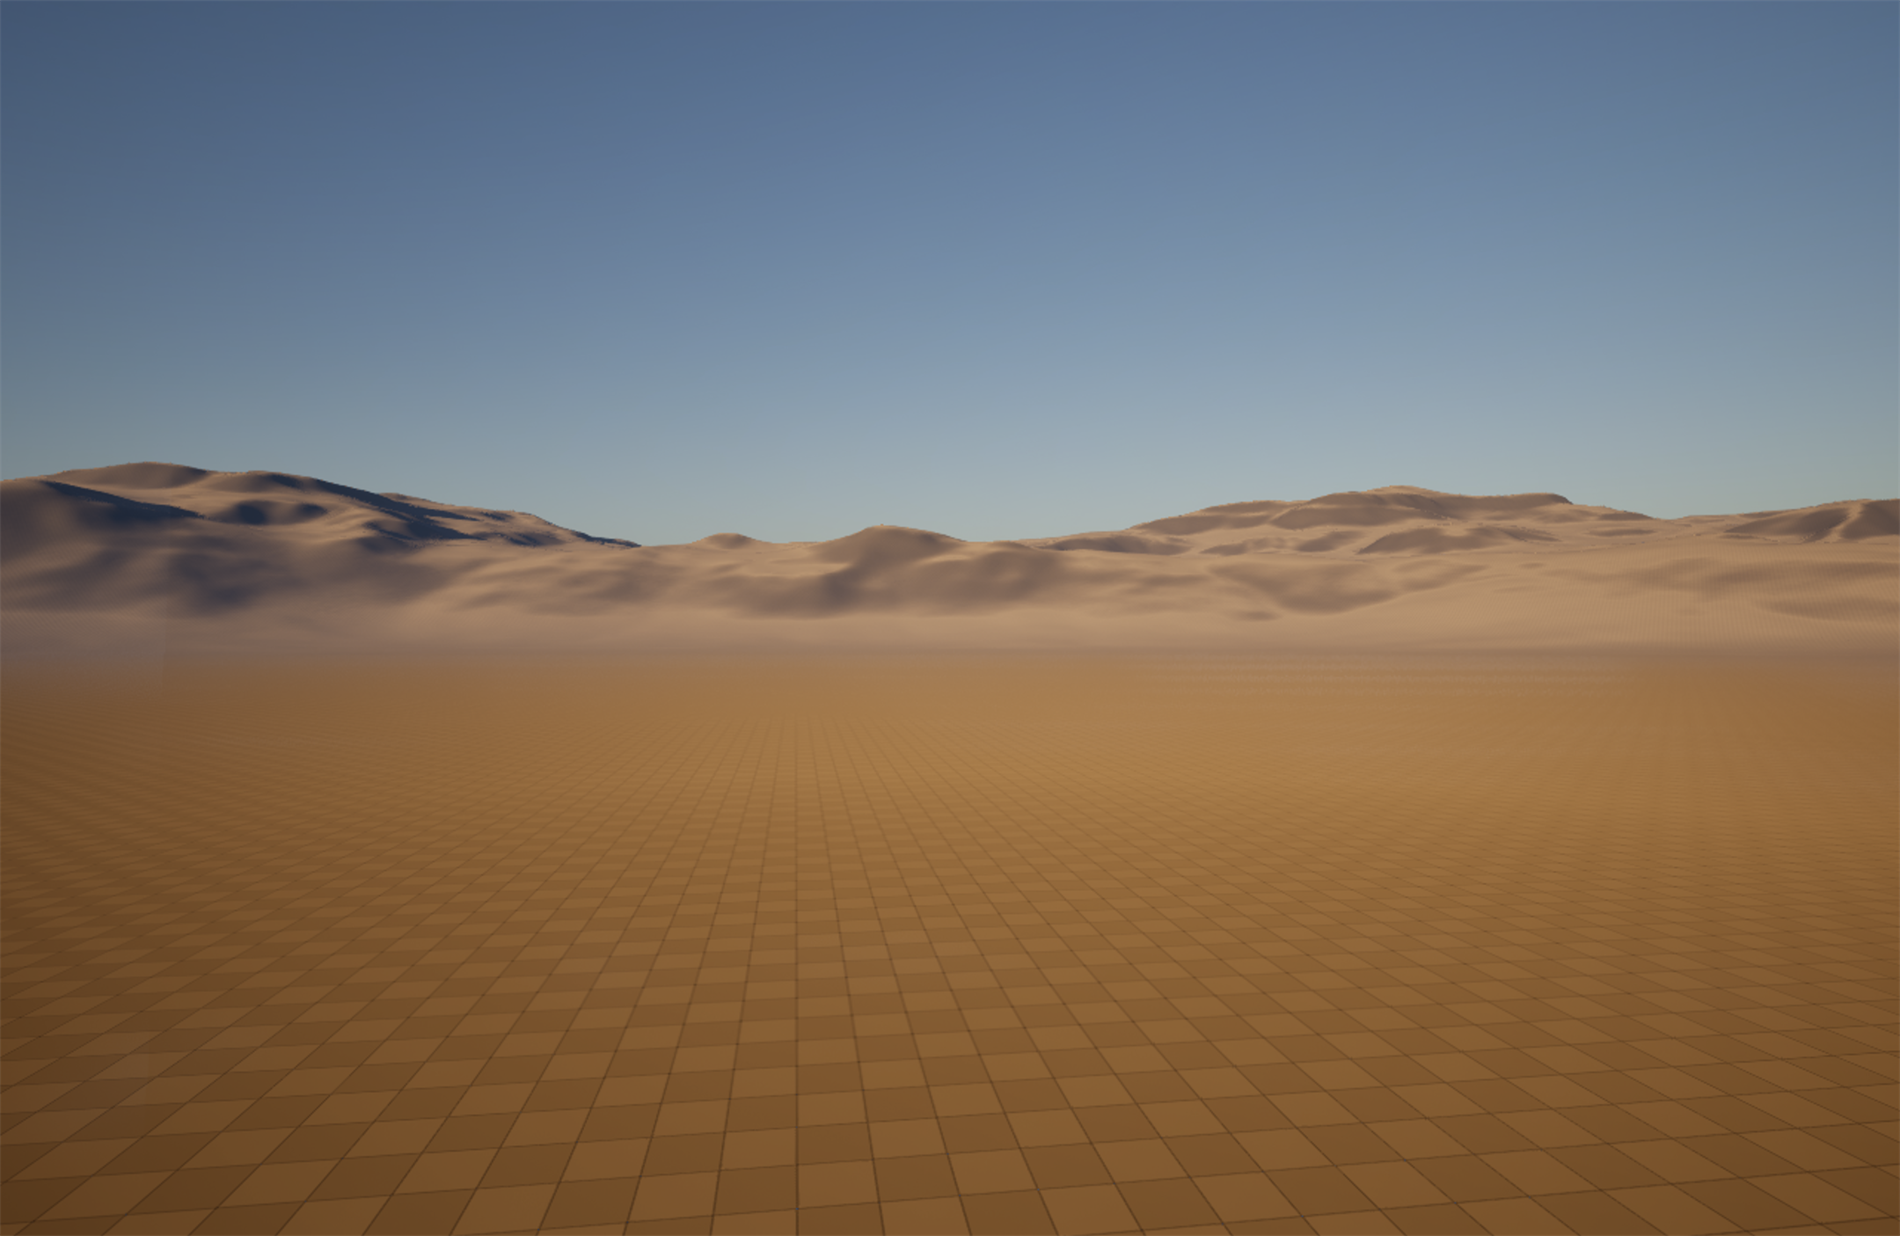
Figure: A Lumen-lit vista, captured live in the course's Unreal project · a desert landscape with a low warm sun, soft filled shadows, and hazy atmospheric distance, computed in real time with no baked lighting. Drag the sun and the whole scene relights, bounce and all. This is the light half of the modern pipeline.
💡 Nothing baked means nothing to wait for
flowchart LR
    MOVE[Move a light
drag the sun to sunset] --> GI[Lumen recomputes
bounce and reflections]
    GI --> SEE[You see it
immediately in the viewport]
    SEE --> MOVE
    style MOVE fill:#faf0e6,stroke:#c1662f
    style GI fill:#e3f2fd,stroke:#2196F3
    style SEE fill:#e8f5e9,stroke:#4CAF50
With no bake between the change and the result, lighting becomes a fast loop: adjust, look, adjust again. That is the difference dynamic global illumination makes to how a world is lit.
Worlds Without Hand-Placing: PCG and Landscape
A world needs more than one lit landscape. It needs terrain to stand on, thousands of assets scattered across it, and a way to hold all of that without grinding the editor to a halt. Three systems handle that. Landscape is the terrain itself: a heightmap you sculpt into hills, dunes, and valleys and paint with layered materials. World Partition is how a large world is managed: instead of hand-built streaming sublevels, it divides the world into a grid and loads only the region near the camera automatically, which is exactly the system running under the desert you saw above. And PCG, Procedural Content Generation, is how that terrain gets populated.
PCG is the shift from placing to describing. Rather than dragging in ten thousand rocks and grass clumps by hand, you author a graph of rules once: scatter this rock set on slopes below this steepness, keep them off the paths, thin them near water, vary their scale and rotation. Run it, and the graph fills the whole landscape, and re-runs the moment you reshape the terrain underneath it. The assets it scatters come from somewhere, and increasingly that source is Fab, Epic's content marketplace, and its Megascans library of photo-scanned meshes and materials, the same high-detail assets Nanite was built to draw. Landscape, World Partition, PCG, and Fab are one loop: shape the land, stream it, scatter detail across it, from a library made for exactly this. Lessons 4 and 5 build that loop for real.
Figure: Populating by rules · a PCG graph reads the Landscape, scatters Fab Megascans assets by rules you set once, and lets World Partition stream the result. Reshape the land and the graph refills it, so a whole world is described rather than hand-placed.
How It Fits Together
Put the pieces in order and the modern environment pipeline reads as a sequence, not a pile of features. You block out the world with Landscape and World Partition, shaping the terrain and setting the streaming grid. You fill it with detailed assets, Fab Megascans meshes drawn by Nanite, so the geometry costs you detail rather than budget. You scatter the small stuff with PCG, populating the landscape by rules. And you light it with Lumen, dynamically, iterating until the mood is right. Each pillar sits at a stage, and each stage feeds the next.
The reason this matters for you specifically is where it leads. A finished environment is not the end; it is the stage. The world you build here is exactly what the Cinematic Production track stands a character inside: you place the character, frame it with a Cine Camera, and light the shot, all within this environment. A character on an empty grid is a test; the same character in a lit, populated world is a shot. This track builds that world, and the lessons ahead build each pillar in turn, ending in a capstone that assembles a complete environment from all of them.
💡 The environment pipeline, end to end
flowchart LR
    BLOCK[Block out
Landscape and World Partition] --> FILL[Fill
Fab Megascans drawn by Nanite]
    FILL --> SCATTER[Scatter
PCG populates by rules]
    SCATTER --> LIGHT[Light
Lumen, dynamic and instant]
    LIGHT --> STAGE[A finished world
the stage for a shot]
    style BLOCK fill:#ede7f6,stroke:#7e57c2
    style FILL fill:#faf0e6,stroke:#c1662f
    style SCATTER fill:#fdf1e7,stroke:#c1662f
    style LIGHT fill:#e3f2fd,stroke:#2196F3
    style STAGE fill:#e8f5e9,stroke:#4CAF50
Block out, fill, scatter, light. Four stages, one for each pillar, ending in a world ready to become the stage for a cinematic shot.
That is the whole map. Nanite gives the world its detail, Lumen gives it its light, PCG gives it its density, and Landscape, World Partition, and Fab hold it all together. From here the track stops previewing and starts building, one pillar per lesson, until you can make a complete environment of your own.
Hands-On: Read Your Own World
This lesson is a map, so the exercise is to learn to read the map in a real project rather than to build anything yet. Open an Unreal Engine 5 project with an open-world or landscape template, or the course project, and go looking for the pillars. The goal is recognition: by the time Lesson 2 begins, you want the words Nanite, Lumen, PCG, Landscape, and World Partition to point at things you have actually seen in the editor.
🏔️ Exercise: spot the pillars in a live scene
- Find the light. Open the World Settings or the Post Process settings and confirm the project's global illumination method is Lumen. Then move the Directional Light and watch the scene relight with no bake step. That is the Lumen loop from this lesson, in your own hands.
- Find the geometry. Select a rock or terrain-detail mesh and look at its Static Mesh settings for the Nanite option. A Nanite-enabled mesh has no separate low-poly levels of detail to manage, which is the whole point of Lesson 2.
- Find the terrain. Identify the Landscape actor and note that the ground is a sculptable heightmap, not a flat plane. If the level uses World Partition, open its window and watch regions load and unload as you move the camera.
- Find the scatter, if present. Look for a PCG actor or graph in the outliner. If the world has procedurally placed foliage or rocks, this is where the rules live, the subject of Lesson 4.
- Name what you found. Write one sentence per pillar describing what you saw. Recognizing each system in a real scene is the readiness this overview is meant to give you.
💡 Hint: not sure which template to open?
Any Unreal Engine 5 project built from the Open World template has all of these on by default: a Landscape, World Partition streaming, Lumen as the lighting method, and Nanite available on meshes. It will not necessarily have a PCG graph unless one was added, so PCG is the one pillar you may have to take on faith until Lesson 4. Everything else you can see and touch today.
✅ Reach exercise: change one thing and watch it ripple
Pick the single change that best shows off the modern pipeline: drag the sun to a low sunset angle and watch the entire landscape relight, shadows lengthening and the sky warming, with no bake and no wait. That one action, and the fact that it is instant, is the thesis of this whole track in a single gesture. Hold onto how it feels, because the lessons ahead are about earning that immediacy across geometry, scatter, and streaming too.
Knowledge Check
Question 1
In the older real-time environment pipeline, why did artists build hand-authored levels of detail and bake their lighting?
Correct answer: B · Levels of detail and baked lighting were both ways of paying down hard costs: geometry had a polygon budget, so cheaper distant versions were authored by hand, and bouncing light in real time was too expensive, so it was precomputed into textures ahead of time.
Question 2
Which three technologies are the pillars of the modern environment pipeline, and what does each remove?
Correct answer: A · Nanite is virtualized geometry that removes the polygon budget and hand-made levels of detail. Lumen is dynamic global illumination that removes light baking. PCG is procedural generation that removes placing assets by hand. Each pillar takes one old budget off the table.
Question 3
What does Nanite let an environment artist do with a high-detail, photo-scanned mesh?
Correct answer: A · Nanite breaks a mesh into small clusters and streams only what the camera needs at the detail the screen can resolve, per frame. So a film-resolution scanned asset can be used directly, with no low-poly copy and no level-of-detail chain to author and maintain.
Question 4
Why does Lumen change how a world is lit, compared with baked lighting?
Correct answer: B · Baked lighting precomputes the bounce into textures, which freezes it and costs time to recompute. Lumen computes global illumination and reflections live, so dragging the sun to sunset relights the entire world, bounce included, the instant you move it. That fast loop is what turns lighting into art direction.
Question 5
How do Landscape, PCG, World Partition, and Fab Megascans work together to build a populated world?
Correct answer: B · Landscape is the sculptable terrain, PCG is a graph of placement rules that scatters assets across it, Fab and its Megascans library supply those high-detail assets, and World Partition streams the large result region by region. Together they let you describe a world once rather than hand-place every piece.
Summary
You now have the map of the modern environment pipeline, the world-building counterpart to the character work of the MetaHuman track. Here is what to carry into the lessons ahead:
The modern pipeline removes the budgets the old one managed. Hand-authored levels of detail, baked lighting, tiling textures, and manual placement were all ways of paying down the cost of drawing a world in real time. Unreal Engine 5 attacks those costs directly, so the artist's time goes into the world instead of into optimizing it.
Three pillars carry the change. Nanite draws detailed geometry with no polygon budget and no hand-made levels of detail. Lumen lights the world with fully dynamic global illumination and no baking, so it relights the moment you move a light. PCG populates the world by rules instead of by hand. Around them, Landscape gives you terrain, World Partition streams a large world automatically, and Fab with its Megascans library supplies the high-detail assets Nanite was built to draw.
A finished environment is a stage. Blocked out, filled, scattered, and lit, the world you build in this track is exactly what the cinematic pipeline stands a character inside. The lessons ahead build each pillar in turn, Nanite next, then Lumen, then PCG, ending in a capstone that assembles a complete environment from all of them.
🔑 Key Takeaways
- The old environment pipeline spent the artist's time managing polygon, lighting, texture, and streaming budgets
- Nanite removes the polygon budget: film-detail meshes with automatic, per-cluster detail and no hand LODs
- Lumen removes light baking: fully dynamic global illumination that relights instantly when you move a light
- PCG removes hand placement: a graph of rules scatters a whole world and re-runs when the terrain changes
- Landscape, World Partition, and Fab Megascans complete the loop, and the finished world becomes the stage for a shot
👆 A note on this lesson's figures
The vista image is a genuine live capture from the course's ClaudeTest project: a desert landscape lit entirely by Lumen, with a low sun, soft filled shadows, and hazy atmospheric distance, and no character or object in the scene, so it shows the environment on its own. It is the course's first purely environmental capture; every earlier real figure framed a character or a game arena. The shift diagram, the three-pillars map, the Nanite cluster diagram, the PCG rules diagram, and the end-to-end pipeline are labeled illustrations, because this overview previews systems whose full editor workflows belong to the lessons that follow. The relationships they show are the ones you will drive for real in Lessons 2 through 5.
Where this fits
This lesson opens the environment track and sets up everything after it: Nanite, Lumen, and PCG each get a dedicated lesson, then a capstone assembles a full environment. It also sits directly upstream of the Cinematic Production track, whose staging, lighting, and rendering lessons run inside the world you build here, and alongside the Digital Humans with MetaHuman track, its sibling in the advanced tier: one track builds the character, this one builds the world. In the larger Story-to-Screen pipeline, this is the craft behind shot assembly, the environment the shot is assembled in.