🎬 Capstone: Direct and Render a Complete Shot
You have learned six techniques on their own: characters, retargeting, Control Rig, Sequencer, lighting, and rendering. A shot is where they stop being separate techniques and become a craft. This capstone threads all six into one workflow: you take a character from an empty level to final rendered frames, making the decisions a real cinematic shot demands, in the order it demands them. There is nothing new to learn here. There is everything to connect.
🎬 Intermediate Track · Capstone
This is the capstone of the Cinematic Production track. It assumes you have worked through the six lessons before it and pulls them together into a single directed shot. Where each earlier lesson went deep on one tool, this one is about sequence and judgment: what you do first, what depends on what, and how to tell when a shot is finished. Treat it as a project, not a read.
🎯 Learning Objectives
By the end of this lesson, you will be able to:
- Plan a shot: think in shots rather than scenes, and know what a single shot needs before you build it
- Stage a character in a level and give it a performance from a retargeted clip or hand-authored Control Rig motion
- Assemble the shot in a Level Sequence with a Cine Camera, a Camera Cuts track, and a timed move
- Light the character for the camera and lock exposure so the render is stable
- Render final frames through the Movie Render Queue and hand them off to post
- Run a repeatable shot checklist you can apply to every shot in a sequence
Estimated Time: 60-75 minutes
Prerequisites: All six intermediate lessons: Characters & Animation, Cinematics with Sequencer, Rendering Output, IK Retargeter, Cinematic Lighting, and Control Rig. A working Unreal Engine 5.8 project with one rigged character and at least one animation for it.
In This Lesson
Thinking in Shots
The single most useful shift from hobbyist to director is to stop thinking about scenes and start thinking about shots. A scene is a story beat. A shot is one continuous run of a single camera: one framing, one move, one moment. A conversation scene might be a dozen shots, each with its own camera, cut together. You do not build a scene; you build shots, and you assemble them.
This matters because a shot is small enough to finish. It has a clear question you can answer before you touch the engine: who or what is the subject, where is the camera and does it move, what is the beat, and how long does it last? Answer those four and the build is almost mechanical. Skip them and you fiddle forever.
Figure: A scene decomposed into shots. Each shot names its subject, camera, beat, and length · you build and finish them individually, and the scene is what the assembled cuts produce.
The rest of this lesson builds one shot, and the order of the sections is the order of operations. Each step leans on a lesson you already know, so the map below is also a map of the track.
💡 The whole pipeline, one shot at a time
flowchart LR
    S[Stage the character
Lesson 1] --> P[Give it a performance
Lessons 4 + 6]
    P --> A[Assemble in Sequencer
Lesson 2]
    A --> L[Light for camera
Lesson 5]
    L --> R[Render frames
Lesson 3]
    R --> O[Hand off to post]
    style S fill:#ede7f6,stroke:#7e57c2
    style A fill:#fff3cd,stroke:#ffc107
    style R fill:#e8f5e9,stroke:#4CAF50
Stage, perform, assemble, light, render, hand off. Notice the order is not arbitrary: you cannot frame a camera on a character that is not staged, and you cannot light for a camera you have not placed.
Stage the Character
Everything starts with the subject in the world. Drop your character's Skeletal Mesh into the level and place it where the shot needs it, then confirm the two things beginners forget: that its feet are planted on the ground (not floating or sunk) and that it faces roughly where the camera will be. A character sunk an inch into the floor or turned away from the lens will fight you through every later step.
This is the payoff of Lesson 1: the mesh rides a Skeleton, the Skeleton is what animation targets, and if your animation came from a different skeleton you already fixed that with the IK Retargeter. For a single shot you rarely need more than one character placed cleanly on the ground plane, oriented to the camera, with room around it for the framing you planned.
✅ Pro Tip: ground contact first, always
Before anything else, orbit the character and check the feet. A shadow anchored right at the soles means it is planted; a gap or a sinking foot means the placement Z is wrong. Fixing it now is one number; fixing it after you have lit and framed the shot means redoing both.
Give It a Performance
A staged character is a statue. The shot needs it to do something, even if that something is a subtle idle. You have two sources for that motion, and a real shot often uses both.
💡 Where a performance comes from
flowchart LR
    LIB[Animation library
walks, idles, gestures] -->|retarget onto
your skeleton| CLIP[A clip on your character]
    CR[Control Rig
author or tweak] -->|hand-key or correct| CLIP
    CLIP --> SHOT[The character performs
in the shot]
    style LIB fill:#e6faf7,stroke:#4fd1c5
    style CR fill:#fff3cd,stroke:#ffc107
    style SHOT fill:#e8f5e9,stroke:#4CAF50
A retargeted library clip gives you motion cheaply; Control Rig lets you author what no library has, or fix the one frame a canned clip gets wrong.
Reach for the retargeted library when a stock walk, idle, or gesture is close enough, which is most of the time. Reach for Control Rig when the shot needs a specific beat that no clip contains, or when a retargeted clip is almost right and you need to correct a hand that clips the body or add a glance the moment calls for. In a directed shot the usual pattern is: drop a retargeted clip on for the base motion, then layer a small Control Rig correction on top so the performance hits the beat exactly. Whichever you use, the result is the same: motion living on your character, ready to be framed.
Assemble the Shot in Sequencer
Now the shot becomes a shot. In a Level Sequence you bind the character and add a Cine Camera, then a Camera Cuts track that tells the sequence to look through that camera. This is the step that turns a character standing in a level into a framed, timed piece of cinema.
A single shot's Sequencer setup is small and always the same shape: the character's animation, the camera's transform, and the Camera Cuts track that makes the camera live. You keyframe the camera's move (a slow push-in, a gentle drift, or nothing at all for a locked-off shot), set the display rate and the shot's length, and scrub to watch it play.
Figure: The anatomy of a single shot in Sequencer. A Camera Cuts track makes the Cine Camera live for the shot's length, the camera's own track holds its keyed move, and the character track carries the performance · scrubbing the playhead plays all three together.
⚠️ Watch out: without a Camera Cuts track you are not filming
A common first-shot mistake is to place a Cine Camera, frame it beautifully, and then render the editor viewport instead of the camera, because nothing told the sequence to look through it. The Camera Cuts track is what binds the render to your camera. No Camera Cuts track, no shot.
Light for the Camera
The shot is staged, performed, and framed. Now you light it, and you light it for the camera you just placed, not for the room in general. This is the whole thesis of Lesson 5: a key that defines the form the lens sees, a fill that controls how deep the shadows read, and a rim that separates the character from the background, all judged through the actual shot.
Two decisions from that lesson matter most here. First, the key-to-fill ratio sets the mood, from a flat, friendly 2:1 to a dramatic, moody 8:1. Second, and easy to forget under a capstone's pressure, you lock the exposure so the camera stops auto-adjusting; otherwise the render can brighten or darken shot to shot and your carefully balanced ratio drifts.
Figure: Lighting a shot, seen from above. The key sits off to one side of the lens axis, the fill opposite it to lift the shadows, and the rim behind the subject to separate it from the background · the ratio between key and fill sets the mood, and a locked exposure keeps it stable through the render.
Render the Final Frames
A scrubbing viewport is not a deliverable. To turn your shot into frames you can cut, grade, and hand off, you send the Level Sequence to the Movie Render Queue. This is where the quality you have been previewing becomes real: high anti-aliasing sample counts to kill the shimmer, warm-up frames so the first frame is not darker than the rest, and a choice of deferred rendering for speed or path tracing for reference-quality light.
For a shot destined for an edit, you almost always render an image sequence (often EXR) rather than a baked video, because it survives color grading and compositing without generational loss. Those frames are the end of Unreal's job and the start of post.
Here is what a finished frame of a directed shot looks like: a character staged and performing, framed through a Cine Camera, lit for that camera, captured in-engine.
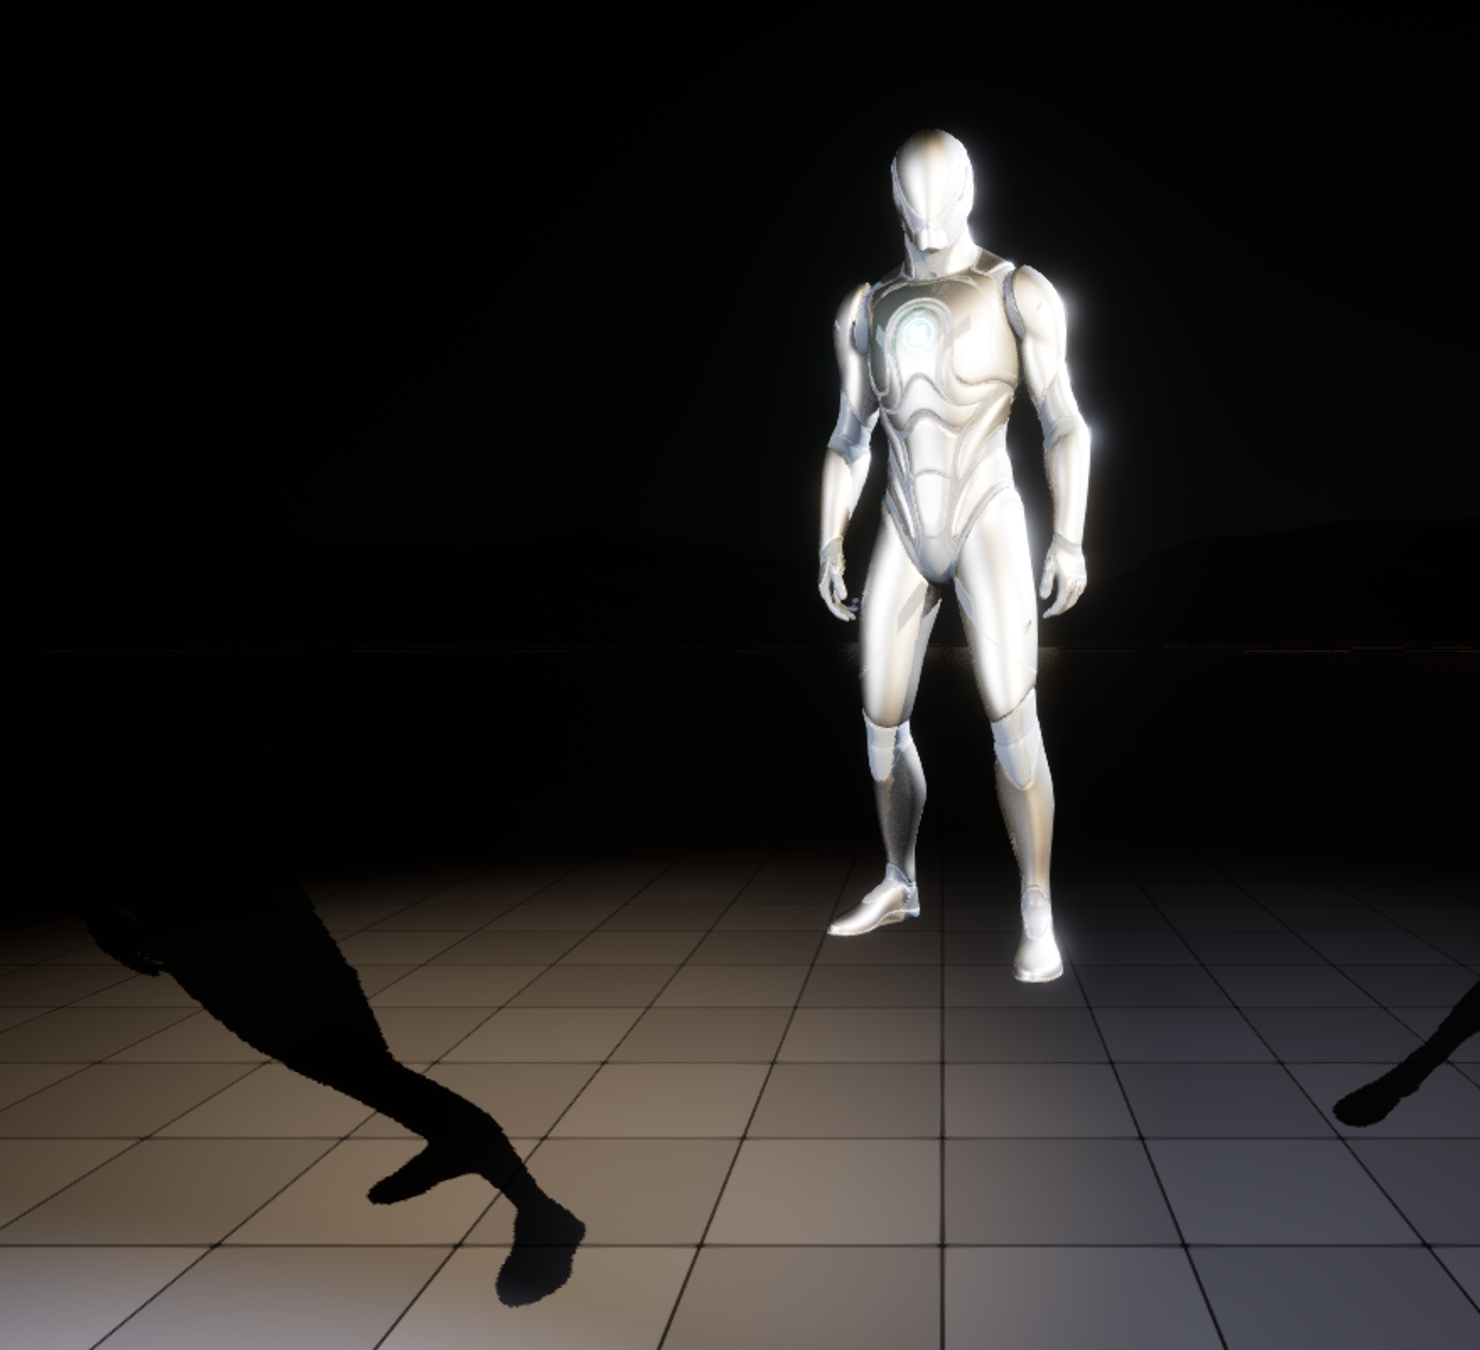
Figure: A frame of a complete shot, captured live in the ClaudeTest project · the character is staged, lit with a warm key against a cool fill and rim, and framed off-center against a dark backdrop with the exposure locked. Every earlier step in this lesson feeds this single image.
💡 The shot checklist
flowchart TD
    Q1{Feet planted,
facing camera?} -->|yes| Q2{Performance
hits the beat?}
    Q1 -->|no| FIX1[Fix staging first]
    Q2 -->|yes| Q3{Camera Cuts track
looking through cam?}
    Q2 -->|no| FIX2[Retarget or Control Rig]
    Q3 -->|yes| Q4{Key/fill ratio set,
exposure locked?}
    Q3 -->|no| FIX3[Add Camera Cuts]
    Q4 -->|yes| R[Render via MRQ
to image sequence]
    Q4 -->|no| FIX4[Light for the camera]
    style R fill:#e8f5e9,stroke:#4CAF50
Run this before every render. Most "why does my shot look wrong" problems are one of these boxes answered no too early.
Hands-On: Your First Complete Shot
Build one five-second shot end to end. Keep it simple: one character, one slow push-in, one clear mood. The goal is not spectacle; it is to run the whole pipeline once so the connections become muscle memory.
🎬 Exercise: a five-second character shot
- Plan (30 seconds on paper). Subject: your character. Camera: a slow push-in. Beat: a quiet idle, then a small gesture. Length: 5 seconds at 24 fps.
- Stage. Place the character on the ground, feet planted, facing where the camera will sit. Leave headroom for the framing.
- Perform. Drop a retargeted idle on the character, and if you want the gesture, layer a small Control Rig move on top.
- Assemble. Make a Level Sequence, bind the character, add a Cine Camera, and add a Camera Cuts track pointing at it. Keyframe the camera closer over the five seconds for the push-in.
- Light. Add a three-point setup on the character: warm key, cooler fill at roughly half the key, a rim from behind. Lock the exposure so it will not drift.
- Render. Send the sequence to the Movie Render Queue, set a high anti-aliasing sample count and a couple of warm-up frames, and render an image sequence.
💡 Hint: the render looks different from the viewport?
Two usual causes. If it is brighter or darker, your exposure was not locked, so the Movie Render Queue auto-exposed differently than the viewport. If it is grainy or shimmering, your anti-aliasing sample count is too low. Both are render-settings fixes, not lighting or camera fixes, so change them in the queue and re-render rather than rebuilding the shot.
✅ Reach exercise: cut two shots together
Once one shot renders cleanly, build a second (a tighter angle on the same character) and use a master sequence with a shots track to cut from the first to the second, exactly as Lesson 2 described. You now have a two-shot scene, rendered from Unreal, that came entirely out of this track.
Knowledge Check
Question 1
Why is "thinking in shots" more productive than thinking in scenes?
Correct answer: B · A shot is one continuous run of a single camera. You can answer its subject, camera, beat, and length up front, which makes the build almost mechanical. A scene is what assembled shots add up to.
Question 2
Your character needs a specific gesture that no clip in your library contains. What is the right tool?
Correct answer: B · Retargeting moves existing library motion onto your character; when the motion exists nowhere, you author it with Control Rig, often as a small correction layered on top of a retargeted base clip.
Question 3
You framed a beautiful Cine Camera but the render shows the wrong angle. What did you most likely forget?
Correct answer: A · Without a Camera Cuts track binding the shot to your Cine Camera, the sequence renders the editor viewport instead. The Camera Cuts track is what makes your camera the one that films.
Question 4
Why lock exposure before rendering a lit shot?
Correct answer: B · Auto-exposure re-balances brightness as the scene changes, which undoes the deliberate key-to-fill ratio you built and can shift shot to shot. Locking it keeps the mood you designed stable through the render.
Question 5
For a shot headed into an edit and color grade, what output do you usually render?
Correct answer: B · An image sequence, commonly EXR, holds full range and rerenders nothing when you grade or composite. A baked video loses quality each generation, so the sequence is the standard handoff to post.
Summary
You put the whole track to work. Here is the arc, which is also the order you build every shot:
Plan, then build in order. A shot is one camera and one moment. Name its subject, camera, beat, and length, then stage the character, give it a performance, assemble it in Sequencer, light it for the camera, and render. Each step depends on the one before, which is why the order is not negotiable.
Every step is a lesson you already know. Staging and skeletons are Lesson 1 and Lesson 4; the performance is retargeting and Control Rig; the assembly is Sequencer; the mood is lighting; the deliverable is the Movie Render Queue. The capstone is not new knowledge, it is the wiring between what you already have.
🔑 Key Takeaways
- Think in shots: one camera, one moment, defined by subject, camera, beat, and length
- Build in a fixed order: stage, perform, assemble, light, render, because each step depends on the last
- A performance comes from a retargeted library clip, a Control Rig authored move, or both layered together
- A Camera Cuts track is what makes the sequence film your Cine Camera; without it you render the viewport
- Light for the camera and lock exposure; render an image sequence through the Movie Render Queue for the handoff to post
👆 A note on this lesson's figures
The finished-shot image is a genuine live capture from the ClaudeTest project: the project's character staged on the level, lit with a real three-point rig (a warm key against a cooler fill and rim) with the exposure locked, and framed off-center against a dark backdrop. The shot-breakdown, Sequencer-layout, lighting-from-above, and checklist diagrams are labeled illustrations of the workflow rather than screenshots, because the value there is the sequence of decisions, not any one editor panel. The pipeline they describe is exactly the one the earlier lessons captured step by step.
Where this fits
This capstone is the whole Unreal half of the Story-to-Screen pipeline in miniature: character finalization and animation feed a shot assembled under a camera and rendered as output. Finish this shot and you have run that pipeline end to end, which is exactly what the Cinematic Production track set out to teach.