🏃 Body, Grooms, and Retargeting
The last lesson made your MetaHuman act from the neck up. It captured a real face performance and drove it onto the shared facial rig, and it closed with a promise: the body side of a digital human done to the same standard, the mocap, the grooms, and the retargeting. This is that lesson. Below the neck a MetaHuman is animated by different tools than the face, and the good news is you already know most of them from the intermediate track. Here you finish the figure: give it motion built for another body, the hair that reads as human, and a place in the shot beside the face performance you already solved.
🧬 Advanced Track · Digital Humans
This is the fourth lesson of the Digital Humans with MetaHuman track. Lesson 1 mapped the shared-rig system, Lesson 2 put your own character onto it, and Lesson 3 made the face act. This lesson finishes the digital human below the neck, and it leans hard on the intermediate track, because the body of a MetaHuman is animated with the same retargeting and Control Rig tools you already met.
🎯 Learning Objectives
By the end of this lesson, you will be able to:
- Explain why the body of a digital human is a separate half of the problem from the face
- Describe how a MetaHuman rides a standard body skeleton, and why that makes motion portable
- Use retargeting to borrow animation built for another body and play it on your MetaHuman
- Name where body motion comes from: motion capture, markerless video, and animation libraries
- Explain what grooms are and why hair, brows, and beard are handled as their own assets
- Assemble body, face, and grooms into one performing character in Sequencer
Estimated Time: 50-65 minutes
Prerequisites: Face Performance with MetaHuman Animator (this lesson finishes the body of the character that lesson made act), plus the IK Retargeter and Control Rig from the intermediate track, which are the exact tools the body uses. A working Unreal Engine 5.8 install with the MetaHuman plugin enabled.
In This Lesson
Why the Body Is Its Own Half of the Problem
The last lesson ended on a diagram worth remembering: a MetaHuman is animated in two tracks. The Face track comes from MetaHuman Animator, and the Body track is authored on its own. That split is not an accident or a limitation. The face and the body are different animation problems, solved by different tools, and keeping them apart is what lets you perfect each without disturbing the other.
The face is a dense field of hundreds of coordinated controls that a viewer reads expertly, which is why you capture it. The body is a jointed skeleton of arms, legs, spine, and hips, the same kind of skeleton every game character in the engine already uses. That means the body does not need a special capture tool of its own. It plugs straight into the animation, retargeting, and Control Rig workflow you learned in the intermediate track. So the whole job of this lesson is to finish the half of the digital human the face capture never touched.
Figure: The two halves of a digital human · the face is a captured performance on a dense control rig, finished in the last lesson. The body is a jointed skeleton animated by retargeting and Control Rig, and dressed with grooms. This lesson finishes that second half.
The Body Rides a Standard Skeleton
The single fact that makes the body easy is this: a MetaHuman body is built on a standard skeleton. Its bones follow the same conventions every skeletal character in Unreal follows, the same layout you met when you first looked at SK_Anya in the skeletal mesh editor. A MetaHuman is not a special island of animation; below the neck it speaks the common language of skeletons that the whole engine already understands.
That matters because animation in Unreal is authored against a skeleton, not against a specific character. Any motion built on a compatible skeleton can play on your MetaHuman, and any motion you build on your MetaHuman can travel elsewhere. The body becomes a socket that a whole world of existing animation can plug into, which is exactly the property that makes the next section, retargeting, possible.
Figure: A standard skeleton is a universal socket · because a MetaHuman body follows the same bone conventions as every skeletal character in the engine, animation built anywhere on a compatible rig can plug in. That portability is the whole reason retargeting works.
💡 The face is dense, the body is jointed
Remember why the two halves need different tools. The face is a soft surface driven by hundreds of blended controls, so you capture it. The body is a set of rigid bones with joints, so you pose and drive those bones the way animators always have. Same character, two very different animation problems.
Retargeting: Borrowing Motion Built for Another Body
You met the IK Retargeter in the intermediate track, and everything you learned there applies directly here. Retargeting takes an animation authored on one skeleton and replays it faithfully on a different one, matching the pose limb for limb even when the two bodies differ in height, proportion, or bone names. It is how a walk cycle built for the standard mannequin ends up moving your MetaHuman without anyone re-animating a single step.
The classic source is SK_Manny, the standard Unreal mannequin. A vast amount of animation, the engine's own library, marketplace packs, and mocap exports, is authored on that body. Below is a genuine capture of SK_Manny from this course's project, at rest on the left and mid-stride on the right. The run on the right is exactly the kind of body motion that retargeting maps onto a MetaHuman: authored once on the standard skeleton, then worn by any compatible character.
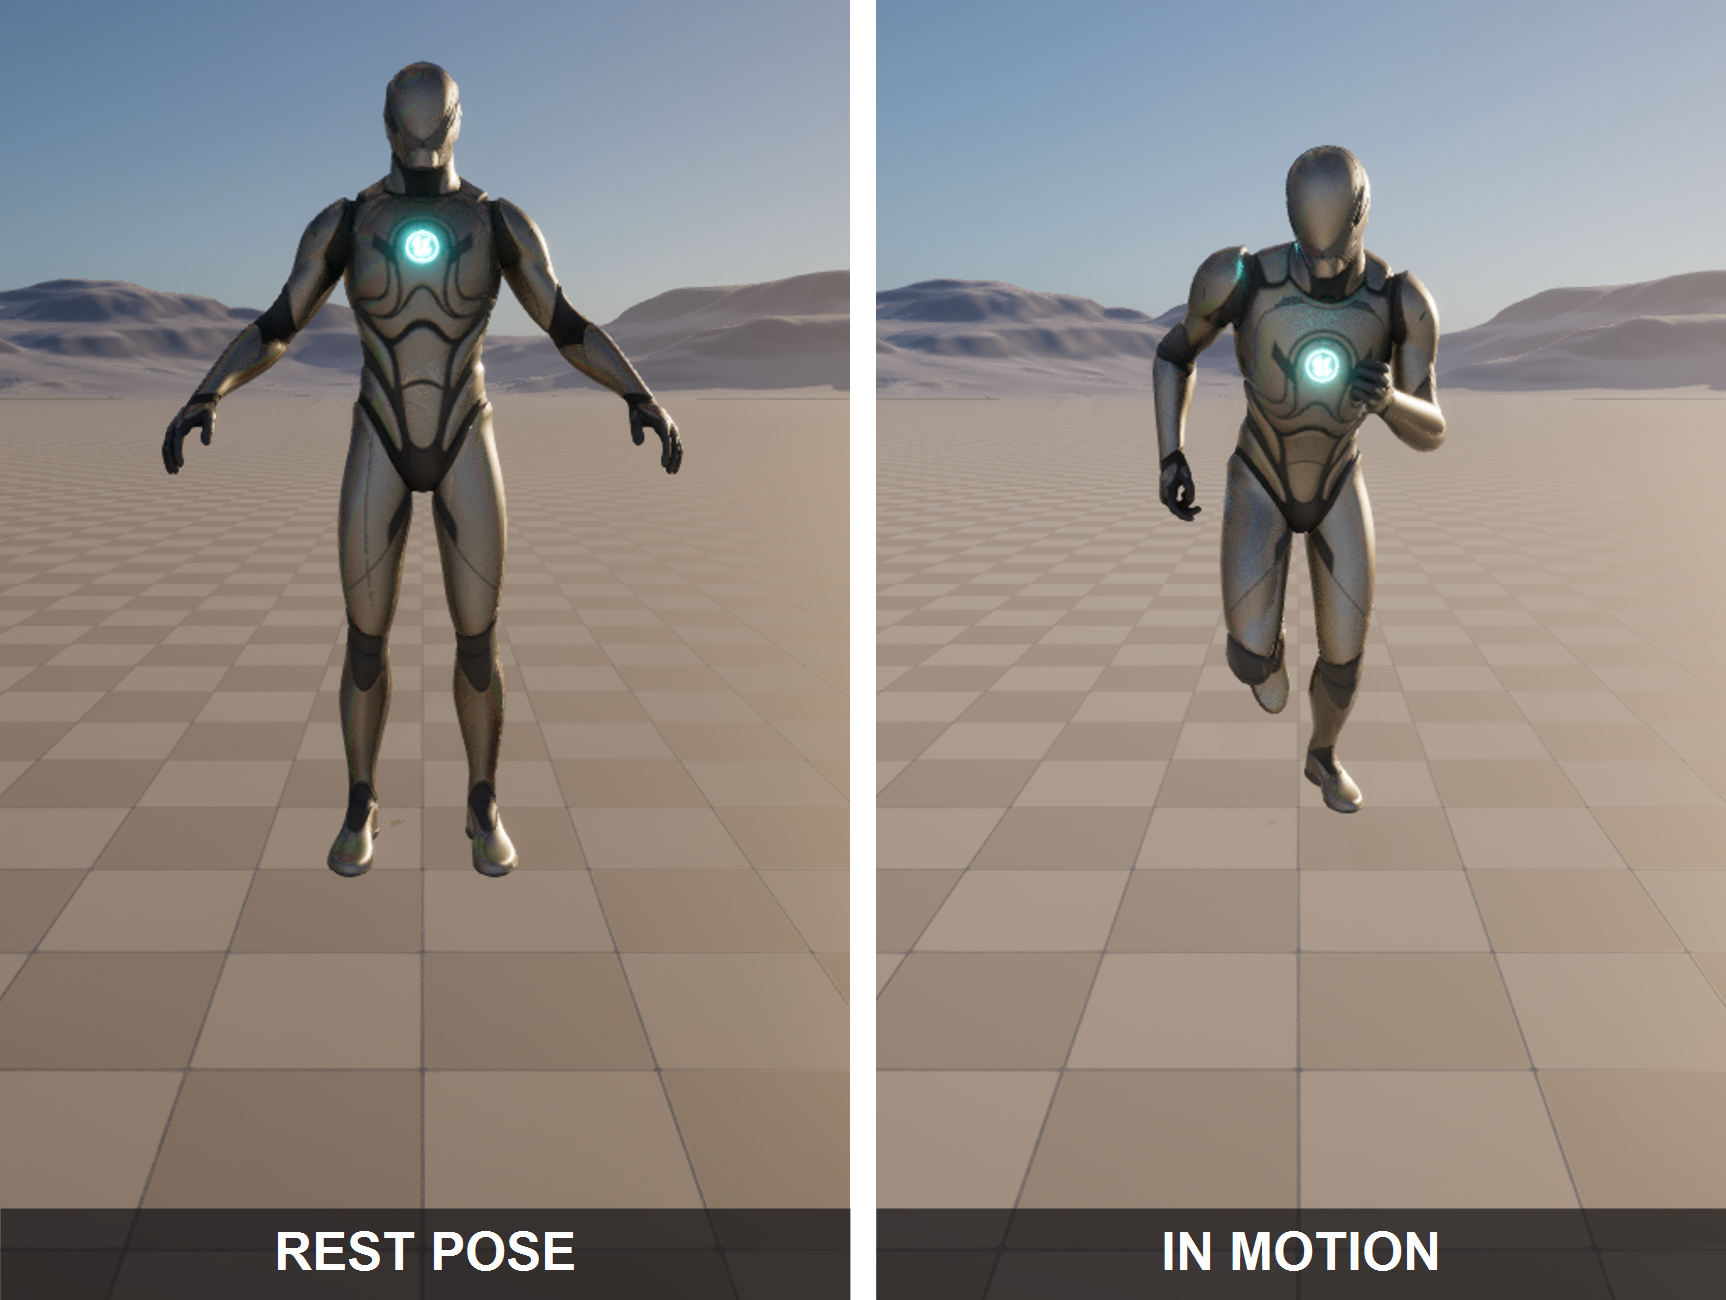
Figure: Body motion on a standard skeleton, captured live in the ClaudeTest project · SK_Manny at rest and mid-run. Motion authored on this standard rig is what retargeting borrows: the run on the right can be replayed on a MetaHuman because both bodies share the same skeleton conventions.
💡 How a borrowed animation reaches your MetaHuman
flowchart LR
    SRC[Animation on a
source skeleton
SK_Manny] --> RT[IK Retargeter
maps bone to bone]
    RT --> MH[The same motion
on the MetaHuman body]
    MH --> ADJ[Optional Control Rig
fixes and flourishes]
    style SRC fill:#f3eefb,stroke:#7e57c2
    style RT fill:#fff3cd,stroke:#ffc107
    style MH fill:#e8eaf6,stroke:#3949ab
The retargeter reads the source pose on SK_Manny, matches it limb for limb onto the MetaHuman skeleton, and you can layer a Control Rig on top to fix contacts or add a flourish.
Retargeting is rarely the whole job. A borrowed animation gets you ninety percent of the way, and then a Control Rig handles the last ten: a foot that slides, a hand that should grip a prop, a bit of personality the stock clip lacks. Borrow the bulk of the motion, then author the details. That is the same divide-and-conquer you used across the intermediate track.
Where the Motion Comes From
Retargeting is the pipe; motion is the water. So where does the body motion originate? There are three practical wells, and they mirror the three face-capture sources from the last lesson. Animation libraries are the accessible starting point: ready-made walks, runs, idles, and gestures you buy or reuse with no capture gear at all. A tracked motion-capture suit is the highest-fidelity, production route, a performer's real body performance recorded directly. And markerless video is the most flexible, solving motion from plain footage when a suit is out of reach, at a fidelity that varies with the clip. Fidelity climbs from library to mocap; flexibility is highest with markerless video. Whatever the source, the motion lands on a standard skeleton and retargets to your MetaHuman.
💡 Motion into your MetaHuman, whatever the source
flowchart TD
    LIB[Animation library clip] --> STD[Body animation on
a standard skeleton]
    MOCAP[Motion capture suit] --> STD
    VID[Markerless video solve] --> STD
    STD --> RT[Retarget onto the
MetaHuman body]
    RT --> POL[Polish with Control Rig]
    style MOCAP fill:#e8eaf6,stroke:#3949ab
    style STD fill:#fff3cd,stroke:#ffc107
    style RT fill:#e8f5e9,stroke:#4CAF50
Every source funnels to the same standard skeleton, retargets onto the MetaHuman body, and gets a Control Rig pass for the finishing touches.
✅ Pro Tip: match the feet to the ground, always
The single most common tell of a borrowed animation is a foot that slides or floats. After retargeting, check ground contact first. A short Control Rig pass to pin the feet fixes what a viewer notices most, long before you fuss over the subtler joints.
Grooms: The Hair That Sells a Human
A moving body with a bald, plastic head still reads as a mannequin. Hair is what tips a digital human from a figure into a person, and in Unreal hair is its own kind of asset called a groom. A groom is not a texture painted on the scalp; it is real strands, thousands of them, that catch light and move. And it is not one thing: the scalp hair, the eyebrows, the eyelashes, and any beard are each a separate groom bound to the head.
Figure: A groom is several strand assets · scalp hair, eyebrows, eyelashes, and an optional beard are each their own groom, bound to the head. They follow the face rig, so the hair moves with the performance rather than sitting frozen on top of it.
Two properties of grooms are worth carrying forward. First, they bind to the head and follow the rig, so when the captured face performance raises a brow, the eyebrow groom lifts with it; the hair is part of the performance, not a hat glued on afterward. Second, real strands are expensive, so grooms ship with levels of detail: full strands for a close-up, and cheaper card or mesh stand-ins as the character moves away from camera. You get the fidelity where it counts and the performance where it does not.
💡 Grooms bind, simulate, and simplify
A groom does three jobs in a shot. It binds to the head so it follows the face and body. It can simulate, so scalp hair sways as the character moves rather than staying rigid. And it carries levels of detail so a crowd of digital humans does not cost the same as one hero close-up. Bind, simulate, simplify: the three verbs of a groom in production.
The Whole Digital Human, Assembled
Now every piece exists. The face performance from the last lesson, the retargeted body from this one, and the grooms that dress the head all belong to the same character, and they come together in the place you already know: Sequencer. Your MetaHuman gets a Face track carrying the capture and a Body track carrying the retargeted motion; the grooms ride along on the head, bound to both. Beside them sit the Cine Camera and lights, and the whole thing renders through Movie Render Queue like any other shot.
💡 Body, face, and grooms become one performing character
flowchart LR
    BODY[Retargeted body motion] --> SEQ[Sequencer
one MetaHuman, two tracks]
    FACE[Solved face performance] --> SEQ
    GROOM[Grooms bound to the head] --> SEQ
    CAM[Cine Camera and lights] --> SEQ
    SEQ --> MRQ[Movie Render Queue]
    MRQ --> OUT[The finished digital human]
    style FACE fill:#e8eaf6,stroke:#3949ab
    style BODY fill:#f3eefb,stroke:#7e57c2
    style SEQ fill:#e3f2fd,stroke:#2196F3
    style OUT fill:#e8f5e9,stroke:#4CAF50
The retargeted body, the captured face, and the grooms layer on one MetaHuman in Sequencer, alongside the camera and lights, and render through the same Movie Render Queue you already know.
Step back and look at what the advanced track has assembled. Lesson 1 gave you the shared rig, Lesson 2 put your character onto it, Lesson 3 made the face act, and this lesson gave the body its motion and the head its hair. The digital human is now complete: a figure you built, that acts with a captured face, moves with borrowed and polished motion, and reads as human down to the strands. What is left is to stand that finished digital human inside a real cinematic shot, camera, lights, staging, and render, as the capstone of everything you have built across both tracks. That is the last lesson.
Hands-On: Move and Dress the Body
Put the body half together end to end. The goal is not a hero shot, it is to feel how borrowed motion becomes your character's motion, and how a groom rides the performance.
🏃 Exercise: from a stock clip to a moving, haired MetaHuman
- Grab a body animation. Take a walk or idle clip authored on the standard
SK_Mannyskeleton, from the engine's library or a marketplace pack. - Retarget it. Use the IK Retargeter to replay that clip on your MetaHuman body, the same way you retargeted onto
SK_Anyain the intermediate track. - Check the feet. Play it back and watch ground contact. If a foot slides, note it, that is your Control Rig job.
- Polish with a Control Rig. Add a short Control Rig pass to pin the feet or add a small flourish the stock clip lacks.
- Confirm the grooms. With the body moving, check that the scalp hair and eyebrows follow the head and, if simulation is on, sway with the motion rather than staying rigid.
- Drop it in Sequencer. Place the MetaHuman in a Sequencer shot with a Body track, and if you solved a face in the last lesson, add that Face track too so the character moves and speaks at once.
💡 Hint: the motion looks wrong on your character?
Almost always it is the retarget, not the clip. If the pose is twisted or limbs bend the wrong way, the bone mapping between the source and the MetaHuman skeleton is off, so revisit the retargeter's bone chains rather than blaming the animation. If the motion looks right but the feet slide, that is expected: retargeting rarely nails ground contact, and a short Control Rig pass is the intended fix, not a workaround.
✅ Reach exercise: one clip, two very different bodies
Retarget the same walk clip onto two MetaHumans with different heights and proportions, a tall figure and a short one. Watching one animation fit two different bodies is the clearest demonstration of this lesson's core idea: motion authored on a standard skeleton is portable, and the retargeter, not the animator, does the fitting.
Knowledge Check
Question 1
Why is the body of a MetaHuman animated with different tools than the face?
Correct answer: B · A MetaHuman is animated in two halves. The face is hundreds of coordinated controls a viewer reads expertly, so you capture it; the body is a set of jointed bones, so you retarget and Control-Rig it. Keeping them apart lets you refine each without disturbing the other.
Question 2
What makes body animation portable onto a MetaHuman?
Correct answer: A · Animation in Unreal is authored against a skeleton, not a specific character. Because the MetaHuman body follows the same standard bone conventions as the rest of the engine, any motion on a compatible skeleton can play on it, which is exactly what makes retargeting possible.
Question 3
What does the IK Retargeter do for a MetaHuman body?
Correct answer: C · Retargeting takes motion built on a source skeleton such as SK_Manny and maps it bone for bone onto the MetaHuman, so a walk cycle built for the mannequin moves your character without re-animating a step. A Control Rig then handles the finishing details.
Question 4
Which of these is a source of body motion you can retarget onto a MetaHuman?
Correct answer: B · The three practical wells are ready-made animation libraries, a tracked mocap suit for the highest fidelity, and markerless video that solves motion from plain footage. All three produce animation on a standard skeleton, which then retargets onto your MetaHuman.
Question 5
What is a groom, and how does it behave on a MetaHuman?
Correct answer: B · A groom is real strands, not a texture. Scalp hair, eyebrows, eyelashes, and any beard are each their own groom bound to the head, so they follow the face rig, can simulate as the character moves, and ship with levels of detail so a crowd does not cost the same as a hero close-up.
Summary
You finished the digital human below the neck: gave the body its motion, dressed the head with grooms, and assembled the whole figure in the shot. Here is what to carry forward:
The body is the other half, solved by tools you already know. The face is captured because it is a dense field of controls; the body is a jointed skeleton, so it is retargeted and Control-Rigged exactly like any skeletal character. Because a MetaHuman body rides a standard skeleton, motion authored anywhere on a compatible rig can plug straight in.
Retargeting borrows motion, Control Rig finishes it. The IK Retargeter maps an animation from a source skeleton such as SK_Manny onto your MetaHuman, limb for limb. That gets you most of the way; a short Control Rig pass pins the feet and adds the details a stock clip lacks. Body motion comes from animation libraries, a mocap suit, or markerless video, all landing on that standard skeleton.
Grooms make it read as human, and everything joins in Sequencer. Hair is strand-based groom assets, scalp, brows, lashes, and beard, bound to the head so they follow the performance, simulate as the body moves, and simplify at distance. Body track, Face track, and grooms all layer on one MetaHuman in Sequencer, beside the camera and lights, and render through Movie Render Queue.
🔑 Key Takeaways
- The body is a separate half of the digital human, animated by retargeting and Control Rig rather than face capture
- A MetaHuman body rides a standard skeleton, which makes any compatible motion portable onto it
- The IK Retargeter replays motion from a source skeleton on your MetaHuman, and a Control Rig polishes the result
- Body motion comes from animation libraries, a mocap suit, or markerless video
- Grooms are strand-based hair assets that bind to the head, simulate with motion, and carry levels of detail
👆 A note on this lesson's figures
The body-motion image is a genuine live capture from the ClaudeTest project: SK_Manny, the standard Unreal mannequin, at rest and mid-run, standing in for the body animation a retarget maps onto a MetaHuman. The two-halves, standard-skeleton, motion-sources, groom, and assembly diagrams are labeled illustrations, because this project contains no MetaHuman asset and the mocap, retarget, and groom steps shown are workflows the automation bridge used for the course's captures cannot drive directly. The relationships they show are exactly the ones you follow in the tools, and the retargeting and Control Rig steps are the same ones you ran for real in the intermediate track.
Where this fits
This lesson completes the digital human that the whole advanced track has been building, and its body motion travels the same Story-to-Screen pipeline as any animation: character finalization, animation and retargeting, shot assembly, cinematography, and output. What changes is that the character being moved is a full digital human, face captured and body retargeted, ready to stand in a finished cinematic shot in the capstone that closes this track.