💡 Cinematic Lighting: Lighting a Character for Camera
Module 4 taught you how light works in Unreal: the light types, the sun and sky, interior setups, Lumen global illumination, and post-process. That module lit rooms and environments. This lesson points the same tools at a person in front of a lens, which is a different craft. A game asks "can the player see the space?" A film asks "how should this face feel?" You will apply three-point lighting to a character, control the key-to-fill ratio that sets mood, use warm and cool color contrast and motivated light, and light specifically for the camera and its exposure. The payoff is the difference between a character who is merely visible and one who looks like they belong in a movie.
🎬 Intermediate Track · Deep Dive
This is a deep-dive companion to the Cinematic Production track. It assumes you have finished Module 4: Lighting Your World, so it does not re-teach light types or how Lumen works. Instead it builds on them for the specific job of lighting a subject on camera, filling in the craft the Phase 6 Cinematography pipeline page assumes. It pairs naturally with Cinematics with Sequencer, where you framed the shot this lesson lights.
🎯 Learning Objectives
By the end of this lesson, you will be able to:
- Explain how lighting a character for camera differs from lighting an environment for gameplay
- Set up three-point lighting (key, fill, rim) on a person and describe each light's job
- Use the key-to-fill ratio to control contrast and shift between high-key and low-key mood
- Apply color temperature contrast (warm key, cool rim) and motivated lighting
- Light for the Cine Camera: lock exposure, separate the subject from the background, and place a catchlight
Estimated Time: 40-50 minutes
Prerequisites: Module 4 (all five lighting lessons), and Intermediate Lesson 2: Cinematics with Sequencer for the Cine Camera. A working Unreal Engine 5.8 project with a character to light.
In This Lesson
From Lighting a Room to Lighting a Person
In Interior Lighting you met three-point lighting as a way to think about a space: a window as the key, bounced ambience as the fill, an accent to pick out a feature. The goal there was believable, readable architecture. Cinematic lighting borrows the same three roles but changes the subject and the question. The subject is now a face and a figure, and the question is not "can I see the room?" but "what does this shot feel like, and where do I want the eye to go?"
That shift has real consequences. Game lighting usually wants the whole playable space evenly lit so nothing important hides in shadow. Cinematic lighting wants shadow: the dark side of a face is what gives it shape, and a pool of darkness is what makes a highlight read. You will often light a character with a darker environment around them precisely so the light you put on them does the storytelling.
📖 Definition
Cinematic lighting: lighting chosen to shape a subject and set a mood for a specific camera, rather than to illuminate a whole space for play. It trades even, total visibility for contrast, direction, and color, using the same Unreal lights (Directional, Spot, Point, Rect) you already know.
💡 Where this sits in the pipeline
In the Story-to-Screen pipeline, lighting the shot is part of cinematography: the character is staged and the camera is framed (Lesson 2), and now you light them before you render (Lesson 3). That is the subject of the Phase 6 Cinematography page.
Three-Point Lighting on a Character
The workhorse setup for a subject is three-point lighting: three lights, each with one job. On a room the roles are loose; on a person they are precise, because each one shapes the face and body in a specific way.
The three lights and their jobs
- Key light: the main, brightest light and the one that defines the subject's form. Placed off to one side and above (classically around 45 degrees to the side and 45 degrees up), it creates the primary highlight and the shadow that gives the face shape.
- Fill light: a softer, dimmer light on the opposite side of the camera from the key. Its only job is to lift the key's shadows so they are not pure black. How much you fill sets the contrast.
- Rim light (also called back or hair light): placed behind the subject, aimed back toward camera. It draws a bright edge along the hair and shoulders that separates the subject from the background.
Here is that setup seen from above: the camera looks at the subject, the key comes from one front-side, the fill from the other, and the rim from behind.
Figure: The classic three-point layout from above. The key is the bright, form-defining light to one front-side; the fill is a dimmer light on the opposite side that opens the shadows; the rim sits behind the subject to draw a separating edge.
The effect is best seen, not described. Below is the exact same character, SK_Anya, captured twice in Unreal from the same camera. On the left she is lit by a single flat light straight from the front, the way a quick game setup might. On the right she is lit with three points: a warm key from the side, a dim cool fill, and a cool rim behind.
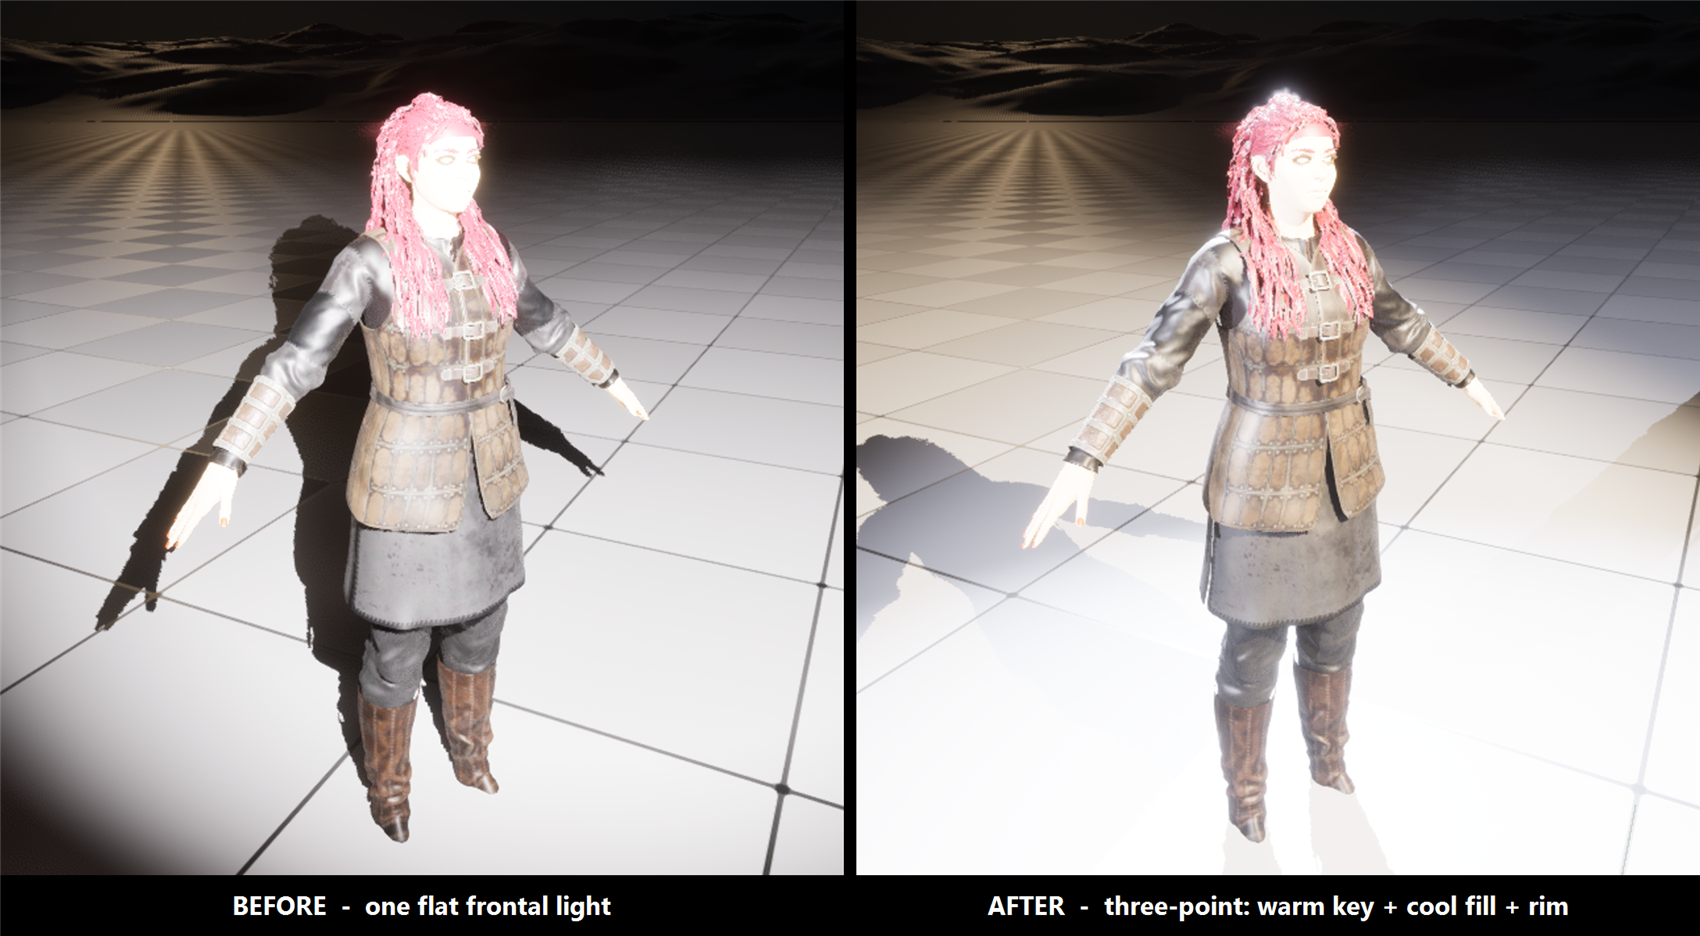
Figure: The same SK_Anya character, one flat frontal light versus a three-point rig, captured in Unreal Engine 5.8. On the right, three real SpotLight actors (a warm key, a cool fill, and a cool rim) shape her face and lift her off the background · both halves use the same camera and a locked exposure so only the lighting changes, in the ClaudeTest project.
Look at what changed. The flat version reads the whole face at one brightness, so it looks pasted-on and shapeless. The three-point version has a lit side and a shadow side (that is form), a warm-to-cool gradient across the skin (that is depth), and a bright edge on the hair that peels her away from the dark background (that is separation). Nothing about the model changed. Only the lights did.
The Key-to-Fill Ratio: Contrast and Mood
Once the three lights are placed, the single most expressive control you have is how bright the fill is relative to the key. This is the key-to-fill ratio, and it is where mood actually lives. A strong fill (close to the key's brightness) gives a bright, even, friendly look. A weak fill (or none) leaves the shadow side deep and dark, which reads as serious, tense, or dramatic.
📖 Definition
Key-to-fill ratio: the brightness of the key light compared with the fill. A low ratio (say 2:1) means the shadow side is only a little darker than the lit side, giving high-key, low-contrast lighting. A high ratio (8:1 or more) means the shadow side is much darker, giving low-key, high-contrast lighting. Same three lights, completely different feeling.
Figure: Only the fill brightness changes between these two. A low ratio keeps both sides of the face close in brightness (high-key, gentle); a high ratio lets the shadow side fall dark (low-key, dramatic).
Two more dials shape the same lights. Soft versus hard: a physically larger light source (a Rect Light, or a spot with a wide soft edge) wraps around the face and gives gentle, gradual shadows; a small, hard source gives crisp, sharp-edged shadows. And direction: raising the key gives more natural top-down shadows, while lowering it toward eye level flattens or, taken far enough, turns unsettling. Pick these to match the feeling you want.
💡 Choosing a mood, then the ratio
flowchart TD
    Q{What should the
shot feel like?} --> A[Warm, safe, upbeat]
    Q --> B[Serious, tense, moody]
    A --> A1[High-key
low ratio 2:1, soft key,
generous fill]
    B --> B1[Low-key
high ratio 8:1+, harder key,
little or no fill]
    style A1 fill:#e8f5e9,stroke:#4CAF50
    style B1 fill:#ede7f6,stroke:#7e57c2
Decide the feeling first, then set the ratio to match. The lights are the same; the ratio is the story.
Color, Temperature, and Motivation
Brightness shapes the face; color gives it life. The most reliable cinematic trick is color temperature contrast: make the key slightly warm and the rim or fill slightly cool. The eye reads warm light as sunlight, firelight, or skin-friendly interior light, and cool light as sky, moonlight, or shade. Putting a warm side and a cool side on the same face adds a sense of depth and place that a single neutral white never will. In Unreal you set this per light with the Temperature control (in Kelvin): lower numbers are warm and orange, higher numbers are cool and blue.
Figure: A light's Temperature in Kelvin runs from warm orange at low values to cool blue at high ones. A common cinematic choice is a warm key played against a cooler rim, which is exactly the pairing in this lesson's before-and-after figure.
The other half of believable light is motivation. Motivated lighting means every light in your shot has a plausible source in the world: the warm key is "the setting sun" or "a fireplace," the cool rim is "the sky behind her," a flicker is "a torch." You rarely show the source, but placing lights as if they come from somewhere real keeps a scene from looking arbitrarily lit. When you invent a light, ask what in the scene could be casting it, and aim it accordingly.
💡 From a source in the world to a light on the face
flowchart LR
    S1[Setting sun
in the scene] --> K[Warm key
~4500K, from that side]
    S2[Open sky
behind subject] --> R[Cool rim
~8000K, from behind]
    S3[Bounce off nearby wall] --> F[Soft fill
neutral, opposite key]
    K --> FACE[A face that reads
as really being there]
    R --> FACE
    F --> FACE
    style FACE fill:#e8f5e9,stroke:#4CAF50
Each light answers to something in the world. That is the difference between lighting that feels placed and lighting that feels real.
Lighting for the Camera and Exposure
Lighting for film is always lighting for a specific camera. A setup that looks good from one angle can fall apart from another, so you light and judge through the lens you will actually shoot, the Cine Camera from Lesson 2. Pilot that camera, then build your three points while looking at the framed image, not the free editor view.
The camera also controls exposure, and exposure will fight you if you let it. By default Unreal's auto-exposure (eye adaptation) brightens dark scenes and darkens bright ones, so as you tune a light the whole image keeps re-balancing and you can never tell what your lights are really doing. The fix is to lock exposure for the shot.
⚠️ Lock exposure before you judge lighting
Add a Post Process Volume (set it Unbound so it covers the whole level) and set the exposure to Manual, or clamp auto-exposure by setting its Min and Max Brightness to the same value. Now the image stops drifting, and a brighter light actually looks brighter. The before-and-after figure in this lesson was shot with exactly this locked-exposure trick, which is the only way the two halves are honestly comparable.
With exposure fixed, three finishing touches separate a good character light from a great one:
Finishing touches
- Separation. Make sure the subject does not merge into the background. The rim light does most of this, but you can also keep the area directly behind them darker (or brighter) than their edge so the silhouette reads.
- The catchlight. A tiny reflection of the key in the eyes brings a face to life. If the eyes look dead, nudge the key until a small highlight appears in them.
- Exposure as mood. With exposure locked you can also choose to sit the whole image a little darker or brighter (via the exposure compensation) to lean into a low-key or high-key feel.
Because these lights are ordinary Unreal actors, everything here is animatable in Sequencer, and it all resolves at full quality only when you render through the Movie Render Queue. Light the shot, lock the exposure, then hand it to the renderer.
💡 The order of operations for lighting a shot
flowchart LR
    A[Pilot the
Cine Camera] --> B[Lock exposure
Post Process Volume]
    B --> C[Place the key
set the form]
    C --> D[Add fill
set the ratio]
    D --> E[Add rim
separate from bg]
    E --> F[Color + catchlight,
judge in frame]
    F --> G[Render
Movie Render Queue]
    style B fill:#fff3cd,stroke:#ffc107
    style G fill:#e8f5e9,stroke:#4CAF50
Camera and exposure first, then key, fill, and rim in that order, judging every step through the lens.
Hands-On: Light a Character
You need a character (a mannequin is fine) and a mostly empty, darkened level so your lights do the work. Work through these steps and you will have built the exact rig from this lesson's figure.
💡 Exercise: build a three-point rig
- Darken the stage. Turn the Directional Light and Sky Light way down (or delete them) so the character starts nearly unlit. Add a Post Process Volume, mark it Unbound, and lock exposure so the image stops auto-adjusting.
- Frame the camera. Add a Cine Camera Actor, pilot it, and compose a head-and-shoulders or upper-body shot of the character.
- Place the key. Add a Spot Light (or Rect Light) about 45 degrees to one side and above. Set its Temperature warm (around 4500K) and raise its intensity until the lit side of the face reads well. Note the shadow it casts across the face: that is your form.
- Add the fill. Add a second, dimmer light on the opposite side of the camera. Set it cooler (around 7500K) and much lower in intensity. Adjust its brightness to taste: more fill for a friendly look, less for a dramatic one.
- Add the rim. Add a third light behind the character, aimed back toward camera and offset to one side. Push its intensity until a bright edge appears on the hair and shoulders and lifts them off the background.
- Judge and tune. Look only through the piloted camera. Check for a catchlight in the eyes, confirm the silhouette separates from the background, and set the key-to-fill ratio for the mood you want.
💡 Hint: everything is blown out or pitch black?
That is auto-exposure, not your lights. If you skipped the locked-exposure step, the dark stage makes eye adaptation crank brightness way up, so the first light you add blows out completely. Add the Unbound Post Process Volume and set exposure to Manual (or clamp Min and Max Brightness to the same value) before you tune intensities, and the lights will behave predictably.
✅ Reach exercise: change only the ratio
With the rig built, do not touch the key or rim. Just take the fill from bright down to nearly off, capturing the framing at a few steps. Watch the same face travel from friendly and high-key to moody and low-key with a single slider. That is the clearest possible demonstration that mood lives in the ratio, not in the number of lights.
Knowledge Check
Question 1
How does lighting a character for a cinematic differ from lighting a level for gameplay?
Correct answer: B · Game lighting usually wants the whole space evenly visible. Cinematic lighting wants contrast and direction, because the dark side of a face is what gives it form and mood.
Question 2
In a three-point setup, what is the rim (back) light's job?
Correct answer: C · The rim sits behind the subject aimed back toward camera, drawing a bright separating edge. The key defines form; the fill lifts shadows; the rim separates.
Question 3
What does a high key-to-fill ratio (for example 8:1) produce?
Correct answer: B · A high ratio means the fill is much dimmer than the key, so the shadow side falls dark. That is low-key, high-contrast, dramatic lighting. A low ratio (2:1) gives the gentle, high-key look.
Question 4
What is "motivated" lighting?
Correct answer: B · Motivated lighting means each light answers to a believable source in the scene, even if that source is never shown. It is what keeps a shot from looking arbitrarily lit.
Question 5
You add a light in a dark scene and the whole image blows out, and every tweak makes the picture re-balance. What is the fix?
Correct answer: A · The drifting is auto-exposure (eye adaptation) reacting to the dark scene. Locking exposure with an Unbound Post Process Volume stops the image from re-balancing so your lights behave predictably.
Summary
You took the lights from Module 4 and used them to shape a person. Here is the arc:
A different job. Cinematic lighting shapes a subject and sets a mood for a camera, trading even visibility for contrast, direction, and color. Where game lighting avoids shadow, cinematic lighting uses it.
Three points and a ratio. The key defines form, the fill lifts shadows, and the rim separates the subject from the background. The key-to-fill ratio then sets the mood: low ratio for a bright high-key look, high ratio for a dark low-key one.
Color, motivation, and the camera. Warm key against cool rim adds depth, and motivating each light with a source in the world keeps it believable. You light through the piloted Cine Camera with exposure locked, add a catchlight and separation, and hand the shot to the Movie Render Queue.
🔑 Key Takeaways
- Cinematic lighting shapes a subject with contrast and direction, unlike even gameplay lighting
- Three-point on a person: key defines form, fill lifts shadows, rim separates from the background
- The key-to-fill ratio sets mood: low ratio = high-key and gentle, high ratio = low-key and dramatic
- Warm key against a cool rim adds depth; motivate every light with a plausible source
- Light through the Cine Camera with exposure locked by an Unbound Post Process Volume
👆 A note on this lesson's figures
The before-and-after image is a genuine capture from the live Unreal Engine 5.8 editor in the ClaudeTest project. The same SK_Anya character was shot from one camera, first under a single flat frontal light and then under three real SpotLight actors (a warm key, a cool fill, and a cool rim), with exposure locked by an Unbound Post Process Volume so only the lighting differs. The layout, ratio, and color diagrams are labeled illustrations of the concepts.
Where this fits
Lighting is the last craft layer before the render. With your character staged (Lesson 1), animated (Lesson 4), and framed in a shot (Lesson 2), lighting is what makes that shot read as cinema before you send it to the Movie Render Queue. In the Story-to-Screen pipeline this is the heart of Phase 6 Cinematography.