🧩 Mesh to MetaHuman
You have a character you designed. The face is yours, the look is art-directed, and it is exactly the human you want on screen. What you do not have is the months of rigging, the eight levels of detail, and the face-performance pipeline that a MetaHuman ships with. Mesh to MetaHuman is the bridge between those two facts. It takes your mesh, a scan, a sculpt, or a Daz figure like the course's SK_Anya, and solves a MetaHuman that matches it, handing your one-off character the entire shared rig. This lesson drives that bridge end to end.
🧬 Advanced Track · Digital Humans
This is the second lesson of the Digital Humans with MetaHuman track, and the one Lesson 1 pointed at repeatedly. Where the first lesson mapped the MetaHuman system, this one connects it to your own work: the workflow that turns a bespoke human into a first-class MetaHuman. Read it as the practical follow-through on the promise that you can stop building rigs and start casting the characters you already own.
🎯 Learning Objectives
By the end of this lesson, you will be able to:
- Explain the gap Mesh to MetaHuman fills: you own the look, but not the rig
- Describe what a MetaHuman identity is and how the solve conforms a template to your mesh
- Walk the workflow: prepare a frame, create an identity, track markers, solve, and generate a MetaHuman
- Separate what the face solve does from the body, grooms, and clothing that come from elsewhere
- Judge whether a given mesh is a good or poor candidate for the solve
- Place the resulting MetaHuman back into the cinematic pipeline you already know
Estimated Time: 50-65 minutes
Prerequisites: What Is a MetaHuman? (this lesson assumes the shared-rig idea), plus Characters & Animation for Skeletal Meshes and Retargeting for how body motion moves between skeletons. A working Unreal Engine 5.8 install with the MetaHuman plugin enabled.
In This Lesson
Why Turn a Mesh into a MetaHuman
Think about what you actually have when you import a custom character. You have geometry, materials, and a skeleton, the things you met back in Lesson 1. That is enough to place the character and, with retargeting, to move its body. What it is not is a face you can perform. Your mesh has no MetaHuman facial rig, no levels of detail built for real time, and no way to receive a captured face performance. You own the look and none of the infrastructure.
Figure: The gap Mesh to MetaHuman closes · a custom mesh brings the look, the materials, and a body skeleton, but none of the MetaHuman facial rig, levels of detail, or face-performance pipeline. The solve gives your existing character all of it.
Here is the kind of mesh this is built for, opened in its Skeletal Mesh editor. It is the course's SK_Anya, the Daz-derived character you have followed since the intermediate track: a genuine, art-directed human with its own skeleton and its own long list of materials, and exactly nothing of the MetaHuman rig.
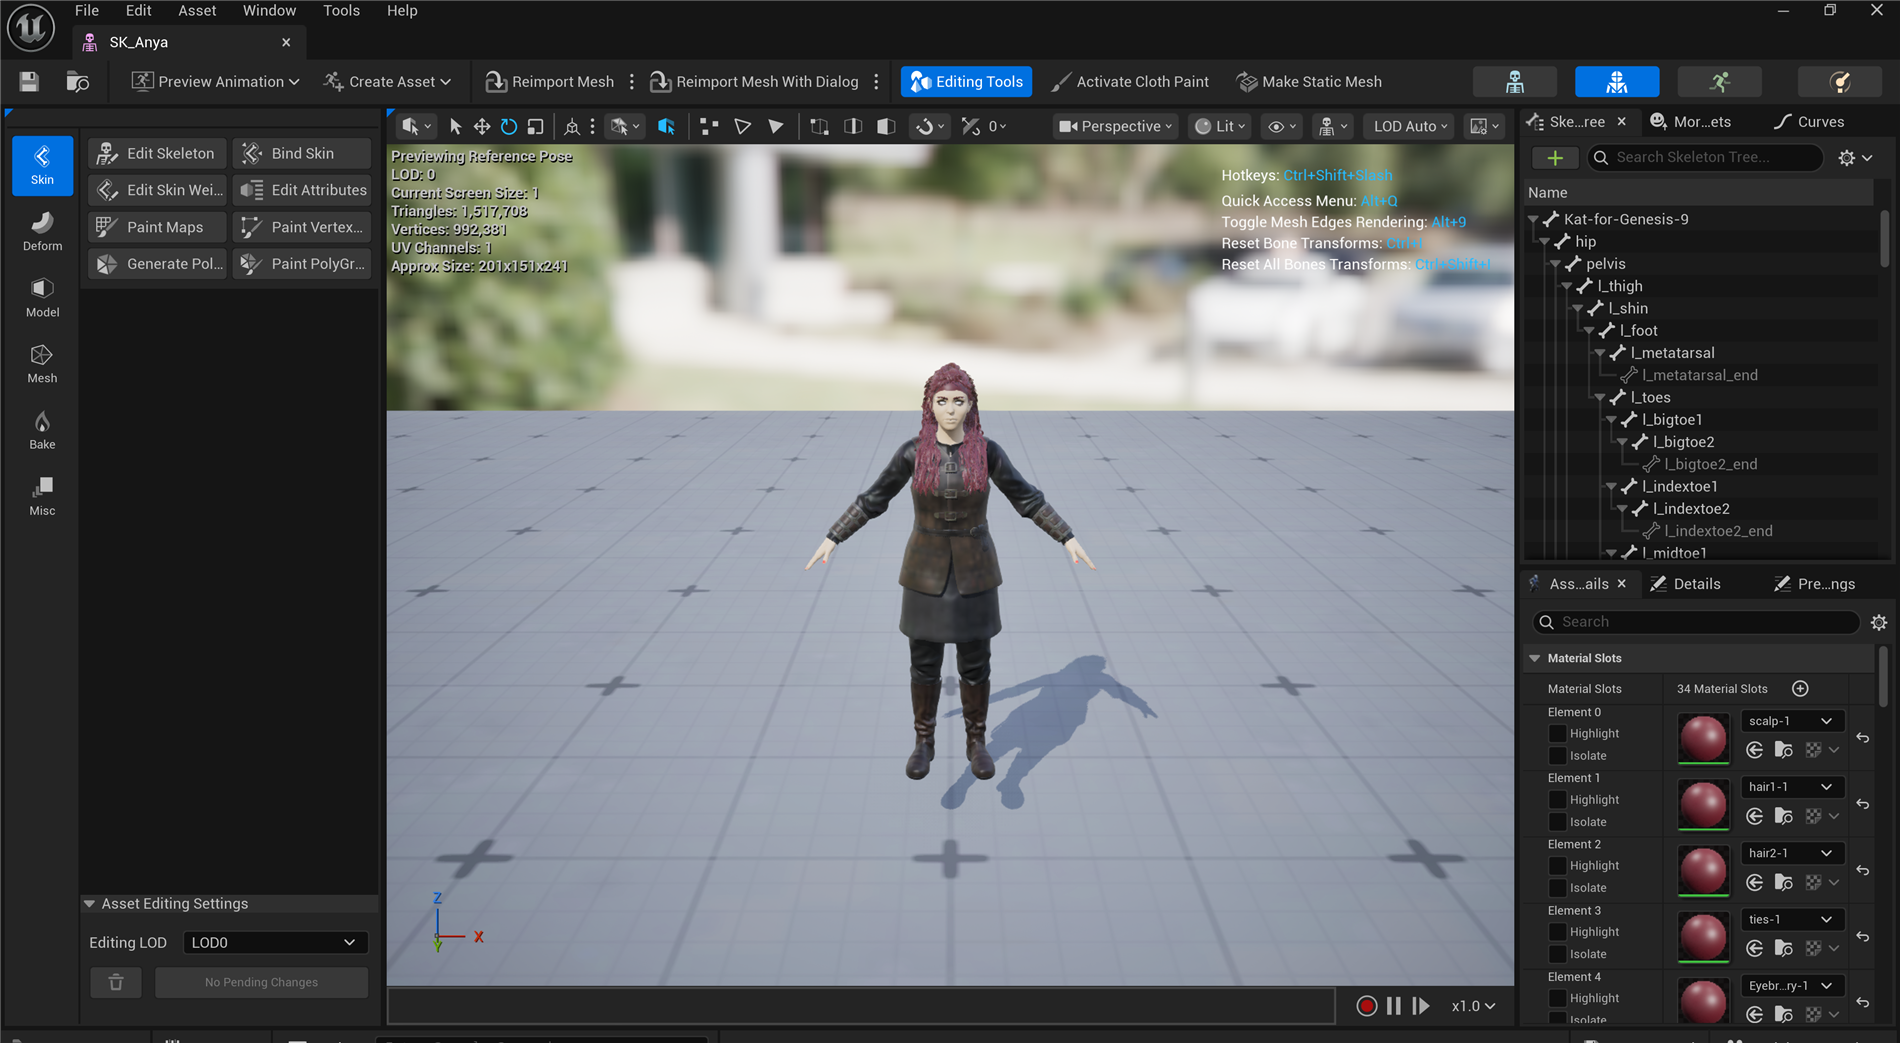
Figure: The input mesh, opened live in the ClaudeTest project · SK_Anya in its Skeletal Mesh editor, with its own Daz skeleton (root Kat-for-Genesis-9) and thirty-four material slots. This is a bespoke human carrying its own look and rig for the body, and it is precisely the sort of character you feed into Mesh to MetaHuman to borrow the shared facial rig.
The Idea: Solving an Identity
Mesh to MetaHuman does not warp a generic head until it looks like yours, and it does not copy your mesh vertex for vertex. It does something smarter, and understanding it makes the whole workflow make sense. Unreal keeps a MetaHuman template, the shared face topology from Lesson 1, and it solves for the version of that template that best matches your mesh. The result is called a MetaHuman identity: a description of your character expressed in MetaHuman terms.
The bridge between your arbitrary geometry and that shared template is a set of landmarks. You mark where the eyes, nose, mouth, and jaw sit on your mesh, and the solve fits the template to those features. Because the answer is always a MetaHuman, it arrives already carrying the shared rig, the levels of detail, and everything else the system provides.
Figure: The identity solve · you place landmarks on your mesh, Unreal fits the shared MetaHuman template to those features, and the result is a MetaHuman that resembles your character and already carries the rig. Individuality is captured; the infrastructure comes for free.
The Workflow, Step by Step
The tool has a specific order, and each step feeds the next. None of it is hard once you know why the step exists, so here is the whole road before you drive it.
💡 The Mesh to MetaHuman pipeline
flowchart TD
    PREP[Prepare a neutral frame
mouth closed, eyes open, face visible] --> ID[Create a MetaHuman Identity asset
from your mesh]
    ID --> TRACK[Promote a frame and track markers
place and nudge the landmarks]
    TRACK --> SOLVE[Solve the identity
fit the template to your features]
    SOLVE --> GEN[Mesh to MetaHuman
generate the full MetaHuman]
    GEN --> REFINE[Refine in MetaHuman Creator
body type, skin, grooms]
    style PREP fill:#f3eefb,stroke:#7e57c2
    style SOLVE fill:#fff3cd,stroke:#ffc107
    style GEN fill:#e8eaf6,stroke:#3949ab
Prepare a clean neutral frame, create an identity from it, mark the features, solve, generate the MetaHuman, then refine it in the Creator.
Three of those steps deserve a note, because they are where the quality of your result is decided:
- Prepare a neutral frame. The solve wants your character in a calm, neutral expression: mouth closed, eyes open, and the face unobstructed. A neutral pose gives the template a clean baseline to fit, which is why a scowling or talking frame produces a worse identity.
- Track the markers. Unreal places facial landmarks automatically, then hands them to you to nudge. Time spent here, making the eye corners and lip line sit exactly on your mesh, is the single biggest lever on how much the final MetaHuman looks like your character.
- Solve, then generate. Solving produces the identity, a MetaHuman-shaped description of your face. Mesh to MetaHuman then turns that identity into a real, complete MetaHuman you can open in the Creator and keep tuning.
✅ Pro Tip: the markers matter more than the mesh
A beautiful high-resolution mesh with sloppy landmarks solves worse than a modest mesh with careful ones. The solve only sees your geometry through the markers, so treat marker placement as the real work of this lesson, not a formality to click past.
Face First, Then the Whole Human
It is easy to expect Mesh to MetaHuman to reproduce your entire character. It does not, and knowing the boundary saves you a lot of confusion. The solve is about the face. The rest of the MetaHuman, the body, the grooms, the skin, and anything the character was wearing, comes from different places.
💡 Where each part comes from
flowchart LR
    MESH[Your mesh] -->|the solve| FACE[Face identity
shape + rig]
    PRESET[MetaHuman system] --> BODY[A body type you pick]
    PRESET --> GROOM[Grooms you choose]
    PRESET --> SKIN[Skin you tune]
    FACE --> MH[Your MetaHuman]
    BODY --> MH
    GROOM --> MH
    SKIN --> MH
    ORIG[Your original mesh] -.keeps.-> CLOTH[Clothing / armor,
handled separately]
    style FACE fill:#e3f2fd,stroke:#2196F3
    style MH fill:#e8eaf6,stroke:#3949ab
    style CLOTH fill:#fbe9e7,stroke:#c62828
The face shape and rig come from solving your mesh. The body, grooms, and skin come from the MetaHuman system and are yours to choose and tune. Clothing and armor are not part of the solve and stay with your original asset.
So the honest way to describe the output is this: a MetaHuman that resembles your character on the shared rig, with a body and grooms you select, that you then refine toward your original design. If your character's identity lives in a distinctive costume rather than its face, remember that the costume was never part of the solve; you keep your original mesh for the wardrobe and let the MetaHuman carry the performance.
Good Candidates and Poor Ones
Mesh to MetaHuman is remarkable, but it is not magic, and it has a clear sweet spot. The solve is built around a realistic human head, so the closer your mesh is to that, with the face clearly visible, the better the identity it produces. Push away from that and the results degrade in predictable ways.
Figure: What the solve handles well and what it fights · a realistic, neutral, unobstructed human head solves cleanly; heavy stylization, non-human forms, and an occluded face all pull the result away from your intent.
This is where the course's own SK_Anya is an honest teaching example rather than a perfect one. She is a realistic human head, which is promising, but her headwrap partly covers the hairline and forehead, exactly the kind of occlusion the right-hand column warns about. In practice you would prepare a frame with the face and hairline exposed before solving, or accept that the wrap is wardrobe you keep on the original mesh. The lesson is general: a good candidate is a visible human face, and preparation is how you turn a real character into one.
After the Bridge
Once the solve is done, something quietly important has happened: your one-off character is now a MetaHuman, a first-class citizen of the whole system. Everything Lesson 1 promised now applies to a character you designed. It has the shared rig, so it can take a face performance. It has the levels of detail, so it stays real time. And to the cinematic pipeline it is just a rigged human.
💡 A converted character rejoins the pipeline
flowchart LR
    ONE[A one-off custom mesh] -->|Mesh to MetaHuman| MH[A rigged MetaHuman]
    MH --> BODY[Body performance
retarget or Control Rig]
    MH --> FACEP[Face performance
captured onto the shared rig]
    BODY --> SHOT[Assemble, light, render
the cinematic pipeline]
    FACEP --> SHOT
    style ONE fill:#f3eefb,stroke:#7e57c2
    style MH fill:#e8eaf6,stroke:#3949ab
    style SHOT fill:#e8f5e9,stroke:#4CAF50
The bridge converts a one-off mesh into a MetaHuman, which then feeds the same body animation, face performance, and cinematic pipeline as any other MetaHuman.
That is the whole point of the bridge. You do not choose between the character you designed and the power of the MetaHuman system; you bring the first into the second. The next lesson picks up exactly here, with the face performance the shared rig now makes possible, and later the full body animation and grooms that finish the digital human.
Hands-On: Solve Your First Identity
Run the solve once, start to finish, on a human head you have. The goal is not a perfect result, it is to feel the shape of the workflow and see how much the markers matter.
🧩 Exercise: a mesh becomes a MetaHuman
- Pick a candidate. Choose a mesh with a realistic, visible human head in a neutral pose. A head scan is ideal; a character like
SK_Anyaworks if you expose the face and hairline first. - Create an identity. With the MetaHuman plugin enabled, create a MetaHuman Identity asset and bring your mesh in as its source.
- Promote a frame. Choose the neutral view you prepared and promote it as the frame the solve will read.
- Track and adjust markers. Let Unreal place the facial landmarks, then nudge the eye corners, nose, and lip line until they sit exactly on your mesh. Spend real time here.
- Solve, then generate. Run the identity solve, review how well the fitted template matches, then use Mesh to MetaHuman to generate the full MetaHuman.
- Open it in the Creator. Load the result in MetaHuman Creator, pick a body type, and tune the skin and grooms toward your original design.
💡 Hint: the MetaHuman does not look much like my character?
Two usual causes, both upstream of the result. If the proportions are off, revisit the markers; a lip line or eye corner placed even slightly wrong drags the whole identity with it. If the whole face fights you, the frame was probably not neutral or the face was partly occluded, so prepare a cleaner, unobstructed neutral frame and solve again. The fix is almost never in the generated MetaHuman; it is in the frame and the markers you fed the solve.
✅ Reach exercise: move a body animation onto it
Take the MetaHuman you just made and, using the IK Retargeter from the intermediate track, retarget one of your existing body animations onto it. You will see your designed character, now a MetaHuman, walking or gesturing with motion it never had before. That is the two halves of this course meeting: your character carrying both your look and a shared, animatable rig.
Knowledge Check
Question 1
What gap does Mesh to MetaHuman close for a custom character?
Correct answer: B · A custom mesh brings geometry, materials, and a body skeleton, but none of the MetaHuman facial rig, levels of detail, or face-performance capability. Mesh to MetaHuman hands your existing character all of that.
Question 2
What is a MetaHuman identity, in the sense the solve produces one?
Correct answer: B · The solve does not copy your mesh; it fits the shared MetaHuman template to your features, expressed through landmarks. Because the answer is a MetaHuman, it arrives already carrying the rig and levels of detail.
Question 3
In the workflow, which step has the biggest effect on how much the result looks like your character?
Correct answer: B · The solve reads your geometry through the landmarks, so marker placement is the real work. A careful lip line and eye corners produce a close identity; sloppy markers drag the whole result off, no matter how good the mesh.
Question 4
Your character's identity is mostly in its distinctive armor. What should you expect from Mesh to MetaHuman?
Correct answer: B · Mesh to MetaHuman solves the face. The body comes from a preset type and the clothing or armor was never part of the solve, so distinctive wardrobe stays with your original asset while the MetaHuman provides the rig and performance.
Question 5
Which mesh is the best candidate for a clean solve?
Correct answer: B · The solve is built around a realistic human head, so a neutral, unobstructed, visible face solves best. Stylization, non-human forms, occlusion, and extreme baked expressions all pull the identity away from your intent.
Summary
You drove the bridge from a bespoke character to a full MetaHuman. Here is what to carry forward:
The gap is the rig, not the look. A custom mesh already has geometry, materials, and a body skeleton. What it lacks is the MetaHuman facial rig, the levels of detail, and the ability to receive a face performance. Mesh to MetaHuman provides exactly those, so you keep the character you designed and gain the infrastructure you did not build.
It solves an identity, guided by markers. The tool fits the shared MetaHuman template to your mesh's features rather than copying your mesh, and it reads those features through landmarks you place. Careful markers on a neutral, unobstructed frame are the whole quality lever. The output is always a MetaHuman, so it arrives rigged.
Face first, then rejoin the pipeline. The solve is about the face; the body, grooms, skin, and wardrobe come from elsewhere. Once done, your character is a MetaHuman like any other, ready for body retargeting, a face performance, and the same assemble, light, and render pipeline you already know.
🔑 Key Takeaways
- Mesh to MetaHuman gives a character you own the MetaHuman facial rig, levels of detail, and face-performance pipeline it lacked
- The solve fits the shared template to your mesh through landmarks; it does not copy your geometry
- Marker placement on a neutral, unobstructed frame is the single biggest lever on the result
- The solve handles the face; body, grooms, skin, and clothing come from the system or your original mesh
- A realistic, visible human head solves best; stylization and occlusion are the usual problems
👆 A note on this lesson's figures
The input-mesh image is a genuine live capture from the ClaudeTest project: SK_Anya open in the Unreal Skeletal Mesh editor, showing its real Daz skeleton and material list. The gap, identity-solve, workflow, part-by-part, and candidate diagrams are labeled illustrations, because this project contains no MetaHuman asset and the Mesh to MetaHuman tool, MetaHuman Identity solve, and MetaHuman Creator are cloud-and-editor workflows that the automation bridge used for the course's live captures cannot drive. The steps they show are exactly the ones you run in the tool.
Where this fits
This lesson is the on-ramp for the rest of the advanced track and for your own characters. The MetaHuman it produces still travels the same Story-to-Screen pipeline as any character: character finalization, animation, shot assembly, cinematography, and output. What changes is that the human sent down it is now a fully rigged MetaHuman built from a character you designed.