🕹️ Capstone: Build the Collect-the-Orbs Mini-Game
You have learned eleven modules of skills on their own: levels and actors, materials, lighting, Blueprints, input, UMG, audio, particles, and packaging. A game is where they stop being separate features and become one built thing. This capstone threads them into a small, complete, playable project: you walk a character around a tiled arena, collect three glowing orbs, watch a heads-up display count them, hear and see each pickup, win by gathering all three before a countdown runs out, and package the result into a build you can hand to someone. There is little new to learn here. There is everything to connect.
🕹️ Intro Course · Capstone Project
This is the capstone of the Introduction to Unreal Engine 5 course. It assumes you have worked through the eleven modules before it and pulls them together into one small game. Where each earlier module went deep on one system, this one is about how the systems fit: what you build first, what depends on what, and how a handful of features become a loop a player can actually play. Treat it as a project, not a read.
🎯 Learning Objectives
By the end of this lesson, you will be able to:
- Plan a small game as a loop: what the player does, how the world responds, and how the game keeps score
- Build a play space from a level, actors, materials, and lighting
- Make the space playable with a controllable pawn, input, and a Blueprint that reacts to an overlap
- Give the player feedback across three senses: a UMG counter, a pickup sound, and a Niagara burst
- Close the loop with a win condition, then add stakes with a countdown timer and a lose condition
- Package the finished project into a runnable build to share
Estimated Time: 90 to 120 minutes
Prerequisites: All eleven course modules, especially Actors and Components, Working with Actors in Blueprints, Interactable Objects, HUD Elements, and Triggering VFX. A working Unreal Engine 5 project using a third-person or first-person template.
In This Lesson
Thinking in Loops
The single most useful shift from following tutorials to building a game is to stop thinking about features and start thinking about the loop. A feature is one thing the engine can do: play a sound, show text, spawn a particle. A loop is the small cycle a player repeats: they do something, the world responds, the game keeps score, and that invites them to do it again. Collect an orb, hear the chime, watch the counter climb, reach for the next orb. That cycle, not any one feature, is the game.
This matters because a loop is small enough to finish. Our whole game is one sentence: the player moves around a space, walks into a glowing orb, the orb reacts and disappears, a counter goes up, and collecting all three wins. Everything in this lesson serves that sentence, and every feature you learned is one word in it.
Figure: The game as a loop, not a pile of features. The player acts, the world responds to a collision, the player senses the response, and the game updates its score, which sends the player back for more · each quarter of the ring is one module you already know.
The rest of this lesson builds that loop, and the order of the sections is the order you build it. Each step leans on modules you already finished, so the map below is also a map of the course.
💡 The whole game, one step at a time
flowchart LR
    S[Build the space
Modules 2, 3, 4] --> P[Make it playable
Modules 5, 6]
    P --> F[Give feedback
Modules 7, 8, 9]
    F --> W[Win and lose
Module 5]
    W --> R[Package and ship
Modules 10, 11]
    style S fill:#ede7f6,stroke:#7e57c2
    style F fill:#fff3cd,stroke:#ffc107
    style R fill:#e8f5e9,stroke:#4CAF50
Build the space, make it playable, give feedback, close the loop, ship it. The order is not arbitrary: you cannot walk a pawn into an orb before the space and the orb exist, and you cannot celebrate a win before there is anything to collect.
Build the Space
Everything starts with a place to play. Make a level, drop a floor to walk on, and place the three orbs the player will collect. The orbs are just actors with a sphere mesh, and what makes them read as collectible is the material: a bright emissive material so each orb glows against the ground rather than sitting there like a grey ball. Then light the arena so the floor, the character, and the glowing orbs all read clearly.
This is Modules 2, 3, and 4 doing exactly what they taught, with a game in mind. The level and the actors are the stage, the emissive material is what turns a plain sphere into an inviting target, and the lighting is what makes the whole thing legible. Keep it simple: a flat tiled area, three orbs spaced out so the player has to travel between them, and enough light to see.
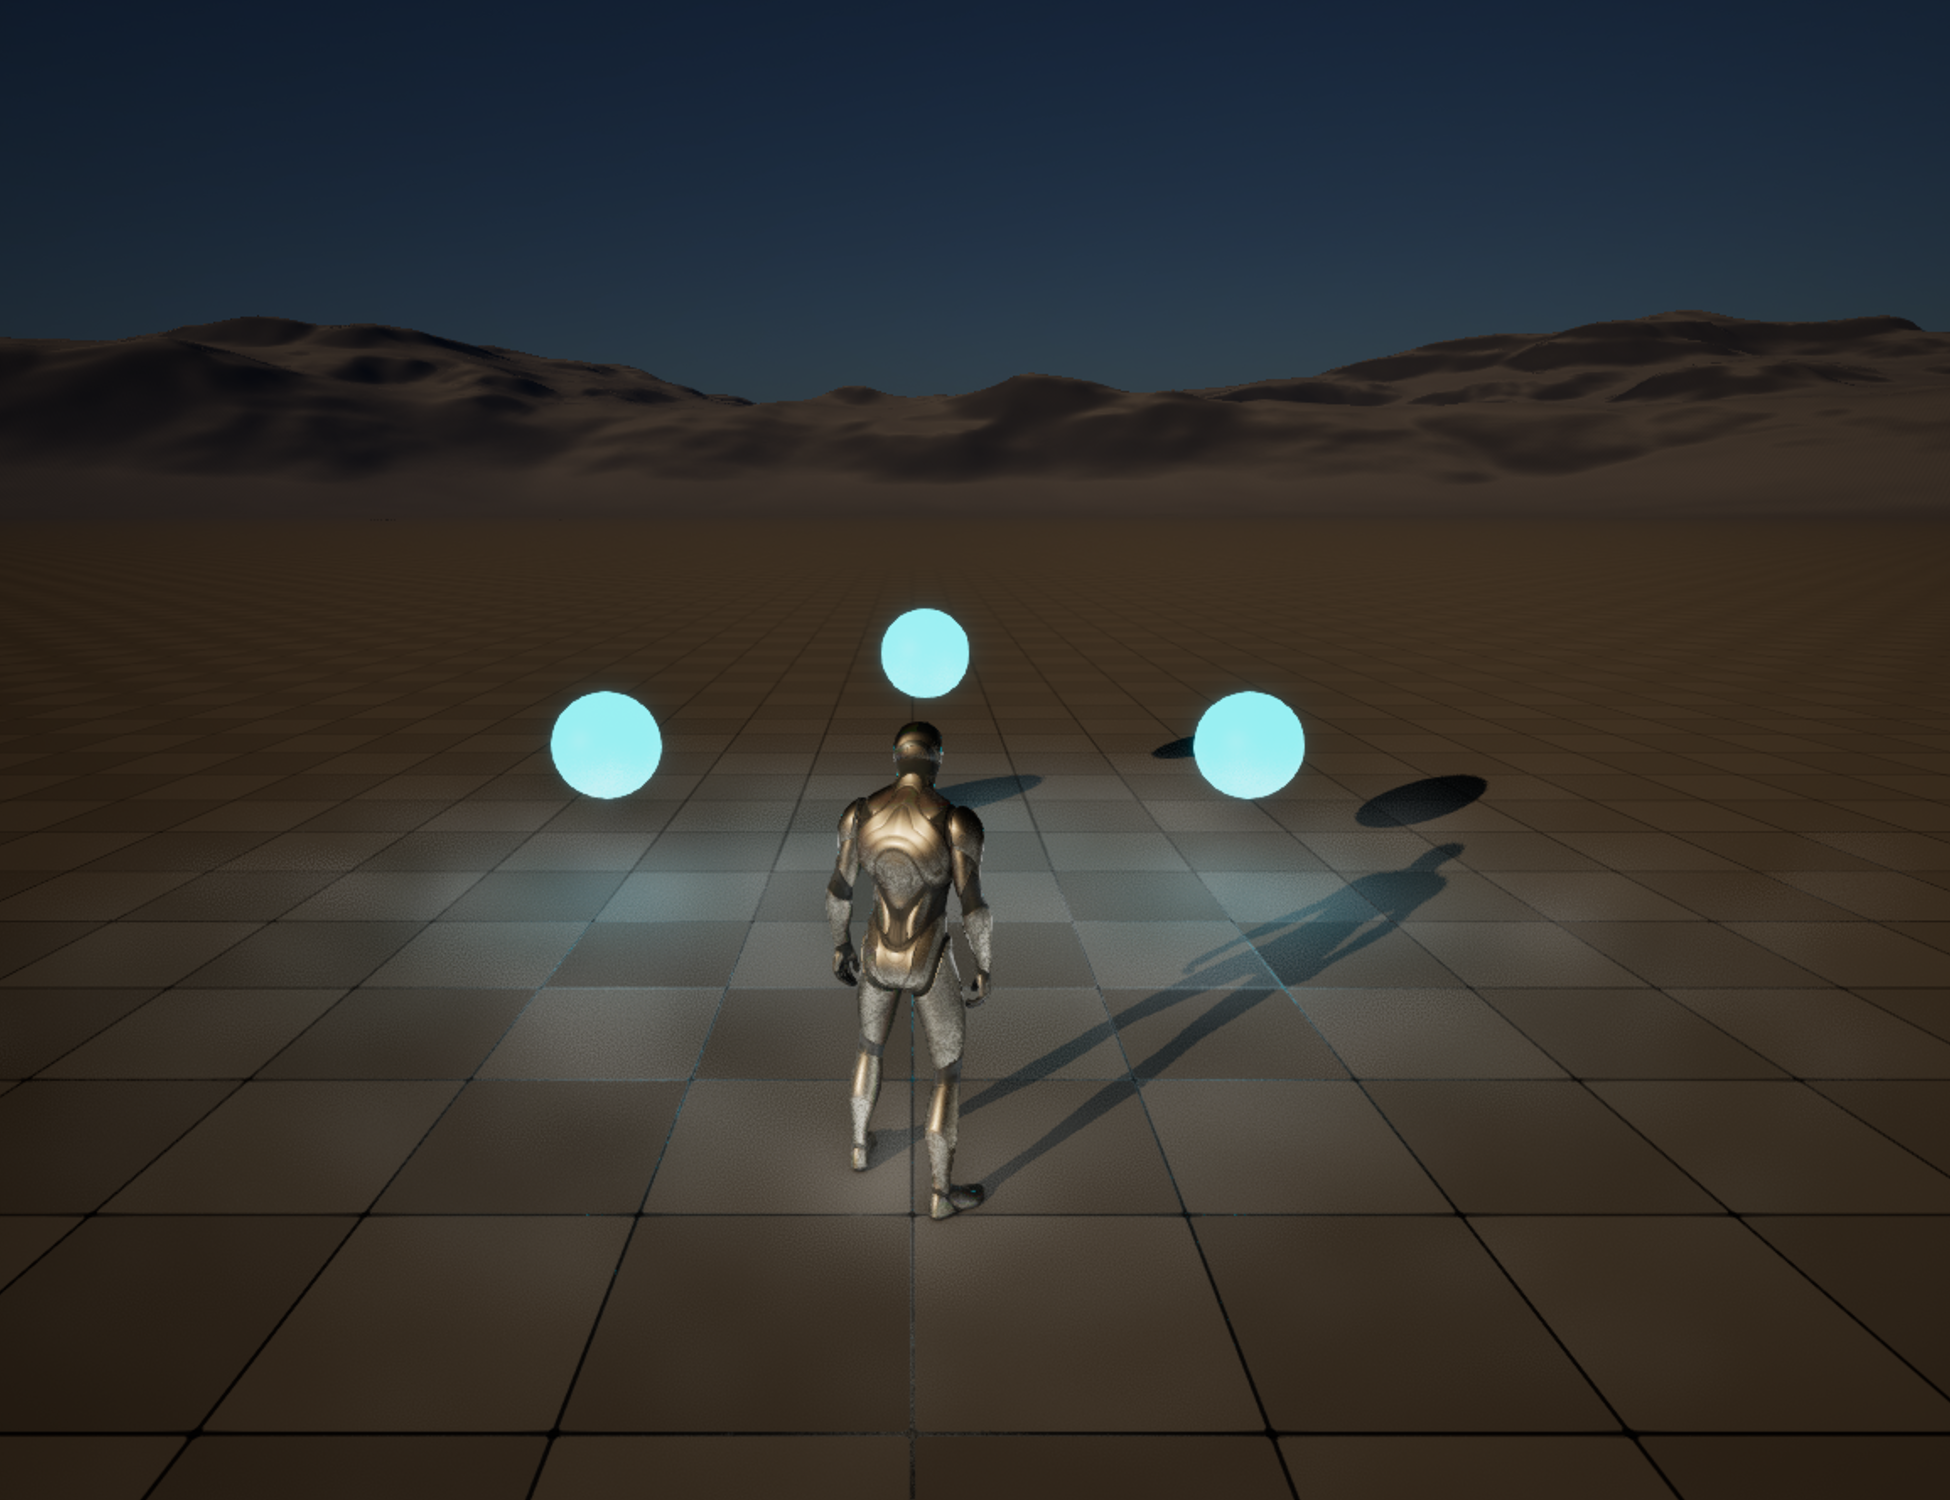
Figure: The mini-game's play space, staged live in the ClaudeTest project · three glowing orbs (spheres with a bright emissive material) sit around the player character on a tiled arena, lit so the collectibles pop against the ground. This is the space the rest of the loop brings to life.
✅ Pro Tip: make the target obvious
A collectible has one job before anything else: to look like something you should walk into. An emissive material does most of that work for free, because a glow draws the eye across a room. If your orbs are hard to spot, the fix is almost always brighter emissive or a stronger contrast with the floor, not a bigger sphere.
Make It Playable
A space with orbs in it is a diorama. To make it a game, the player needs to move and the orbs need to react. Movement comes from the template's pawn plus the Enhanced Input system you already set up: press a key or push a stick, the character walks. The reaction comes from Blueprints listening for a collision.
The heart of this step is one event. Each orb carries a collision component set to generate overlap events, and its Blueprint responds to On Component Begin Overlap: the moment the player's capsule enters the orb's space, that event fires, and from it you trigger everything else. This is the exact interactable object and collision pattern from Module 6, used for the simplest possible interaction, touching a thing.
Figure: The pickup, as a Blueprint sees it. The player pawn walks into the orb's collision volume, which fires an On Component Begin Overlap event · from that one event you branch out to the feedback, the score, and destroying the collected orb.
⚠️ Watch out: no overlap events, no pickup
A common first bug is an orb you can walk straight through with nothing happening. Almost always the collision component is not set to generate overlap events, or its collision is set to block instead of overlap, so the event never fires. Before debugging your Blueprint logic, confirm the orb is actually reporting the overlap. The collision settings are where this loop most often breaks.
Give the Player Feedback
The overlap fires, the orb vanishes, the score goes up. Mechanically the game works. But a game that changes state in silence feels broken, because the player cannot tell that anything happened. Feedback is what turns a state change into a moment, and the reliable trick is to hit more than one sense at once.
On each pickup, fire three things together. Show it: update a UMG heads-up display so the counter ticks from one number to the next. Hear it: play a sound, a short bright chime that says got it. Feel it: trigger a Niagara burst where the orb was, a quick spray of particles that punctuates the moment. Modules 7, 8, and 9, fired from the same overlap event, turn a silent increment into something satisfying.
Figure: Feedback across three senses. The same overlap event that scores the orb also updates the UMG counter, plays a pickup sound, and spawns a Niagara burst · hitting sight, hearing, and motion at once is what makes a collectible feel collected.
Close the Loop: Win and Lose
A loop that never ends is a toy, not a game. What makes it a game is a goal, and the goal here is simple: collect all three orbs. To know when that happens, the game has to keep score, and that is one integer variable, held somewhere that outlives any single orb (the player, the level Blueprint, or a small game-mode Blueprint). Each pickup adds one to it, then checks: is the count now three?
This is Blueprint flow control at its most useful. Increment the counter, then a branch: if it equals the target, the player has won, so fire the win, whether that is a message on the HUD, an opening door, or simply a bright You Win panel. If it is not there yet, do nothing special and let the player keep collecting. That one branch is the difference between a pile of pickups and a game with an ending.
Add stakes: a countdown and a lose
A goal with no pressure is a chore. The cheapest way to add tension is a countdown timer that races the player: a clock that starts full, ticks down while they play, and shows on the HUD next to the orb counter. Now the game has two ways to end, and they race each other: the player wins by reaching the target first, or loses if the clock reaches zero first.
The clock is a second small piece of state: a float of seconds remaining, decremented over time. You can drive it two ways, subtract the frame's delta time every tick, or set a repeating timer that fires once a second and subtracts one, and each time it changes you update the HUD so the player feels the pressure. Then add the mirror image of the win branch: when the timer reaches zero, check whether the game is already won, and if not, the player loses, so fire a Time's Up panel. Winning and losing are the same shape, one branch each, watching two different numbers.
💡 Two ways to end, racing each other
flowchart LR
    Z["Orbs: 0 of 3
clock ticking"] -->|collect| O["1 of 3"]
    O -->|collect| T["2 of 3"]
    T -->|collect| H["3 of 3"]
    H --> W["You win"]
    C["Clock reaches 0
before 3 collected"] --> L["You lose"]
    style Z fill:#ede7f6,stroke:#7e57c2
    style W fill:#e8f5e9,stroke:#4CAF50
    style C fill:#fff3cd,stroke:#ffc107
    style L fill:#fdecea,stroke:#e53935
The top row is the collection race to the win; the bottom is the timer that can cut it short. Both are one branch watching one number: the count for the win, the clock for the lose.
✅ Pro Tip: stop the clock the moment the game ends
Whichever branch fires first, disable the timer and freeze input right away, or the countdown keeps ticking under your win panel and can fire a Time's Up a second later, ending the same game twice. A single is the game over flag that both branches check, and set, keeps the two endings from stepping on each other. And store the target count and the starting time as variables, not hard-coded numbers, so a three-orb, thirty-second game becomes a ten-orb, minute-long one by editing two values.
Ship It
A game that only runs when you press Play in the editor is a project, not a game someone can play. To turn it into something you can hand to a friend, you package it: set the project's name, icon, and default map, pick a platform, and let the engine cook the content and build a standalone application. The output is a runnable build, no editor required.
This is Module 10 closing the course the way it opened, with the whole project rather than one feature. Packaging is also where small oversights surface, a default map that is not your game level, or a missing setting, so it is worth doing once early rather than only at the very end.
💡 From project to a build you can share
flowchart LR
    P[Your project
level + Blueprints] --> S[Project settings
name, icon, default map]
    S --> C[Cook and build
for a platform]
    C --> B[A runnable build
anyone can play]
    style P fill:#ede7f6,stroke:#7e57c2
    style B fill:#e8f5e9,stroke:#4CAF50
Set it up, cook it, ship it. The runnable build is the real end of the course: proof that eleven modules of features became one thing a player can open and play.
One more tool worth naming: the AI-assisted workflows from Module 11 are not a separate step so much as an accelerator for every step above. Staging the arena, wiring a Blueprint, or checking a setting can all be driven through the Unreal MCP bridge, which is exactly how the play-space figure earlier in this lesson was staged and captured. The game is still yours to design; the assistant just moves your hands faster.
Hands-On: Build the Whole Loop
Build the entire game once, end to end. Keep it small: one flat arena, three orbs, one counter, one win. The goal is not polish; it is to run the whole loop once so the connections between modules become muscle memory.
🕹️ Exercise: a three-orb game from scratch
- Build the space. New level, a floor, and three sphere actors. Give the spheres a bright emissive material so they glow, and add enough light to see the arena.
- Make it playable. Use the template pawn so the player can move. On each orb, add a collision component set to generate overlap events, and a Blueprint with an On Component Begin Overlap event.
- React to the pickup. From that overlap event, do three things: add one to a counter, play a pickup sound, spawn a Niagara burst, then destroy the orb.
- Show the score. Make a UMG widget that displays "Orbs: X / 3", add it to the screen, and update it whenever the counter changes.
- Close the loop. After incrementing, branch: if the count equals your target, show a "You Win" panel (or open a door). Otherwise, keep playing. Then add a countdown: a seconds-remaining variable that ticks down and shows on the HUD, plus a second branch that shows a "Time's Up" panel and stops the game if the clock reaches zero before all three orbs are collected.
- Package it. Set your default map to the game level, then package the project for your platform and run the build outside the editor.
💡 Hint: I collect an orb but nothing happens?
Work backward along the loop. If the counter does not change, the overlap event is probably not firing, so check that the orb's collision generates overlap events and is set to overlap the pawn, not block it. If the event fires but you see nothing, the feedback is wired to the wrong node or the widget is not on screen. Test one channel at a time (drop a quick print first) so you know exactly which link in the loop is broken.
✅ Reach exercise: make the clock part of the risk and reward
Now that a timer can end the game, use it as a reward too. Give each collected orb a small time bonus, a few seconds added back to the countdown, so the player is racing the clock and refilling it at once. Then tighten the starting time until the game is just barely winnable. You are now tuning difficulty, which is the last real job in making something fun to play.
Knowledge Check
Question 1
Why is "thinking in loops" more productive than thinking in features when building a game?
Correct answer: B · A loop is act, respond, keep score, repeat. Naming that cycle up front makes the build almost mechanical, because every feature is just one word in the sentence. A pile of features has no such shape.
Question 2
What single event is the trigger for everything that happens when the player collects an orb?
Correct answer: A · The overlap event fires the instant the player touches the orb, and the feedback, the score, and destroying the orb all branch off that one event. It is the trigger the whole pickup hangs from.
Question 3
Your orb increments the score and disappears, but the game "feels broken." What is most likely missing?
Correct answer: B · A state change with no feedback reads as a bug. Hitting sight, hearing, and motion together (counter, sound, particles) is what turns a silent increment into a moment the player can feel.
Question 4
The game has two ways to end. How do the win and the lose each fire?
Correct answer: B · Win and lose are the same shape: one branch each, watching one number. The counter reaching the target fires the win; the countdown reaching zero first fires the lose. Whichever happens first should stop the game so the other cannot fire too.
Question 5
What does packaging the project produce?
Correct answer: A · Packaging cooks the content and builds a standalone application for a platform, so someone can open and play your game with no editor installed. It is what turns a project into a game you can share.
Summary
You put the whole course to work. Here is the arc, which is also the order you build every small game:
Plan the loop, then build in order. A game is a cycle the player repeats: act, respond, keep score, repeat. Name that loop, then build the space, make it playable, give feedback, close the loop with a win and a timed lose, and ship it. Each step depends on the one before, which is why the order is not negotiable.
Every step is a module you already know. The space is levels and actors, materials, and lighting; playability is input and a Blueprint overlap; feedback is UMG, audio, and Niagara; the win and the timed lose are flow control; the deliverable is packaging, sped up by AI-assisted workflows. The capstone is not new knowledge, it is the wiring between what you already have.
🔑 Key Takeaways
- Think in loops: act, respond, keep score, repeat, all defined by one sentence you can build
- Build in a fixed order: space, playability, feedback, win, ship, because each step depends on the last
- One overlap event is the trigger the whole pickup hangs from
- Feedback across three senses (counter, sound, VFX) is what makes a collectible feel collected
- The win is a counter plus a branch, and a countdown timer adds a matching lose; the deliverable is a packaged build a player can open
👆 A note on this lesson's figures
The play-space image is a genuine live capture from the ClaudeTest project: a character staged on a tiled arena with three glowing orbs, each a sphere carrying a real emissive material, lit and framed in the editor. The loop, overlap, feedback, win, and packaging diagrams are labeled illustrations of the workflow rather than screenshots, because the value there is how the pieces connect, and a running game's Blueprint graphs, HUD, sound, and particles cannot be shown in a single still. Every feature the diagrams describe is one the earlier modules taught step by step.
Where this fits
This capstone is the whole game-development half of the course in miniature. Where the two cinematic capstones in the Intermediate and Advanced tracks assemble a shot to be watched, this one assembles a game to be played, from an empty level to a packaged build. Finish it and you have done the thing the whole course set out to teach: turned Unreal's systems into something interactive that runs on its own.