🎮 HUD Elements
A static health bar showing "75%" isn't very useful if the player actually has 30% health. Real game UI must update dynamically—health decreases when damaged, ammo counts change when firing, objectives update when completed. In this lesson, you'll learn how to connect your UI widgets to game data so they reflect the actual game state in real-time.
🎯 Learning Objectives
By the end of this lesson, you will be able to:
- Bind widget properties to game data for real-time updates
- Create a health bar that reflects actual player health
- Build an ammo counter that updates when firing
- Display objective text that changes based on game progress
- Use formatting to display values appropriately
Estimated Time: 50-60 minutes
Prerequisites: Lesson 7.2 (Creating Widgets), Module 5 (Blueprints basics)
In This Lesson
Data Binding Fundamentals
Data binding connects widget properties to data sources so the UI automatically updates when data changes. Instead of manually setting a text widget's content every time health changes, you bind it once and the widget handles updates itself.
Why Binding Matters
Without binding, you'd need to:
- Store a reference to the text widget
- Every time health changes, call Set Text
- Remember to update in every place health can change (damage, healing, pickups...)
- Risk forgetting one and having outdated UI
With binding:
- Create a binding function that returns current health
- UMG calls this function automatically each frame
- Widget always shows correct value
Types of Binding
UMG supports several binding approaches:
Property Binding (Function): Bind a property to a function that returns the value. Simple and automatic, but the function is polled every frame whether or not the value changed, so it can get expensive across a busy HUD.
Property Binding (Variable): Bind directly to a variable. Less flexible but slightly more efficient.
Event-Driven Updates: Don't bind—instead, update the widget manually when data changes. More control, better performance for infrequent updates.
MVVM (Viewmodel): Unreal Engine 5's modern, recommended binding system (built into the engine since 5.3). A Viewmodel holds your UI data, and widgets bind to it through an event-driven mechanism, so the UI refreshes only when that data actually changes · no per-frame polling. Covered in depth in Lesson 7.5.
Figure: Three ways to connect UI with game data. In UE 5.8 a fourth · MVVM · is the recommended default (see below).
✅ Modern Binding: MVVM (UE 5.8)
All three approaches above still work, but per-frame Property Binding polls its function every single frame, which adds up fast across a full HUD. In modern Unreal the recommended approach is MVVM (Model-View-Viewmodel), an event-driven system built into the engine since 5.3: your game logic updates a Viewmodel, and bound widgets refresh only when that data changes, at zero per-frame cost. Prefer MVVM (or plain event-driven updates) for anything that changes often · health, ammo, timers · and keep per-frame Property Binding for quick prototypes. Lesson 7.5 covers MVVM end to end; this lesson uses simple Property Binding so you can focus on the HUD itself.
Creating a Property Binding
To bind a widget property to a function:
- Select the widget in Designer
- Find the property you want to bind (e.g., Text, Percent)
- Click the Bind dropdown next to the property
- Select Create Binding
- A function is created—add logic to return the correct value
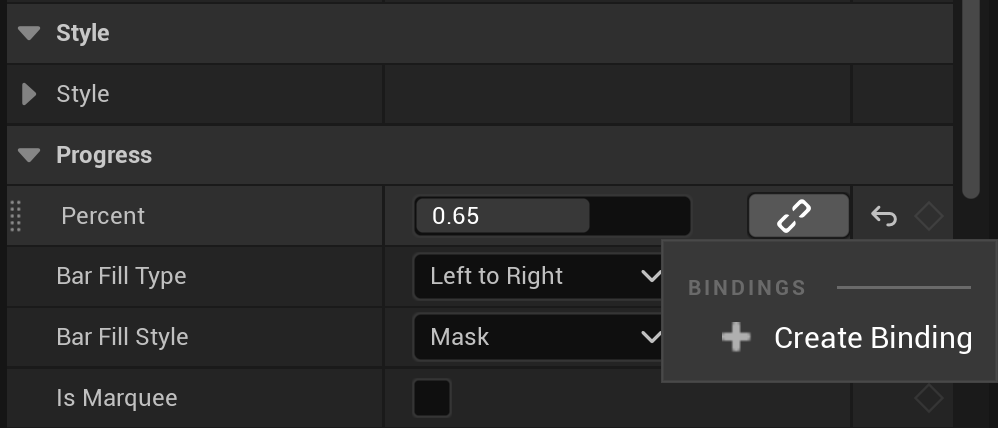
Figure: Creating a Property Binding · a bindable property (here a Progress Bar’s Percent) shows a Bind dropdown in the Details panel; choosing Create Binding generates the function it polls.
The binding function must return the correct type for that property:
- Text property → returns Text or String
- Percent (Progress Bar) → returns Float (0.0 to 1.0)
- Color → returns Slate Color or Linear Color
- Visibility → returns ESlateVisibility enum
Getting References to Game Data
Your binding functions need access to game data. Common patterns:
Get Player Character/Controller:
Get Player Character (index 0) → Cast to YourCharacter → Get HealthGet Game State:
Get Game State → Cast to YourGameState → Get ScoreCached Reference: Store reference in a variable on Event Construct, then use it in bindings. More efficient than getting reference every frame.
flowchart LR
    W["Widget Property
(Text, Percent)"] -->|"Bind"| F["Binding Function"]
    F -->|"Every Frame"| G["Get Player Character"]
    G --> C["Cast to MyCharacter"]
    C --> H["Get Health"]
    H --> R["Return Value"]
    R -->|"Updates"| W

    style W fill:#4CAF50,color:#fff
    style F fill:#667eea,color:#fff
    style R fill:#FF9800,color:#fff
Figure: Binding function flow—widget calls function each frame to get current value.
Performance Considerations
Bindings are called every frame, so keep them efficient:
- Cache references: Don't call Get Player Character every frame—store it once
- Simple calculations: Avoid complex logic in binding functions
- Consider events: For data that changes rarely, event-driven updates are more efficient
- Limit bound widgets: Having 100 widgets all with bindings can add up
⚠️ Binding Performance
While bindings are convenient, they're called every frame even if data hasn't changed. For a simple health bar, this is fine. For complex calculations or many bound widgets, consider caching the reference on Event Construct and using event-driven updates when performance matters.
Formatting Bound Values
Raw values often need formatting for display:
Integer to Text: Use To Text (Integer) for whole numbers
Float to Text: Use To Text (Float) with formatting options:
- Minimum/Maximum Fractional Digits — control decimal places
- Use Grouping — add thousands separators (1,000 vs 1000)
Append/Format Text: Combine values with labels:
Format Text: "Health: {0}%" with Health value = "Health: 75%"Percentage Display: Multiply 0-1 value by 100 for percentage:
Health (0.75) × 100 = 75 → "75%"Creating a Dynamic Health Bar
A health bar is the quintessential HUD element—it needs to show current health, maximum health, and update instantly when the player takes damage or heals. Let's build one properly.
Health System Setup
Before creating the UI, ensure your character has health data. A simple setup:
- In your Character Blueprint, create variables:
CurrentHealth(Float) — Default: 100MaxHealth(Float) — Default: 100
- Create a function
GetHealthPercent:- Return: CurrentHealth / MaxHealth
- This gives a 0-1 value perfect for Progress Bar
- Create functions
TakeDamageandHealthat modify CurrentHealth
Figure: Character provides health data; widget binds to it.
Creating the Health Bar Widget
Create a new Widget Blueprint WBP_HealthBar:
- Add a Canvas Panel as root
- Add a Size Box to control dimensions (Width: 300, Height: 40)
- Inside Size Box, add an Overlay (to layer background and fill)
- In Overlay, add:
- Image — Background (dark color, full size)
- Progress Bar — Health fill (red color)
- Text Block — Health text (centered, optional)
Widget Hierarchy
Canvas Panel
└── Size Box (300 × 40)
    └── Overlay
        ├── Image (Background) — #1a1a1a
        ├── Progress Bar (HealthBar) — #f44336
        └── Text Block (HealthText) — "75%"
Caching the Player Reference
Instead of getting the player every frame, cache it once:
- Create a variable
PlayerRef(type: Your Character class) - In the Graph, override Event Construct
- Get Player Character → Cast to YourCharacter → Set PlayerRef
- Now bindings can use PlayerRef directly
Figure: Cache the player reference once on widget construction.
Binding the Progress Bar
- Select the Progress Bar widget
- In Details, find Percent
- Click Bind → Create Binding
- In the created function:
- Check if PlayerRef is valid (Is Valid node)
- If valid: Call GetHealthPercent on PlayerRef → Return value
- If not valid: Return 1.0 (full bar as fallback)
Binding the Health Text
- Select the Text Block widget
- Bind the Text property
- In the binding function:
- Get CurrentHealth from PlayerRef
- Round to integer (if desired)
- Format:
Format Text "{0} / {1}"with CurrentHealth and MaxHealth - Or simple:
Round(CurrentHealth) → To Text → Append " HP"
Adding Visual Polish
Color Change Based on Health: Bind the Progress Bar's Fill Color to change from green (high) to yellow (medium) to red (low):
- Create a binding for Fill Color and Opacity
- In the function:
- Get health percent
- If > 0.6: Return Green
- If > 0.3: Return Yellow
- Else: Return Red
Figure: Health bar color changes based on current health percentage.
Low Health Warning: Add a pulsing effect when health is critical:
- Create a widget animation that pulses the bar (scale or opacity)
- In the binding or Event Tick, check if health < 20%
- If low and animation not playing: Play Animation
- If not low and animation playing: Stop Animation
💡 Smooth Health Changes
For a polished feel, don't instantly jump to new health values. Instead, use FInterp To in Tick to smoothly animate toward the target. Show a "damage preview" bar behind the main bar that catches up over time.
Ammo and Resource Counters
Unlike health bars, ammo and resources are typically displayed as numbers. They need to update instantly and may have more complex formatting requirements.
Simple Ammo Display
A basic ammo counter shows: Current Ammo / Magazine Size or Current / Reserve.
Setup in Character:
CurrentAmmo(Integer) — Bullets in current magazineMaxAmmo(Integer) — Magazine capacityReserveAmmo(Integer) — Extra bullets carried
Widget Structure:
Horizontal Box
├── Text Block (CurrentAmmo) — "30"
├── Text Block (Separator) — " / "
└── Text Block (ReserveAmmo) — "120"
Or use a single Text Block with formatted text:
Format Text: "{0} / {1}" → "30 / 120"Binding Ammo Text
- Create Text Block for ammo display
- Bind the Text property
- In binding function:
- Get PlayerRef → Get CurrentAmmo, ReserveAmmo
- Format Text with both values
- Return formatted string
Figure: Different ammo counter layout options.
Low Ammo Warning
Communicate urgency when ammo is low:
Color Change:
- Bind the text color property
- If CurrentAmmo <= 5: Return Red
- If CurrentAmmo <= 10: Return Yellow
- Else: Return White
Visibility: Show/hide a warning icon based on ammo level:
- Add a warning icon Image widget
- Bind Visibility property
- Return Visible if ammo low, Collapsed otherwise
Multiple Resource Types
Games often have multiple resources—health, mana, stamina, ammo types. Create a reusable resource display component:
- Create
WBP_ResourceDisplayUser Widget - Add exposed variables:
ResourceName(Text)ResourceIcon(Texture 2D)ResourceColor(Slate Color)CurrentValue(Float)MaxValue(Float)
- Design with icon, progress bar, and text
- Bind internal widgets to exposed variables
- Reuse for health, mana, stamina, experience, etc.
Objective and Status Text
Beyond numeric values, HUDs often show text that changes based on game state:
Current Objective:
"Find the key" → "Open the door" → "Escape the building"Status Messages:
"Wave 3 of 10" | "Boss Health: 45%" | "Time: 2:30"For text that changes infrequently, event-driven updates are better than bindings:
- Create a function in your HUD widget:
SetObjectiveText(Text) - This function sets the Text Block's text directly
- Call this function from game logic when objectives change
- No per-frame binding overhead
flowchart LR
    subgraph Game["Game Logic"]
        A["Player picks up key"] --> B["Update Objective"]
    end

    subgraph HUD["HUD Widget"]
        C["SetObjectiveText()"] --> D["Text Block
Updated"]
    end

    B -->|"Call Function"| C

    style A fill:#4CAF50,color:#fff
    style B fill:#667eea,color:#fff
    style C fill:#667eea,color:#fff
    style D fill:#FF9800,color:#fff
Figure: Event-driven updates—game logic directly updates HUD when needed.
Timer Display
Countdown timers need special formatting:
- Store time as float (seconds remaining)
- In binding or update:
- Calculate minutes:
Floor(Time / 60) - Calculate seconds:
Floor(Time % 60) - Format:
Format Text "{0}:{1}" - Pad seconds with zero if needed: "2:05" not "2:5"
- Calculate minutes:
✅ Time Formatting Blueprint
For "MM:SS" format:
Minutes = Floor(TotalSeconds / 60)
Seconds = Floor(TotalSeconds % 60)
// Pad seconds: if Seconds < 10, prepend "0"
Format Text: "{0}:{1}" where {1} is padded
Hands-On: Complete Player HUD
Let's build a complete player HUD that displays health, ammo, and an objective tracker. This exercise ties together everything we've learned about data binding and dynamic updates.
🎯 Exercise Goal
Create a player HUD with: a health bar (top-left) that changes color based on health level, an ammo counter (bottom-right) with low ammo warning, and an objective text display (top-center). All elements update in real-time from character data.
Step 1: Set Up Character Variables
First, ensure your character has the necessary data. Open your Character Blueprint and add:
Health Variables:
CurrentHealth(Float) — Default: 100MaxHealth(Float) — Default: 100
Ammo Variables:
CurrentAmmo(Integer) — Default: 30MaxAmmo(Integer) — Default: 30ReserveAmmo(Integer) — Default: 90
Helper Functions:
- Create
GetHealthPercentfunction:- Return type: Float
- Logic: Return CurrentHealth / MaxHealth
Test Functions (for debugging):
- Create
TakeDamage(Input: Float Amount):- CurrentHealth = Clamp(CurrentHealth - Amount, 0, MaxHealth)
- Create
UseAmmo:- If CurrentAmmo > 0: CurrentAmmo = CurrentAmmo - 1
Step 2: Create the HUD Widget
- Right-click in Content Browser → User Interface → Widget Blueprint
- Name it
WBP_PlayerHUD - Open it in the Widget Editor
Step 3: Set Up Root Structure
- Add a Canvas Panel as the root (this is default)
- The Canvas Panel allows free positioning with anchors
Step 4: Create the Health Bar Section (Top-Left)
- Add a Vertical Box to Canvas Panel
- Rename it to
HealthSection - Set anchors to Top-Left
- Set Position: X: 30, Y: 30
- Set Size: X: 250, Y: 60
Inside HealthSection, add:
- Text Block — Name:
HealthLabel- Text: "HEALTH"
- Font Size: 14
- Color: White with slight transparency (0.8 alpha)
- Overlay — Name:
HealthBarContainer- Inside, add Image (Background): Color #1a1a1a
- Inside, add Progress Bar: Name
HealthBar
- Text Block — Name:
HealthText- Text: "100 / 100" (placeholder)
- Font Size: 12
- Justification: Right
Figure: Health section positioned in top-left corner.
Step 5: Create the Ammo Counter (Bottom-Right)
- Add a Vertical Box to Canvas Panel
- Rename it to
AmmoSection - Set anchors to Bottom-Right
- Set Position: X: -30, Y: -30 (negative because anchored to right/bottom)
- Set Alignment: X: 1.0, Y: 1.0 (aligns right edge to anchor)
- Set Size: X: 150, Y: 70
Inside AmmoSection, add:
- Text Block — Name:
AmmoLabel- Text: "AMMO"
- Font Size: 12
- Justification: Right
- Horizontal Box — Name:
AmmoDisplay- Inside, add Text Block — Name:
CurrentAmmoText- Text: "30"
- Font Size: 28, Bold
- Inside, add Text Block — Name:
AmmoSeparator- Text: " / "
- Font Size: 18
- Color: Gray
- Inside, add Text Block — Name:
ReserveAmmoText- Text: "90"
- Font Size: 18
- Color: Gray
- Inside, add Text Block — Name:
Step 6: Create Objective Display (Top-Center)
- Add a Vertical Box to Canvas Panel
- Rename it to
ObjectiveSection - Set anchors to Top-Center
- Set Position: X: 0, Y: 30
- Set Alignment: X: 0.5 (centers horizontally)
Inside ObjectiveSection, add:
- Text Block — Name:
ObjectiveLabel- Text: "OBJECTIVE"
- Font Size: 10
- Justification: Center
- Color: Yellow/Gold
- Text Block — Name:
ObjectiveText- Text: "Find the hidden key"
- Font Size: 16
- Justification: Center
- Check Is Variable
Figure: Complete HUD layout with health (top-left), objective (top-center), and ammo (bottom-right).
Step 7: Cache Player Reference
Switch to the Graph view:
- Create a variable
PlayerRef(type: your Character Blueprint class) - Add Event Construct node
- From Event Construct:
- Get Owning Player Pawn
- Cast to your Character class
- Set PlayerRef to the cast result
Step 8: Bind Health Bar Percent
- Switch to Designer, select
HealthBar(Progress Bar) - In Details, find Percent
- Click Bind → Create Binding
- In the binding function:
- Add Is Valid node for PlayerRef
- If valid: Call GetHealthPercent on PlayerRef, return result
- If not valid: Return 1.0
Figure: Binding function with validity check and fallback.
Step 9: Bind Health Bar Color
- Select
HealthBar, find Fill Color and Opacity - Click Bind → Create Binding
- In the binding function:
- Get health percent from PlayerRef
- Use Select node or branches:
- If percent > 0.6: Return Green (0.3, 0.69, 0.31)
- Else if percent > 0.3: Return Yellow (1.0, 0.76, 0.03)
- Else: Return Red (0.96, 0.26, 0.21)
Step 10: Bind Health Text
- Select
HealthText, bind the Text property - In the binding function:
- Get CurrentHealth and MaxHealth from PlayerRef
- Round CurrentHealth to integer
- Use Format Text: "{0} / {1}"
- Return the formatted text
Step 11: Bind Ammo Display
- Select
CurrentAmmoText, bind Text:- Get CurrentAmmo from PlayerRef
- Convert to Text, return
- Select
ReserveAmmoText, bind Text:- Get ReserveAmmo from PlayerRef
- Convert to Text, return
Step 12: Bind Ammo Color (Low Ammo Warning)
- Select
CurrentAmmoText, bind Color and Opacity - In the binding function:
- Get CurrentAmmo from PlayerRef
- If CurrentAmmo <= 5: Return Red
- Else if CurrentAmmo <= 10: Return Yellow
- Else: Return White
Step 13: Create Objective Update Function
For the objective text, we'll use event-driven updates:
- In the Graph, create a new function
SetObjective - Add input parameter:
NewObjective(Text) - In the function:
- Get reference to ObjectiveText (drag from Hierarchy)
- Call
Set Texton ObjectiveText - Connect NewObjective to the text input
Now game logic can call this function to update the objective.
Step 14: Display the HUD
Open your Player Controller Blueprint:
- Create variable
PlayerHUD(type: WBP_PlayerHUD) - On Event BeginPlay:
- Create Widget (class: WBP_PlayerHUD)
- Add to Viewport
- Set PlayerHUD variable to the created widget
Step 15: Test with Debug Keys
Add test inputs to verify everything works:
- In Character Blueprint, on keyboard H pressed: Call TakeDamage(10)
- On keyboard J pressed: Call TakeDamage(-10) (heal)
- On keyboard K pressed: Call UseAmmo
Play the game and press these keys to see the HUD update!
✅ Exercise Complete!
You've built a complete player HUD with:
- Health bar with dynamic fill and color based on health level
- Health text showing current/max values
- Ammo counter with current and reserve display
- Low ammo color warning
- Objective text that can be updated from game logic
- Proper anchoring for different screen positions
- Cached player reference for performance
This HUD pattern scales to any game—add more sections as needed!
Troubleshooting
⚠️ Common Issues
Health bar doesn't update:
- Check that PlayerRef is being set on Event Construct
- Verify the binding function is returning the correct value
- Make sure GetHealthPercent function exists on your character
Values show as 0 or empty:
- Check Is Valid before accessing PlayerRef
- Verify character variables have default values set
- Ensure Cast To is using correct character class
HUD doesn't appear:
- Verify Player Controller is set in Game Mode
- Check that Add to Viewport is connected
- Ensure widget has visible content (not all collapsed)
Position is wrong:
- Check anchor settings match intended corner
- For right/bottom anchors, use negative position values
- Set Alignment to match anchor (1.0 for right/bottom)
Bonus Challenges
- Smooth Health Animation: Instead of instant updates, lerp the health bar fill over 0.2 seconds
- Damage Flash: Flash the health bar red briefly when taking damage
- Ammo Reload: Add reload functionality and show reload progress
- Minimap: Add a minimap in the corner using a Render Target
- Crosshair: Add a centered crosshair that changes when aiming at enemies
- Damage Numbers: Spawn floating damage numbers when the player takes damage
Summary
In this lesson, you've learned how to create HUD elements that respond to real game data. Your UI is no longer static—it reflects the actual state of your game in real-time, providing players with the information they need to play effectively.
Key Concepts
Data Binding: Connects widget properties to data sources. Function bindings are called every frame and work well for frequently changing data like health. Event-driven updates are more efficient for infrequent changes like objectives.
Binding Functions: Return the appropriate type for the property being bound. Text properties need Text/String, Percent needs Float (0-1), Color needs Slate Color. Always validate references before using them.
Caching References: Store references to frequently accessed objects (like the player character) in variables during Event Construct. This avoids expensive lookups every frame in binding functions.
Health Bars: Use Progress Bar widgets with Percent bound to a health ratio (current/max). Color bindings can change the bar from green to yellow to red based on health level. Text displays can show exact values.
Ammo Counters: Text-based displays showing current/reserve or current/magazine. Color changes indicate low ammo warnings. Use Format Text for combining multiple values.
Event-Driven Updates: For data that changes infrequently (objectives, status messages), create functions that update widgets directly. Call these functions from game logic when changes occur.
Value Formatting: Use To Text nodes with formatting options for numbers. Format Text combines values with labels. Time displays need special handling (minutes/seconds calculation).
Data Binding Quick Reference
| Property Type | Return Type | Example Use |
|---|---|---|
| Text | Text or String | Health text, ammo count, objective |
| Percent | Float (0.0 - 1.0) | Progress bar fill amount |
| Color and Opacity | Slate Color / Linear Color | Dynamic color based on value |
| Visibility | ESlateVisibility | Show/hide warning icons |
| Is Enabled | Boolean | Enable/disable buttons |
Common HUD Elements
| Element | Widget(s) | Binding Approach |
|---|---|---|
| Health Bar | Progress Bar + Text | Function binding (frequent updates) |
| Ammo Counter | Text Blocks | Function binding |
| Stamina/Mana Bar | Progress Bar | Function binding |
| Objective Text | Text Block | Event-driven (infrequent) |
| Score/Points | Text Block | Event-driven |
| Timer | Text Block | Function binding with formatting |
| Minimap | Image (Render Target) | Scene Capture Component |
Best Practices
- Cache references: Store frequently accessed objects (player, game state) in variables during Event Construct
- Validate before use: Always check Is Valid before accessing cached references in bindings
- Choose binding wisely: Use function bindings for frequent changes, event-driven for rare changes
- Keep bindings simple: Complex logic in binding functions runs every frame—move complexity elsewhere
- Provide fallbacks: Return sensible default values when references are invalid
- Use visual feedback: Color changes, animations, and icons communicate urgency better than numbers alone
- Test at extremes: Verify HUD looks correct at 0%, 50%, and 100% of values
- Consider performance: Many bound widgets add up—profile if you have performance concerns
Figure: Data flows from game systems through binding functions to widget properties displayed on screen.
What's Next?
With your HUD displaying real-time game data, the next lesson covers Menus and Navigation. You'll learn how to create main menus, pause screens, and settings interfaces. We'll cover menu navigation with keyboard/gamepad, widget focus, and transitioning between menu screens. Menus are where UI meets game flow control!
Knowledge Check
Question 1
What value range should a binding function return for a Progress Bar's Percent property?
Correct answer: B — Progress Bar Percent expects a float from 0.0 (empty) to 1.0 (full). If your health is stored as 0-100, divide by max health to get the 0-1 ratio: CurrentHealth / MaxHealth.
Question 2
Why should you cache the player reference in a variable instead of getting it every frame in binding functions?
Correct answer: B — While Get Player Character works, calling it every frame in multiple binding functions adds unnecessary overhead. Caching the reference once on Event Construct means binding functions just access a variable, which is much faster.
Question 3
When is event-driven updating better than function binding for HUD elements?
Correct answer: B — Event-driven updates are more efficient for data that changes infrequently. Objective text might change once every few minutes—there's no need to check it 60 times per second. Instead, update the widget directly when the objective changes.
Question 4
What should a binding function return if the cached player reference is not valid?
Correct answer: C — Always provide a fallback value. For health percent, return 1.0 (full bar) as fallback. For text, return a placeholder. This prevents errors and keeps the UI functional even if something goes wrong temporarily.
Question 5
How can you make a health bar change color based on health level?
Correct answer: B — Create a binding for the Fill Color and Opacity property. The function checks health percent and returns green (>60%), yellow (>30%), or red (≤30%). This provides instant visual feedback about health urgency.
Question 6
What widget event is best for caching the player reference when the HUD widget is created?
Correct answer: C — Event Construct fires when the widget is created and initialized, making it the ideal place to cache references. Event Pre Construct fires earlier but the widget isn't fully set up yet. Event Tick would cache every frame, defeating the purpose.
Question 7
To display a timer as "2:05" (minutes:seconds), what calculation do you need?
Correct answer: B — Minutes is the integer division (Floor of seconds/60). Remaining seconds is the modulo (seconds % 60). Then format as text, padding seconds with a leading zero if less than 10 to get "2:05" instead of "2:5".