🎮 Enhanced Input System
The Enhanced Input System is Unreal Engine 5's modern approach to handling player input. It replaces the older input system with a more flexible, data-driven architecture that makes it easy to support multiple input devices, remap controls, and create complex input behaviors. Whether players use keyboard and mouse, gamepad, or touch controls, Enhanced Input provides a unified way to handle all of them. In this lesson, you'll learn how to create Input Actions, configure Input Mapping Contexts, and bind input to your Blueprints.
🎯 Learning Objectives
By the end of this lesson, you will be able to:
- Explain the advantages of Enhanced Input over the legacy system
- Create Input Actions for different types of player input
- Configure Input Mapping Contexts to bind keys to actions
- Distinguish between digital and axis-based inputs
- Apply Input Modifiers and Triggers for advanced behavior
- Set up complete WASD movement with keyboard and gamepad support
Estimated Time: 50-60 minutes
Prerequisites: Lesson 6.1 (Player Controllers and Pawns)
In This Lesson
Why Enhanced Input?
Before UE5, Unreal used a simpler input system where you defined "Action Mappings" and "Axis Mappings" directly in Project Settings. While functional, this approach had limitations. The Enhanced Input System addresses these issues with a more powerful, flexible architecture.
Problems with the Legacy System
The old input system had several pain points:
Hardcoded Bindings: Key bindings were defined in project settings, making it difficult to change them at runtime or let players customize controls.
Limited Input Types: Actions were either digital (pressed/released) or axis (continuous values), with limited flexibility for complex input patterns.
Device Agnostic Challenges: Supporting multiple input devices (keyboard + gamepad + touch) required manual work and often duplicated logic.
No Input Processing: You couldn't easily modify input values (like dead zones, sensitivity curves) without custom code.
Enhanced Input Advantages
The Enhanced Input System solves these problems:
Data-Driven Design: Input Actions and Mapping Contexts are assets you create in the Content Browser. They can be modified, swapped, and extended without changing code.
Flexible Value Types: Actions can output booleans, floats, 2D vectors, or 3D vectors—whatever makes sense for the action.
Modifiers and Triggers: Built-in systems to process input values (dead zones, sensitivity, swizzle axes) and control when actions fire (press, release, hold, tap).
Context Switching: Different Mapping Contexts for different gameplay states (on foot, in vehicle, in menu). Switch contexts instantly.
Runtime Remapping: Players can remap controls without restarting. The system handles saving and loading preferences.
Figure: Enhanced Input provides a more flexible, data-driven approach to handling player input.
The Enhanced Input Architecture
Enhanced Input separates input handling into distinct components:
Input Actions: Define what can happen. "Jump," "Move," "Fire," "Interact." Each action specifies its value type (digital, axis, 2D, 3D).
Input Mapping Contexts: Define how actions are triggered. Map specific keys/buttons to actions. Different contexts for different situations.
Modifiers: Process input values before they reach your game. Dead zones, sensitivity curves, axis inversion, value clamping.
Triggers: Define when actions fire. On press, on release, while held, on tap, on hold for duration.
flowchart LR
    A["🎮 Physical Input
(Key/Button)"] --> B["Input Mapping
Context"]
    B --> C["Input Action"]
    C --> D["Modifiers
(Dead Zone, etc.)"]
    D --> E["Triggers
(Press/Hold/etc.)"]
    E --> F["Blueprint Event
(Your Code)"]

    style A fill:#e3f2fd,color:#333
    style B fill:#fff3e0,color:#333
    style C fill:#667eea,color:#fff
    style D fill:#9C27B0,color:#fff
    style E fill:#FF9800,color:#fff
    style F fill:#4CAF50,color:#fff
Figure: Input flows from physical device through Mapping Context, Action, Modifiers, and Triggers to your Blueprint.
✅ Default in UE5
Enhanced Input is enabled by default in new UE5 projects. The Third Person and First Person templates use Enhanced Input for movement and camera controls. If you're working with an older project, you may need to enable the Enhanced Input plugin (Edit → Plugins → Enhanced Input).
Input Actions
Input Actions are data assets that define what the player can do. They don't specify which key triggers them—that's the Mapping Context's job. Actions define the type of input and what value it produces.
Creating an Input Action
To create an Input Action:
- In Content Browser, right-click
- Select Input → Input Action
- Name it descriptively with "IA_" prefix (e.g.,
IA_Jump,IA_Move) - Double-click to open and configure
Input Action Settings
The most important setting is Value Type:
Digital (Bool): True or false. Perfect for buttons: jump, fire, interact, pause. Outputs true when pressed, false when released.
Axis1D (Float): A single floating-point value, typically -1 to 1. Good for throttle, zoom, single-axis movement. Can represent analog trigger pressure.
Axis2D (Vector2D): Two floating-point values (X, Y). Ideal for movement (forward/back + left/right) or camera look (yaw + pitch). Joysticks naturally output 2D.
Axis3D (Vector): Three floating-point values (X, Y, Z). Used for VR motion controllers or other 3D input devices. Less common in traditional games.
Figure: Choose the Value Type that matches what your action needs to output.
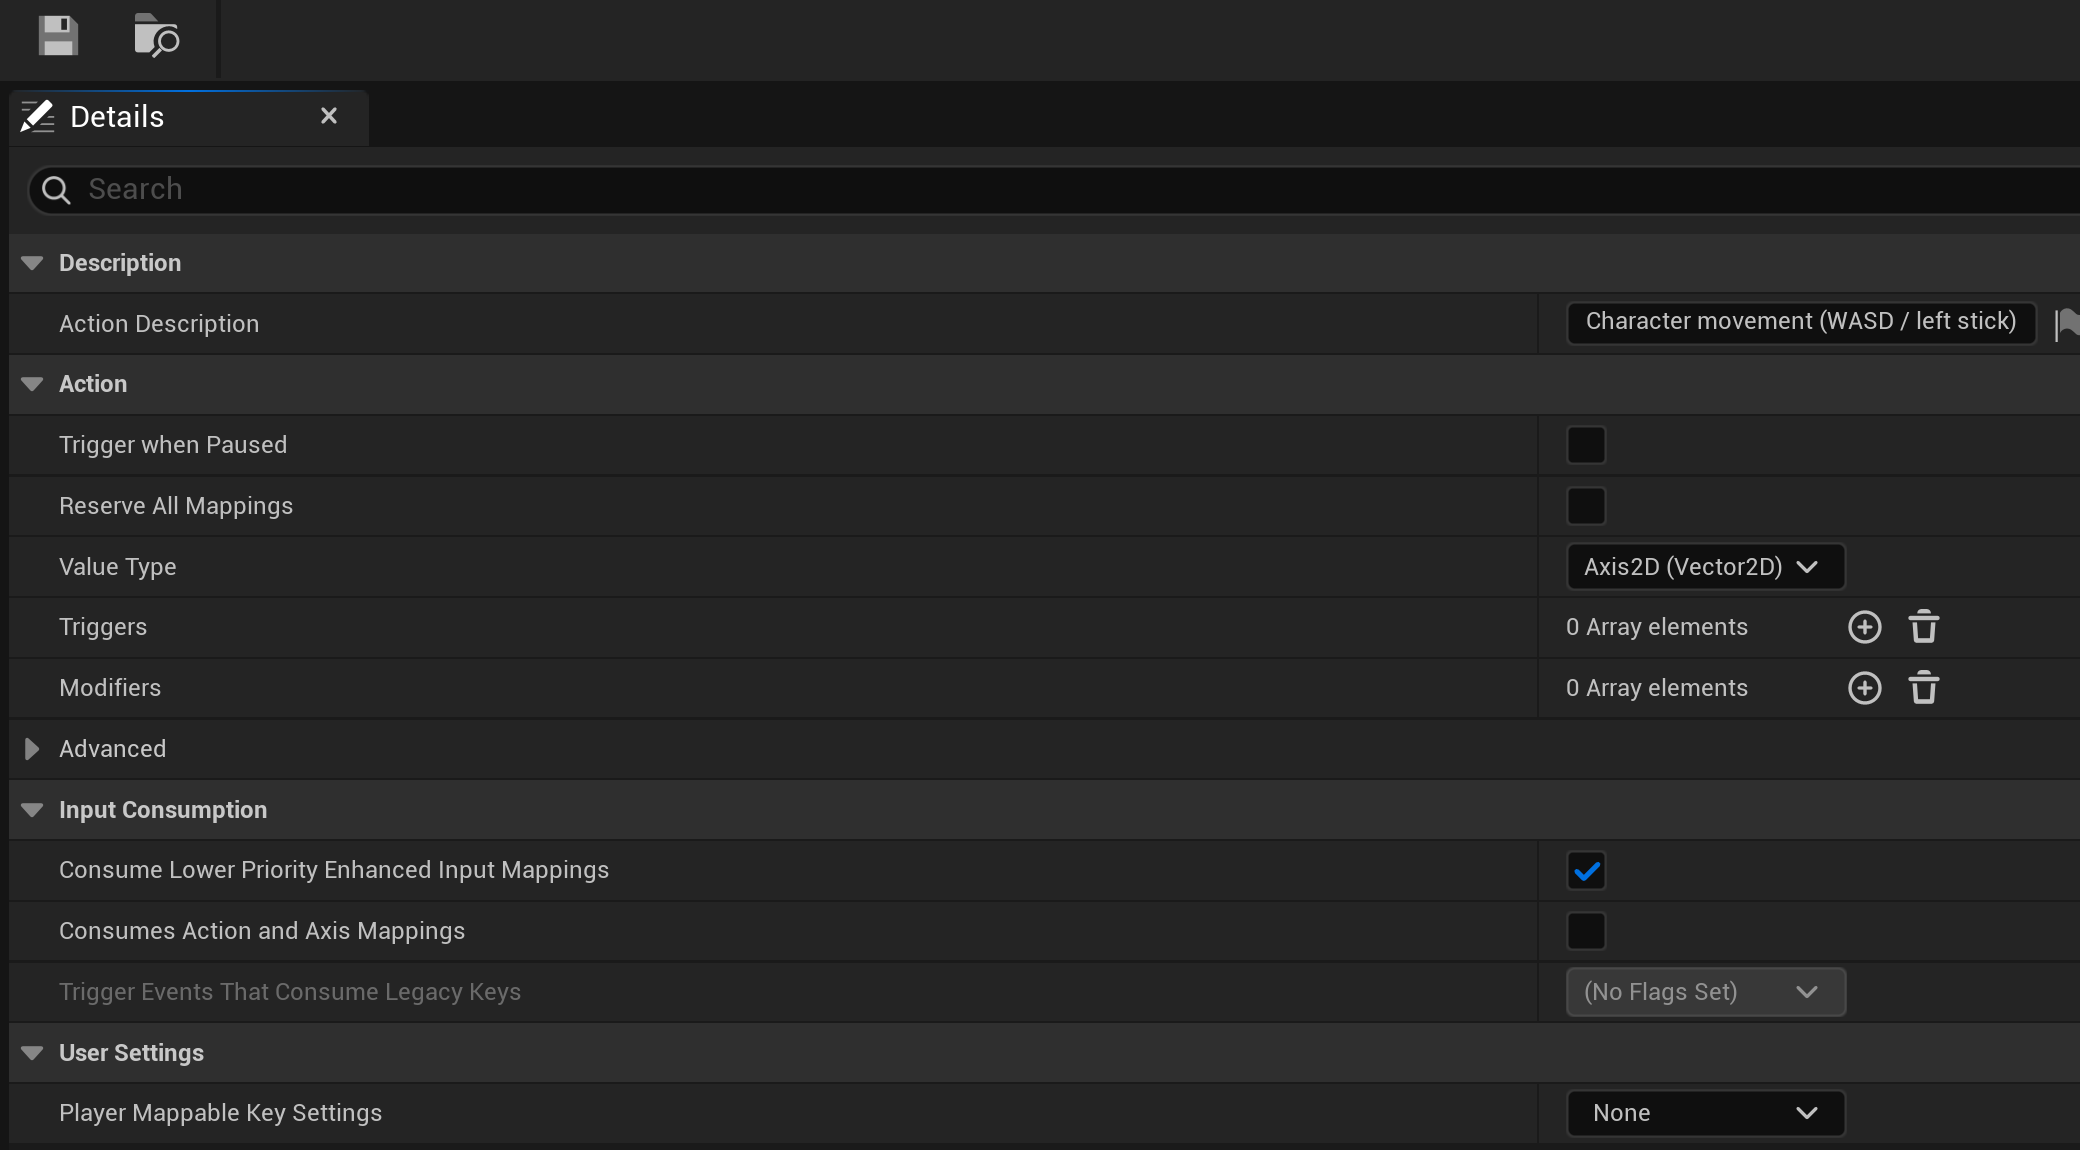
Figure: The real Input Action editor (UE 5.8) · Value Type is set here (Axis2D for IA_Move). The Action group also carries per-action Triggers and Modifiers, and Input Consumption controls whether the action blocks lower-priority mappings.
Common Input Actions
Here are typical Input Actions for a third-person game:
| Action Name | Value Type | Description |
|---|---|---|
IA_Move |
Axis2D | Character movement (WASD / left stick) |
IA_Look |
Axis2D | Camera control (mouse / right stick) |
IA_Jump |
Digital | Jump action (Space / A button) |
IA_Sprint |
Digital | Sprint modifier (Shift / left stick click) |
IA_Interact |
Digital | Interact with objects (E / X button) |
IA_Fire |
Digital | Attack / shoot (Left click / right trigger) |
💡 Naming Convention
Use the IA_ prefix for Input Actions (e.g., IA_Jump) and IMC_ for Input Mapping Contexts (e.g., IMC_Default). This makes assets easy to find in the Content Browser and clearly identifies their purpose.
Other Action Settings
Beyond Value Type, Input Actions have additional settings:
Consume Input: When true (default), this action consumes the input so lower-priority actions can't use it. Disable to allow multiple actions to share the same key.
Triggers: Can define default triggers directly on the action (though usually done in Mapping Context).
Modifiers: Can define default modifiers directly on the action (though usually done in Mapping Context).
For most cases, you'll just set the Value Type and leave other settings at defaults.
Input Mapping Contexts
Input Mapping Contexts connect physical inputs (keys, buttons, sticks) to Input Actions. They define which keys trigger which actions, and can include modifiers and triggers for each mapping. You can have multiple contexts and switch between them based on gameplay state.
Creating a Mapping Context
- In Content Browser, right-click
- Select Input → Input Mapping Context
- Name it with "IMC_" prefix (e.g.,
IMC_Default,IMC_Vehicle) - Double-click to open and configure
Adding Mappings
Inside the Mapping Context editor:
- Expand Default Key Mappings, then click the + next to its Mappings array
- Select an Input Action from the dropdown
- Expand the action to see its mappings
- Click + to add a key/button mapping
- Select the key or button from the dropdown
- Add Modifiers and Triggers as needed
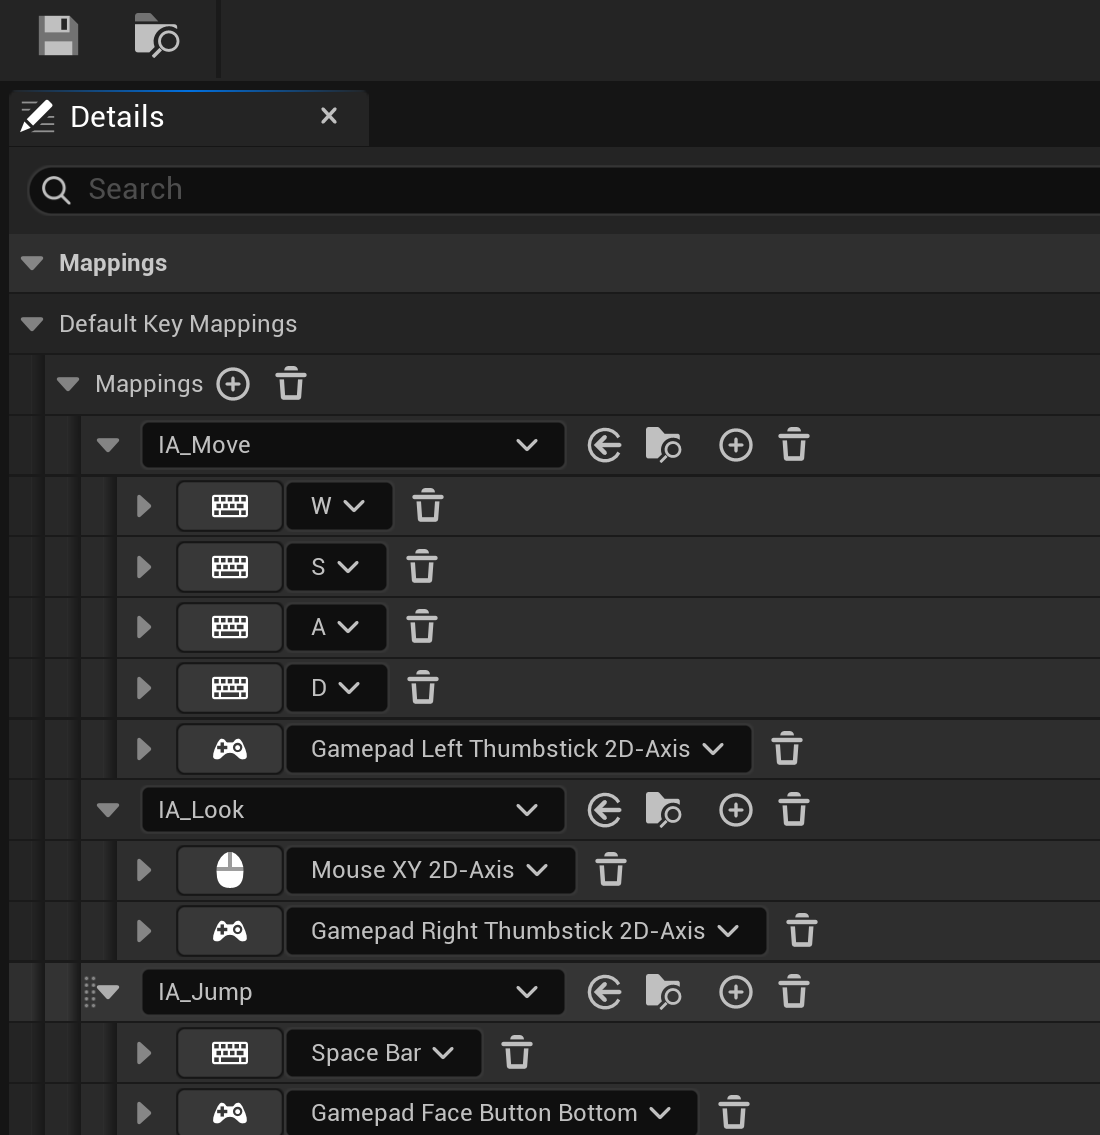
Figure: The real Input Mapping Context editor in UE 5.8 · each Input Action groups its key bindings. IA_Move maps W, A, S, D and the Gamepad Left Thumbstick; IA_Look maps Mouse XY and the Right Thumbstick; IA_Jump maps Space Bar and the Gamepad Face Button. Expand any key row to attach Modifiers and Triggers.
Multiple Key Bindings
Each action can have multiple key bindings. This lets you support different input devices in one context:
IA_Move: W/A/S/D keys AND left gamepad stickIA_Jump: Space key AND gamepad A buttonIA_Fire: Left mouse AND right trigger
When any bound input is activated, the action fires. This makes your game automatically support multiple input devices without extra code.
WASD to Axis2D Mapping
Mapping four discrete keys (W, A, S, D) to a 2D axis requires modifiers to combine them properly:
W Key: Produces +Y (forward). Modifier: Swizzle Input Axis Values (set to YXZ to put the value in Y)
S Key: Produces -Y (backward). Modifiers: Swizzle + Negate
A Key: Produces -X (left). Modifier: Negate
D Key: Produces +X (right). No modifier needed
The system combines these into a single Vector2D value representing the movement direction.
Figure: Four discrete keys combine into a single 2D vector for movement direction.
Context Switching
You can create different Mapping Contexts for different gameplay states:
IMC_OnFoot— Walking character controlsIMC_Vehicle— Driving controls (accelerate, brake, steer)IMC_Menu— Menu navigation (confirm, cancel, navigate)IMC_Swimming— Swimming controls (different movement feel)
In Blueprints, you add/remove mapping contexts from the player's Enhanced Input Local Player Subsystem. When you remove one context and add another, the control scheme changes instantly.
⚠️ Context Priority
When adding a Mapping Context, you specify a priority. Higher priority contexts take precedence when the same key is mapped in multiple contexts. For example, if Space is "Jump" in IMC_OnFoot and "Boost" in IMC_Vehicle, the active context with higher priority wins.
Modifiers and Triggers
Modifiers transform input values before they reach your game. Triggers control when an action fires. Together, they provide powerful control over input behavior without writing custom code.
Input Modifiers
Modifiers process the raw input value and output a modified value. They're applied in order, so the output of one becomes the input of the next.
Common Modifiers
Dead Zone: Ignores small stick movements near the center. Essential for analog sticks that may not rest perfectly at zero. Set inner and outer dead zone thresholds.
Negate: Multiplies the value by -1. Used to invert axes (e.g., S key produces negative Y instead of positive).
Swizzle Input Axis Values: Rearranges axis components. Used when a single key needs to affect a specific axis of a 2D/3D value. Options: YXZ, ZXY, XZY, etc.
Scalar: Multiplies the input by a constant. Useful for sensitivity adjustments. A scalar of 2.0 doubles the input value.
Smooth: Applies smoothing over time to reduce jitter. Good for mouse input that feels too twitchy.
Response Curve - Exponential: Applies an exponential curve to the input. Makes small movements more precise while preserving full range for large movements.
Figure: Common modifiers transform input values. They can be chained together in sequence.
Input Triggers
Triggers define the conditions under which an action fires. By default, actions fire continuously while input is active. Triggers let you specify more precise behavior.
Common Triggers
Down: Fires continuously while the input is active (default behavior). Good for movement, aiming.
Pressed: Fires once when input first becomes active. The classic "on press" event. Good for jump, interact, single actions.
Released: Fires once when input becomes inactive. Good for "charge and release" mechanics.
Hold: Fires after input has been held for a specified duration. Good for "hold to interact" or "hold to charge."
Hold and Release: Fires when released, but only if held for minimum duration. Combines hold requirement with release timing.
Tap: Fires if input is pressed and released quickly (under threshold). Good for quick-time events or distinguishing tap from hold.
Pulse: Fires repeatedly at specified intervals while input is held. Good for auto-fire weapons.
Figure: Different triggers control when and how actions fire based on input timing.
Combining Modifiers and Triggers
Each key mapping in a Mapping Context can have its own set of modifiers and triggers. This gives you precise control:
Example: Sprint Toggle
- Action:
IA_Sprint(Digital) - Key: Left Shift
- Trigger:
Pressed— fires once to toggle sprint on - Another mapping with
Releasedtrigger could toggle it off
Example: Gamepad Look with Dead Zone and Sensitivity
- Action:
IA_Look(Axis2D) - Key: Gamepad Right Stick
- Modifier 1:
Dead Zone(inner: 0.2, outer: 1.0) - Modifier 2:
Scalar(value: 2.5 for sensitivity) - Trigger:
Down(continuous while held)
✅ Modifier Order Matters
Modifiers are applied in the order they appear. For gamepad input, apply Dead Zone first (to eliminate drift), then Scalar (for sensitivity). If you scaled first, you'd amplify the drift before removing it!
Per-Action vs. Per-Mapping Configuration
You can add modifiers and triggers in two places:
On the Input Action asset: These become defaults for all mappings that use this action. Good for behavior that should always apply.
On individual mappings in the Mapping Context: These override or extend the action's defaults. Good for device-specific adjustments (e.g., dead zone only for gamepad, not keyboard).
Per-mapping configuration is more common because different devices need different processing.
Binding Input to Blueprints
Once you've created Input Actions and Mapping Contexts, you need to connect them to your Blueprint logic. This involves two steps: adding the Mapping Context to the player, and responding to Input Action events.
Adding the Mapping Context
Before Input Actions will work, you must add your Mapping Context to the player's Enhanced Input system. This is typically done in the Player Controller or Pawn's BeginPlay event.
In a Character/Pawn Blueprint:
- Open the Event Graph
- Add an
Event BeginPlaynode - Drag from it and search for
Get Controller - Cast the result to
PlayerController - From the cast output, search for
Get Enhanced Input Local Player Subsystem - From the subsystem, call
Add Mapping Context - Set the Mapping Context to your IMC asset
- Set Priority (0 is fine for default context)
Figure: Blueprint flow to add a Mapping Context when the game starts.
Responding to Input Actions
With the Mapping Context added, you can now respond to Input Action events in your Blueprint:
- In the Event Graph, right-click
- Search for the action name (e.g., "IA_Jump")
- Select
Enhanced Action Events → IA_Jump - Choose the event type:
Triggered,Started,Ongoing,Canceled, orCompleted
Event Types Explained
Started: Fires when the action first triggers (input begins).
Triggered: The main event—fires according to the trigger rules. Most commonly used.
Ongoing: Fires every frame while action is active. Useful for continuous updates.
Canceled: Fires if the action is interrupted before completing (e.g., released before hold duration met).
Completed: Fires when the action successfully completes its trigger condition.
For simple cases, Triggered is usually what you want.
Figure: The Enhanced Input Action event provides the action value and elapsed time.
Using Action Values
The Action Value output pin provides the processed input value. Its type depends on the Input Action's Value Type:
For Digital (Bool): The value is true when triggered. You typically just care that the event fired.
For Axis1D (Float): The value ranges from -1 to 1. Use directly for things like throttle.
For Axis2D (Vector2D): Break the vector to get X and Y components. Use for movement direction.
Example: Movement from Axis2D
- Get the
Action ValuefromIA_Move Triggeredevent - The value type is
Input Action Value—right-click and "Get Action Value As..." → "Get Action Value 2D" - This gives you a Vector2D
- Use X for right/left movement, Y for forward/back
- Feed into
Add Movement Inputwith appropriate direction vectors
💡 Character Movement Pattern
For third-person movement, you typically:
- Get the input vector from IA_Move
- Get the controller's forward/right vectors (rotation)
- Combine input with rotation to get world-space movement direction
- Call
Add Movement Inputwith that direction
The Third Person template shows this pattern in action.
Switching Mapping Contexts
To change control schemes (e.g., entering a vehicle), remove one context and add another:
- Get the Enhanced Input Local Player Subsystem (same as before)
- Call
Remove Mapping Contextwith the old context - Call
Add Mapping Contextwith the new context
This instantly swaps the controls. The old bindings stop working; the new bindings take over.
sequenceDiagram
    participant P as Player
    participant BP as Blueprint
    participant EIS as Enhanced Input Subsystem

    Note over BP,EIS: Initial State: IMC_OnFoot active
    P->>BP: Press "Enter Vehicle"
    BP->>EIS: Remove Mapping Context (IMC_OnFoot)
    BP->>EIS: Add Mapping Context (IMC_Vehicle)
    Note over BP,EIS: Now: IMC_Vehicle active

    P->>BP: Press "Exit Vehicle"
    BP->>EIS: Remove Mapping Context (IMC_Vehicle)
    BP->>EIS: Add Mapping Context (IMC_OnFoot)
    Note over BP,EIS: Back to: IMC_OnFoot
Figure: Switching Mapping Contexts changes the active control scheme instantly.
Hands-On: Set Up WASD Movement
Let's put everything together by creating a complete movement system from scratch. We'll create Input Actions, configure a Mapping Context with keyboard and gamepad support, and wire it up in a Character Blueprint.
🎯 Exercise Goal
Create WASD movement and mouse look controls using the Enhanced Input System. Support both keyboard/mouse and gamepad input. Understand the complete flow from physical input to character movement.
Step 1: Create a New Project or Use Existing
You can either:
- Create a new Third Person project (already has Enhanced Input set up—examine it)
- Create a new Blank project to build from scratch (we'll do this)
For learning, let's start with a Blank project:
- Create a new Blank project with Blueprint, Starter Content
- Let it load completely
Step 2: Create Input Actions
First, create the Input Actions we need:
Create IA_Move:
- In Content Browser, right-click → Input → Input Action
- Name it
IA_Move - Double-click to open
- Set Value Type to
Axis2D (Vector2D) - Save and close
Create IA_Look:
- Right-click → Input → Input Action
- Name it
IA_Look - Set Value Type to
Axis2D (Vector2D) - Save and close
Create IA_Jump:
- Right-click → Input → Input Action
- Name it
IA_Jump - Set Value Type to
Digital (bool)(default) - Save and close
✅ Checkpoint
You should now have three Input Action assets in your Content Browser: IA_Move, IA_Look, and IA_Jump. These define what can happen but not which keys trigger them.
Step 3: Create Input Mapping Context
- Right-click → Input → Input Mapping Context
- Name it
IMC_Default - Double-click to open
Now add mappings for each action:
Map IA_Move (WASD + Gamepad)
- Click + next to "Mappings"
- Select
IA_Move - Expand IA_Move to see its mappings
Add W key (forward):
- Click + to add a mapping
- Click the key dropdown, select
W - Click + next to Modifiers
- Add
Swizzle Input Axis Values— set Order toYXZ - This puts the input into the Y axis (forward/back)
Add S key (backward):
- Click + to add another mapping
- Select
S - Add Modifier:
Swizzle Input Axis Values→YXZ - Add Modifier:
Negate(makes it negative Y)
Add A key (left):
- Add mapping for
A - Add Modifier:
Negate(negative X = left)
Add D key (right):
- Add mapping for
D - No modifiers needed (positive X = right)
Add Gamepad Left Stick:
- Add mapping, select
Gamepad Left Thumbstick 2D-Axis - Add Modifier:
Dead Zone - Set Lower Threshold to
0.2
Figure: Complete IA_Move mapping with WASD keys and gamepad stick.
Map IA_Look (Mouse + Gamepad)
- Click + next to Mappings, select
IA_Look - Add mapping:
Mouse XY 2D-Axis— no modifiers needed - Add mapping:
Gamepad Right Thumbstick 2D-Axis - Add Modifier to gamepad:
Dead Zone(Lower: 0.2) - Optional: Add
Scalarmodifier for sensitivity (e.g., 2.0)
Map IA_Jump (Space + Gamepad)
- Click +, select
IA_Jump - Add mapping:
Space Bar - Add mapping:
Gamepad Face Button Bottom(A on Xbox, X on PlayStation)
Save the Mapping Context.
Step 4: Create a Character Blueprint
- Right-click in Content Browser → Blueprint Class
- Select
Characteras parent - Name it
BP_PlayerCharacter - Double-click to open
Add a visual representation:
- In Components panel, select the Mesh component
- In Details, set Skeletal Mesh to a mannequin or any available mesh
- Or add a Static Mesh component (sphere/capsule) for visibility
Add a camera:
- Click Add Component →
Spring Arm - Attach it to the Capsule (drag onto Capsule in hierarchy)
- Set Target Arm Length to 300
- Enable Use Pawn Control Rotation
- Add a
Cameracomponent as child of Spring Arm
Step 5: Add Input Setup to Character
Open the Event Graph and create the input setup:
Add Mapping Context on BeginPlay:
- Add
Event BeginPlay - Add
Get Controllernode - Add
Cast To PlayerController - From the cast result, add
Get Enhanced Input Local Player Subsystem - From the subsystem, add
Add Mapping Context - Set Mapping Context to
IMC_Default - Set Priority to 0
- Connect the execution wires
Step 6: Handle Movement Input
Add movement handling:
- Right-click → search "IA_Move" → select
EnhancedInputAction IA_Move - Choose the
Triggeredevent - From the
Action Valuepin, drag and selectGet Action Value 2D - This gives you X (right/left) and Y (forward/back) values
Calculate movement direction:
- Add
Get Control Rotationnode - Add
Break Rotatorto get Yaw - Add
Make Rotatorwith only Yaw (Pitch and Roll = 0) - Add
Get Forward Vectorfrom this rotator (for forward/back) - Add
Get Right Vectorfrom this rotator (for left/right)
Apply movement:
- Multiply Forward Vector by Input Y value
- Multiply Right Vector by Input X value
- Add the two vectors together
- Feed result into
Add Movement Input
Figure: Movement flow—input direction combined with camera rotation to move character.
Step 7: Handle Look Input
- Add
EnhancedInputAction IA_Look(Triggered) - Get Action Value 2D from Action Value
- Add
Add Controller Yaw Input— connect Input X - Add
Add Controller Pitch Input— connect Input Y (may need to negate for natural feel)
Step 8: Handle Jump Input
- Add
EnhancedInputAction IA_Jump(Triggered) - Add
Jumpnode (built into Character class) - Connect execution wire from IA_Jump to Jump
Step 9: Set Up Game Mode
- Create a new Blueprint: Blueprint Class → Game Mode Base
- Name it
BP_GameMode - Open it and in Details panel, set Default Pawn Class to
BP_PlayerCharacter - Go to Edit → Project Settings → Maps & Modes
- Set Default GameMode to
BP_GameMode
Step 10: Add a Player Start and Test
- In your level, add a Player Start actor
- Add a floor (Place Actors → Basic → Cube, scale to 10×10×0.1)
- Position Player Start above the floor
- Press Play
Test the controls:
- WASD should move the character
- Mouse should rotate the camera
- Space should make the character jump
- If you have a gamepad, test those inputs too
✅ Exercise Complete!
You've built a complete movement system using Enhanced Input from scratch. You understand how Input Actions define capabilities, Mapping Contexts bind keys, modifiers process values, and Blueprint events respond to input. This same pattern applies to any input in your game.
Troubleshooting Common Issues
⚠️ Input Not Working?
No movement at all:
- Check that Add Mapping Context is called in BeginPlay
- Verify the Mapping Context references the correct Input Actions
- Ensure Game Mode's Default Pawn is your character
Movement is backwards or sideways:
- Check Swizzle modifier settings (YXZ for forward/back)
- Check Negate modifiers (S and A should negate)
- Verify you're using Forward Vector for Y and Right Vector for X
Camera doesn't rotate:
- Enable "Use Pawn Control Rotation" on Spring Arm
- Disable "Use Controller Rotation Yaw/Pitch" on Character Movement
- Or enable them depending on your desired behavior
Gamepad not working:
- Connect gamepad before launching the game
- Check Dead Zone isn't too high (0.2 is reasonable)
- Verify gamepad mappings exist in the Mapping Context
Summary
In this lesson, you've mastered the Enhanced Input System—Unreal Engine 5's modern, data-driven approach to handling player input. This system provides the flexibility and power needed for professional game development while remaining accessible for beginners.
Key Concepts
Enhanced Input Architecture: Separates input handling into distinct components: Input Actions (what can happen), Input Mapping Contexts (how it's triggered), Modifiers (value processing), and Triggers (when it fires). This separation enables flexibility and reusability.
Input Actions: Data assets that define player capabilities like Move, Jump, Fire. Each action has a Value Type (Digital, Axis1D, Axis2D, Axis3D) that determines what kind of data it outputs.
Input Mapping Contexts: Connect physical inputs (keys, buttons, sticks) to Input Actions. Support multiple bindings per action for multi-device support. Can be swapped at runtime for different control schemes.
Modifiers: Transform input values before they reach your game. Dead Zone eliminates stick drift. Negate inverts values. Swizzle rearranges axes. Scalar adjusts sensitivity. Applied in sequence.
Triggers: Control when actions fire. Pressed for one-shot events. Down for continuous input. Hold for delayed activation. Tap for quick press detection. Pulse for auto-repeat.
Blueprint Integration: Add Mapping Context via the Enhanced Input Local Player Subsystem. Respond to Enhanced Input Action events. Use Action Value for the processed input data.
Best Practices
- Name consistently: Use IA_ prefix for Input Actions, IMC_ for Mapping Contexts
- Choose correct Value Type: Digital for buttons, Axis2D for movement/look, Axis1D for single-axis controls
- Apply Dead Zone to analog inputs: Always add Dead Zone to gamepad sticks
- Order modifiers correctly: Dead Zone → Scalar → Curve (process, then scale, then shape)
- Support multiple devices: Add keyboard AND gamepad mappings to the same action
- Use context switching: Create separate Mapping Contexts for different gameplay states
- Test with actual devices: Keyboard feel differs from gamepad—test both
Figure: Enhanced Input transforms raw hardware signals into game-ready events.
What's Next?
Now that you can receive and process player input, the next lesson focuses on Character Movement—diving deeper into the Character Movement Component to customize walking, running, jumping, and other movement behaviors. You'll learn how to tune movement parameters for different gameplay feels.
Knowledge Check
Question 1
What is an Input Action in the Enhanced Input System?
Correct answer: B — Input Actions are data assets that define player capabilities (like "Move" or "Jump") and specify a Value Type (Digital, Axis1D, Axis2D, Axis3D). They don't specify which keys trigger them—that's the Mapping Context's job.
Question 2
What Value Type should you use for an Input Action that handles character movement (forward/back and left/right)?
Correct answer: C — Movement typically requires two axes: X for left/right and Y for forward/back. Axis2D (Vector2D) provides both values in a single action, making it perfect for movement input from WASD keys or a gamepad stick.
Question 3
What is the purpose of the Dead Zone modifier?
Correct answer: C — Dead Zone ignores small input values near the center (zero) position. This is essential for analog sticks that may not rest perfectly at zero, preventing unwanted drift when the player isn't touching the stick.
Question 4
Which trigger type fires once when a button is first pressed?
Correct answer: B — The Pressed trigger fires once when input first becomes active. It's perfect for single-shot actions like jumping or interacting. Down fires continuously while held; Hold fires after a duration; Pulse fires repeatedly.
Question 5
What must you do before Input Actions will work in a Character Blueprint?
Correct answer: B — Before Input Actions work, you must add your Input Mapping Context to the player's Enhanced Input system. This is typically done in BeginPlay by getting the Enhanced Input Local Player Subsystem and calling Add Mapping Context.