✨ Niagara Overview
Visual effects bring games to life—explosions, magic spells, fire, smoke, rain, and countless other phenomena that make worlds feel dynamic and reactive. Unreal Engine 5's Niagara system is a powerful, flexible VFX tool that lets you create everything from simple sparks to complex simulations. This lesson introduces Niagara's architecture and prepares you to build your own effects.
🎯 Learning Objectives
By the end of this lesson, you will be able to:
- Understand Niagara's role in Unreal Engine's VFX pipeline
- Explain the System, Emitter, and Module hierarchy
- Navigate the Niagara editor interface
- Identify when to use Niagara vs. other VFX approaches
- Recognize common particle effect types and their uses
Estimated Time: 25-35 minutes
Prerequisites: Basic familiarity with the Unreal Editor
In This Lesson
What is Niagara?
Niagara is Unreal Engine's next-generation visual effects system. It replaced the older Cascade system with a more powerful, flexible, and performant approach to creating particle effects. If you want fire, smoke, sparks, magic, weather, or any dynamic visual phenomenon in your game, Niagara is the tool.
Why Niagara?
Niagara offers significant advantages over previous particle systems:
- Node-based and modular: Build effects by combining reusable modules
- Data-driven: Full control over every particle attribute
- GPU simulation: Millions of particles with excellent performance
- Programmable: Custom expressions and HLSL for advanced effects
- Event-driven: Particles can trigger other particles or game events
- Simulation stages: Control exactly when and how particles update
Niagara vs. Cascade
| Feature | Cascade (Legacy) | Niagara |
|---|---|---|
| Architecture | Fixed modules | Fully modular, stackable |
| GPU Particles | Limited support | Full GPU simulation |
| Customization | Preset parameters | Custom modules, expressions |
| Data Access | Limited | Read any attribute, any particle |
| Events | Basic | Full event system |
| Learning Curve | Lower | Higher (but more powerful) |
| Status in UE5 | Deprecated | Primary VFX system |
💡 Focus on Niagara
Cascade is deprecated in UE5 and may be removed in future versions. All new VFX work should use Niagara. If you encounter legacy Cascade effects, Epic provides migration tools, but learning Niagara from the start is the right approach.
What Can Niagara Create?
Niagara handles a vast range of visual effects:
- Environmental: Rain, snow, fog, dust, leaves, fireflies
- Fire and smoke: Campfires, explosions, chimneys, torches
- Magic and abilities: Spell effects, auras, energy beams
- Impacts: Bullet hits, footstep dust, splashes
- UI effects: Sparkles, highlights, transitions
- Destruction: Debris, sparks, shrapnel
- Fluid simulation: Water splashes, blood, slime
- Crowds: Flocking birds, swarming insects, schools of fish
Figure: Niagara can create virtually any particle-based visual effect.
System Architecture
Understanding Niagara's hierarchy is essential for creating and organizing effects. The system uses a three-level structure: Systems contain Emitters, and Emitters contain Modules.
The Hierarchy
Niagara System:
- The top-level asset you place in the world
- Can contain multiple emitters
- Controls overall timing, looping, and playback
- Examples: A complete explosion (fire + smoke + sparks), a weather system (rain + fog)
Emitter:
- A single particle generator within a system
- Defines one "type" of particle (fire, smoke, sparks)
- Contains modules that control particle behavior
- Can be reused across multiple systems
Module:
- A self-contained behavior or calculation
- Plugs into emitters at specific stages
- Examples: Spawn Rate, Initial Velocity, Color Over Life, Gravity
- Can be built-in, downloaded, or custom-created
Figure: A Niagara System contains multiple Emitters, each with stacked Modules.
Emitter Stages
Within each emitter, modules are organized into stages that execute in order:
| Stage | When It Runs | Example Modules |
|---|---|---|
| Emitter Spawn | Once when emitter starts | Initialize emitter variables |
| Emitter Update | Every frame for the emitter | Spawn Rate, Emitter lifetime |
| Particle Spawn | Once per particle, when born | Initial Position, Velocity, Size, Color |
| Particle Update | Every frame, per particle | Gravity, Drag, Color Over Life, Scale Over Life |
| Render | When drawing particles | Sprite Renderer, Mesh Renderer, Ribbon |
flowchart TD
    A[System Spawns] --> B[Emitter Spawn]
    B --> C[Emitter Update Loop]
    C --> D{Spawn Particles?}
    D -->|Yes| E[Particle Spawn]
    D -->|No| F[Particle Update]
    E --> F
    F --> G[Render]
    G --> C

    style A fill:#667eea,color:#fff
    style B fill:#2196F3,color:#fff
    style C fill:#4CAF50,color:#fff
    style E fill:#FF9800,color:#fff
    style F fill:#9C27B0,color:#fff
    style G fill:#f44336,color:#fff
Figure: Niagara execution flow through stages.
Simulation Targets
Niagara can simulate particles on either CPU or GPU:
CPU Simulation:
- Default for most emitters
- Easier to debug
- Better for effects with complex logic
- Can interact with game code more easily
- Limited particle counts (thousands)
GPU Simulation:
- Massive particle counts (millions)
- Better performance for simple particles
- Required for some advanced features
- Less flexible for CPU-side interactions
- Set in emitter properties
⚠️ Start with CPU
For learning, start with CPU simulation. It's easier to understand and debug. Switch to GPU when you need massive particle counts or hit performance limits. Many professional effects use CPU simulation perfectly fine.
✅ Lightweight (Stateless) Emitters · UE 5.8
Alongside the CPU and GPU simulation targets, UE 5.8 offers Lightweight Emitters (also called stateless emitters, added in 5.4). They are fixed-function and don’t need to be compiled, so they iterate faster in the editor and cost far less at runtime · a system can hold many of them with little performance impact, which makes them ideal for mobile and for effects spawned in large numbers. The trade-off is less flexibility (no arbitrary custom modules). Many of the engine’s template systems are now lightweight, and you can mix lightweight and full stateful emitters in one system. Learn the stack on a standard CPU emitter, then reach for lightweight emitters when performance and scale matter.
The Niagara Editor
The Niagara editor is where you build and modify particle effects. It has a unique interface compared to other Unreal editors, so let's get familiar with its layout.
Opening the Editor
- Right-click in Content Browser
- Select FX → Niagara System
- Choose a template or start from empty
- Double-click the created asset to open the editor
Editor Panels
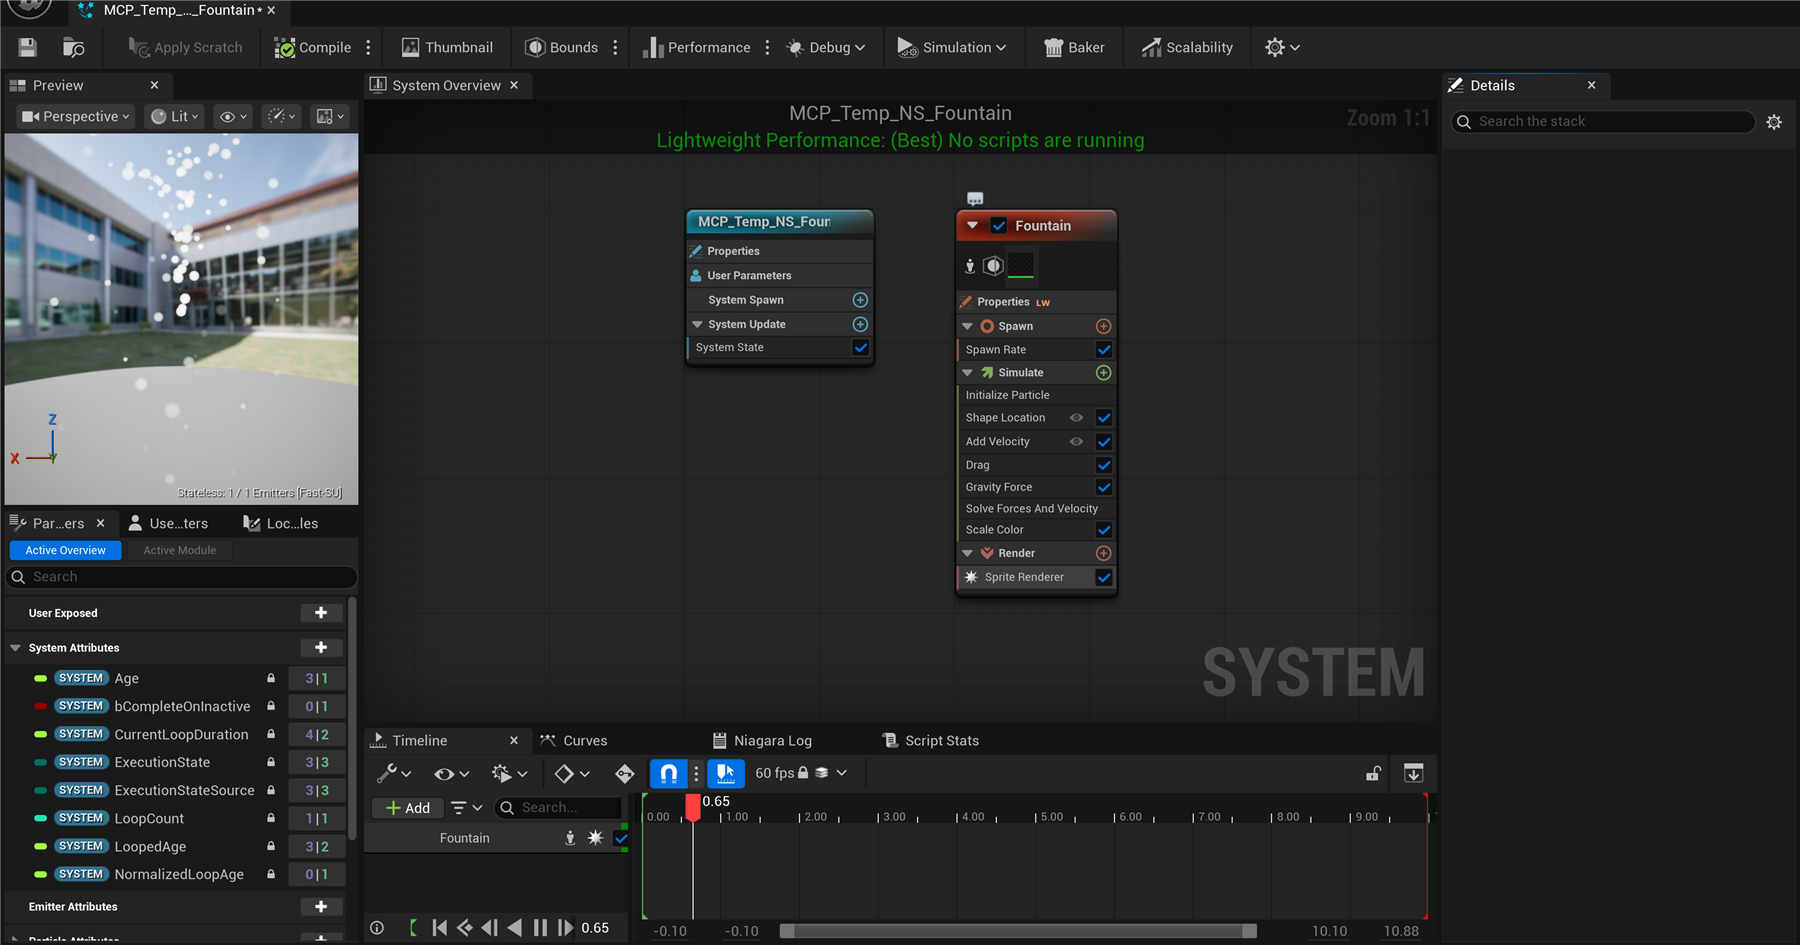
Figure: the Niagara Editor and its key panels · the Preview viewport (a fountain playing), the System Overview graph (the System node plus the Fountain emitter’s stack: Spawn · Spawn Rate · Simulate · Render), the Parameters panel, Details, and the Timeline. This example is a lightweight/stateless system · note the green “Lightweight Performance: (Best)” readout.
Key Panels Explained
System Overview (Left):
- Shows all emitters in the system
- Add new emitters with the + button
- Click an emitter to see its modules
- Drag to reorder render priority
Preview Viewport (Center):
- Real-time visualization of your effect
- Rotate view with right-click drag
- Zoom with scroll wheel
- Reset with the Home key
Selection Panel (Right):
- Shows parameters for selected module
- Edit values, curves, colors
- Most of your tweaking happens here
Timeline (Bottom):
- Scrub through the effect's lifetime
- Play, pause, loop controls
- Useful for timing adjustments
Adding Modules
To add behavior to an emitter:
- Select the emitter in System Overview
- Click the + button next to a stage (Particle Spawn, Particle Update, etc.)
- Browse or search for modules
- Click to add the module
- Configure parameters in the Selection Panel
✅ Module Search Tip
The module browser can be overwhelming. Use the search bar! Type "velocity" to find velocity modules, "color" for color modules, "spawn" for spawn modules. Most common operations have intuitively named modules.
Common Effect Types
Before diving into creating effects, it helps to understand the common patterns and what makes them work. Most effects are variations of a few fundamental types.
Effect Patterns
| Pattern | Description | Examples | Key Modules |
|---|---|---|---|
| Continuous Stream | Constant spawn rate, particles live and die | Fire, smoke, fountain | Spawn Rate, Lifetime, Velocity |
| Burst | Many particles at once, then nothing | Explosion, muzzle flash, impact | Spawn Burst, Initial Velocity Range |
| Trail/Ribbon | Connected particles forming lines | Sword swipe, magic trail, smoke trail | Ribbon Renderer, Spawn Per Unit |
| Mesh Particles | 3D meshes instead of sprites | Debris, leaves, shrapnel | Mesh Renderer, Rotation |
| GPU Simulation | Massive particle counts | Rain, snow, grass, crowds | GPU Sim Target, Simple behaviors |
Renderer Types
How particles appear depends on the renderer:
Sprite Renderer:
- Billboard quads that face the camera
- Most common renderer type
- Uses textures/materials for appearance
- Good for: fire, smoke, sparks, dust
Mesh Renderer:
- Full 3D meshes as particles
- More expensive but more realistic
- Good for: debris, leaves, rocks, objects
Ribbon Renderer:
- Connects particles into continuous strips
- Creates trail effects
- Good for: sword trails, magic lines, vehicle tracks
Light Renderer:
- Particles emit dynamic light
- Performance-intensive
- Good for: sparks, fire glow, magic effects
Figure: Four main renderer types for different visual needs.
Essential Modules to Know
| Module | Stage | Purpose |
|---|---|---|
| Spawn Rate | Emitter Update | How many particles per second |
| Spawn Burst Instantaneous | Emitter Update | Spawn many at once |
| Initialize Particle | Particle Spawn | Set initial lifetime, mass, size |
| Add Velocity | Particle Spawn | Initial movement direction/speed |
| Gravity Force | Particle Update | Pull particles down (or up) |
| Drag | Particle Update | Slow particles over time |
| Scale Color | Particle Update | Change color over lifetime |
| Scale Sprite Size | Particle Update | Grow or shrink over lifetime |
| Sprite Renderer | Render | Draw as billboard sprites |
💡 Templates Are Your Friend
When creating a new Niagara System, choose a template that's close to what you want. Templates come pre-configured with appropriate modules. It's much easier to modify an existing effect than build from scratch.
Hands-On: Exploring Niagara
Let's get hands-on with the Niagara editor. You'll create a system from a template, explore its structure, and make basic modifications to understand how the pieces fit together.
🎯 Exercise Goal
Create a Niagara System from a template, examine its emitter structure, modify key parameters, and preview the results in real-time. This builds familiarity with the editor before creating effects from scratch.
Part 1: Create a Niagara System
Step 1: Create New System
- In Content Browser, navigate to or create a folder:
VFX - Right-click → FX → Niagara System
- In the wizard, select New system from selected emitter(s)
- Click Next
Step 2: Choose a Template Emitter
- In the emitter browser, expand Templates
- Find and select Fountain (simple upward spray)
- Click the + to add it
- Click Finish
- Name it
NS_TestFountain
Step 3: Open the Editor
- Double-click
NS_TestFountainto open the Niagara editor - The preview viewport shows particles spraying upward
- Use right-click drag to rotate the view
- Scroll to zoom in/out
Figure: Steps to create a new Niagara System from template.
Part 2: Explore the Structure
Step 4: Examine the System Overview
- Look at the System Overview panel (left side)
- You should see one emitter: Fountain
- Click the emitter name to select it
- Notice the module stack that appears
Step 5: Identify the Stages
With the emitter selected, find these stages in the stack:
- Emitter Spawn: Runs once when emitter starts
- Emitter Update: Look for Spawn Rate here
- Particle Spawn: Look for Initialize Particle, Add Velocity
- Particle Update: Look for Gravity Force, Drag
- Render: Look for Sprite Renderer
Step 6: Click Through Modules
- Click on Spawn Rate in Emitter Update
- The Selection Panel (right) shows its parameters
- Note the Spawn Rate value
- Click on other modules to see their parameters
Part 3: Modify Basic Parameters
Step 7: Change Spawn Rate
- Select the Spawn Rate module
- In Selection Panel, find Spawn Rate parameter
- Change the value from default to
100 - Watch the preview—more particles should appear
- Try
20for fewer particles - Set it back to
50for now
Step 8: Adjust Velocity
- Find Add Velocity in Particle Spawn
- Select it and look at the parameters
- Find the velocity vector (usually Z is up)
- Increase the Z value to make particles spray higher
- Decrease it for a lower fountain
- Try adding X or Y values for angled spray
Step 9: Modify Gravity
- Find Gravity Force in Particle Update
- Select it—note the gravity vector (negative Z = down)
- Reduce the magnitude for slower falling
- Set to 0 for floating particles
- Set to positive for particles that fall upward
- Reset to default gravity (~-980)
Figure: Key parameters that dramatically change fountain behavior.
Part 4: Modify Appearance
Step 10: Change Particle Size
- Find Initialize Particle in Particle Spawn
- Look for Sprite Size or Uniform Sprite Size
- Increase the value for larger particles
- Decrease for smaller, finer particles
Step 11: Adjust Color
- Look for a color module (may be in Initialize Particle or a separate Scale Color)
- Click the color swatch to open the color picker
- Change to a different color
- If there's a Scale Color module with a curve, click it to edit the color over lifetime
Step 12: Modify Lifetime
- In Initialize Particle, find Lifetime
- Increase for longer-lived particles (more visible trail)
- Decrease for shorter bursts
- Try values between 0.5 and 3.0 seconds
Part 5: Place in Level
Step 13: Add to Level
- Save your Niagara System (Ctrl+S)
- Go to your level viewport
- Drag
NS_TestFountainfrom Content Browser into the level - Position it where you want the fountain
- The effect should play automatically in the editor
Step 14: Test in PIE
- Press Play to test in Play In Editor
- Walk around the fountain
- Observe how it looks from different angles
- Stop play and adjust parameters if needed
✅ Exercise Complete!
You've successfully:
- Created a Niagara System from a template
- Explored the System, Emitter, Module hierarchy
- Modified spawn rate, velocity, and gravity
- Adjusted appearance (size, color, lifetime)
- Placed and tested the effect in a level
You now understand how Niagara organizes effects and how to make basic modifications!
Troubleshooting
⚠️ Common Issues
No particles visible:
- Check Spawn Rate isn't 0
- Verify the emitter is enabled (checkbox in System Overview)
- Make sure there's a renderer (Sprite Renderer in Render stage)
- Check particle size isn't too small
Particles don't move:
- Check velocity values aren't all 0
- Verify Solve Forces and Velocity module exists in Particle Update
Effect doesn't play in level:
- Select the Niagara System actor in the level
- In Details, ensure Auto Activate is checked
- Compile the Niagara System if you made changes
Editor preview is black:
- Click the viewport and press Home to reset view
- Check that the preview isn't paused (timeline controls)
Bonus Challenges
- Fire Template: Create a new system using the Fire template, explore its structure
- Smoke Addition: Add a second emitter (smoke) to your fountain system
- Burst Effect: Create a system using Spawn Burst instead of Spawn Rate
- Color Gradient: Make particles change from yellow to red over their lifetime
- Size Variation: Add randomness to initial particle size
- Try GPU Sim: Change the emitter to GPU simulation and increase particle count to 10,000
Summary
In this lesson, you've been introduced to Niagara, Unreal Engine 5's powerful visual effects system. Understanding the fundamentals of how Niagara organizes and processes particles prepares you to create your own effects in the following lessons.
Key Concepts
Niagara Overview: Niagara is UE5's primary VFX system, replacing the deprecated Cascade. It offers modular design, GPU simulation, full data access, and extensive customization. Use it for any particle-based visual effect—fire, smoke, magic, weather, impacts, and more.
Three-Level Hierarchy: Niagara organizes effects into Systems (top-level assets placed in world), Emitters (individual particle generators), and Modules (self-contained behaviors). A single system can contain multiple emitters working together.
Emitter Stages: Modules execute in specific stages: Emitter Spawn (once at start), Emitter Update (every frame), Particle Spawn (when particles born), Particle Update (every frame per particle), and Render (drawing). Understanding stages helps you place modules correctly.
Renderer Types: Sprite (camera-facing quads), Mesh (3D objects), Ribbon (connected trails), and Light (dynamic lights). Choose based on the visual you need.
Templates: Starting from templates is the fastest way to learn. Templates come pre-configured with appropriate modules—modify them rather than building from scratch.
Niagara Quick Reference
| Concept | Description |
|---|---|
| Niagara System | Top-level asset, contains emitters, placed in world |
| Emitter | Single particle type, contains modules, reusable |
| Module | Self-contained behavior (spawn, velocity, gravity, etc.) |
| CPU Simulation | Default, easier debug, limited count (thousands) |
| GPU Simulation | Massive counts (millions), better performance |
Essential Modules Reference
| Module | Stage | What It Does |
|---|---|---|
| Spawn Rate | Emitter Update | Particles per second |
| Spawn Burst | Emitter Update | Many particles at once |
| Initialize Particle | Particle Spawn | Lifetime, size, mass |
| Add Velocity | Particle Spawn | Initial movement |
| Gravity Force | Particle Update | Pulls particles down |
| Scale Color | Particle Update | Color over lifetime |
| Sprite Renderer | Render | Draw as billboards |
Best Practices
- Start with templates: Don't build from scratch until you understand the basics
- Use CPU simulation first: Easier to learn and debug
- Organize with folders: Keep VFX assets in a dedicated folder
- Name clearly: Use NS_ prefix for systems, give emitters descriptive names
- Preview constantly: Make small changes and observe results
- Reuse emitters: Build a library of common effects to combine
- Test in-game: Editor preview differs from actual gameplay
Figure: A Niagara System combines multiple emitters, each with its own module stack.
What's Next?
Now that you understand Niagara's structure, the next lesson covers Creating Particle Effects. You'll build effects from scratch, work with materials, and learn techniques for common effect types like fire, smoke, and sparks.
Knowledge Check
Question 1
What is the correct hierarchy in Niagara, from largest to smallest?
Correct answer: C — The hierarchy is System (top-level, placed in world) → Emitter (particle generator) → Module (individual behavior). Systems contain multiple emitters, and emitters contain multiple modules.
Question 2
In which stage would you place a "Spawn Rate" module?
Correct answer: C — Spawn Rate belongs in Emitter Update because it controls how many particles the emitter creates each frame. It's an emitter-level decision, not a per-particle operation.
Question 3
What renderer type would you use for a sword trail effect?
Correct answer: C — Ribbon Renderer connects particles into continuous strips, perfect for trails behind moving objects like swords, magic projectiles, or vehicle tracks.
Question 4
What's the main advantage of GPU simulation over CPU simulation?
Correct answer: C — GPU simulation excels at massive particle counts (millions) with excellent performance. The trade-off is less flexibility for CPU-side interactions and harder debugging. CPU is better for complex logic with fewer particles.
Question 5
When does the "Particle Spawn" stage execute?
Correct answer: C — Particle Spawn runs once per particle at the moment it's created. This is where you set initial values like position, velocity, size, and color. Particle Update then runs every frame to modify these values over the particle's lifetime.
Question 6
What is the best approach for beginners learning Niagara?
Correct answer: B — Starting with templates is the fastest way to learn. Templates come pre-configured with appropriate modules for common effects. Modify and experiment with them to understand how different modules work together.
Question 7
What replaced the Cascade particle system in Unreal Engine 5?
Correct answer: C — Niagara is UE5's primary VFX system, replacing the deprecated Cascade. Niagara offers modular design, GPU simulation, full data access, and extensive customization. All new VFX work should use Niagara.