🎨 Material Fundamentals
If geometry is the skeleton of your 3D world, materials are its skin. They define how every surface looks—whether it gleams like polished chrome, absorbs light like rough concrete, or glows with inner fire. In this lesson, you'll discover how Unreal Engine's powerful material system brings your environments to life.
🎯 Learning Objectives
By the end of this lesson, you will be able to:
- Explain what a material is and how it defines surface appearance in Unreal Engine
- Describe the principles of Physically Based Rendering (PBR) and why it matters
- Identify the core PBR channels: Base Color, Metallic, Roughness, and Normal
- Navigate the Material Editor interface confidently
- Understand Material Instances and when to use them
- Create a simple material from scratch and apply it to an object
Estimated Time: 45-60 minutes
Prerequisites: Module 2 - Working with Levels and Actors
In This Lesson
What is a Material?
Think of a material like a recipe for how a surface should look. Just as a chef combines ingredients to create a dish, you combine various properties—color, shininess, bumpiness, transparency—to create the visual appearance of any surface in your game.
In Unreal Engine, a Material is an asset that controls the visual properties of surfaces. It's applied to meshes (3D objects) and determines how those surfaces interact with light. Without materials, every object in your scene would look like flat gray plastic—not exactly the immersive experience players expect!
📖 Definition
Material: An asset in Unreal Engine that defines the visual characteristics of a surface, including its color, reflectivity, transparency, and surface detail. Materials are created in the Material Editor using a node-based visual system.
The Real-World Analogy
Consider how different surfaces behave in real life. A polished marble floor reflects your image like a mirror. A rubber ball absorbs light and appears matte. A stained glass window lets colored light pass through. Your brain instantly recognizes these differences because of how light interacts with each material.
Unreal Engine's material system simulates these same physical properties. When you create a material, you're essentially telling the engine: "When light hits this surface, here's exactly how it should behave."
Figure: Different materials produce dramatically different visual results based on how they interact with light.
Materials vs. Textures: What's the Difference?
New developers often confuse materials with textures, so let's clear that up right away:
A texture is a 2D image file—a photograph, a painted pattern, or a procedurally generated graphic. It's just a picture. By itself, a texture can't do anything in your game.
A material is the complete system that uses textures (and other inputs) to define how a surface appears. Think of it this way: if a texture is an ingredient (like flour), a material is the complete recipe that uses that ingredient along with others to create the final dish (bread).
💡 Key Insight
A material can use multiple textures—one for color, one for surface bumps, one for reflectivity—and combine them with mathematical operations to achieve complex visual effects. You can also create materials with no textures at all, using only solid colors and procedural patterns.
flowchart LR
    subgraph Textures["📁 Textures (2D Images)"]
        T1["🖼️ Color Map"]
        T2["🖼️ Normal Map"]
        T3["🖼️ Roughness Map"]
    end

    subgraph Material["🎨 Material (The Recipe)"]
        M["Material Editor\nCombines & processes\nall inputs"]
    end

    subgraph Result["✨ Final Appearance"]
        R["Surface rendering\non 3D mesh"]
    end

    T1 --> M
    T2 --> M
    T3 --> M
    M --> R

    style Material fill:#667eea,color:#fff
    style Result fill:#4CAF50,color:#fff
Figure: Textures are inputs that feed into a material, which then produces the final rendered appearance.
Physically Based Rendering (PBR)
Before we dive into creating materials, you need to understand the philosophy that drives modern material creation: Physically Based Rendering, or PBR.
In the early days of computer graphics, artists created materials by tweaking arbitrary values until things "looked right." The result? Materials that only worked under specific lighting conditions. Move that shiny sword from a bright outdoor scene to a dim dungeon, and suddenly it looked completely wrong.
PBR solved this problem by grounding material creation in real-world physics. Instead of asking "what settings make this look good right now?", PBR asks "how does this material actually behave in real life?"
📖 Definition
Physically Based Rendering (PBR): A rendering approach that uses real-world physical principles to calculate how light interacts with surfaces. PBR materials respond correctly to any lighting condition because they're based on measurable physical properties rather than arbitrary artistic tweaks.
Why PBR Matters
PBR offers several game-changing advantages:
Consistency across lighting: A PBR gold material looks like gold whether it's under harsh noon sunlight, soft twilight, or flickering torchlight. The physics-based calculations handle all scenarios automatically.
Realistic results: Because PBR is based on how real materials work, your virtual surfaces immediately feel more believable. Players might not know why something looks "right," but they'll definitely notice when it doesn't.
Standardized workflow: PBR uses a consistent set of channels (Base Color, Metallic, Roughness, Normal) that work across different engines and tools. Artists can create texture sets in Substance Painter, Quixel Mixer, or other software, and they'll work in Unreal Engine without modification.
Easier iteration: With traditional methods, changing the lighting meant re-tweaking all your materials. With PBR, you adjust the lighting and everything just works.
✅ Pro Tip
Unreal Engine 5 is designed around PBR from the ground up. When you create materials using the standard PBR channels, you're working with the engine rather than against it. Your materials will integrate seamlessly with Lumen (Unreal's global illumination system) and produce realistic results with minimal effort.
The Two PBR Workflows
You'll encounter two main PBR workflows in the industry. Unreal Engine primarily uses the Metallic/Roughness workflow, but it's worth knowing both:
Figure: Unreal Engine uses the Metallic/Roughness workflow (left), which is the current industry standard.
For this course, we'll focus exclusively on the Metallic/Roughness workflow since that's what Unreal Engine uses natively. If you ever need to use textures created for the Specular/Glossiness workflow, Unreal provides conversion tools.
⚠️ Watch Out
When downloading texture sets from online sources, make sure they're in the Metallic/Roughness format. Many free texture sites offer both formats—look for files labeled "Metallic" rather than "Specular" to ensure compatibility with Unreal's default workflow.
The Core PBR Channels
Now that you understand why PBR matters, let's examine the four fundamental channels that define every PBR material. Think of these as the "ingredients" in your material recipe—each one controls a specific aspect of how the surface interacts with light.
Base Color
The Base Color (sometimes called "Albedo") represents the inherent color of a surface with all lighting information removed. Imagine taking a photo of a wall in a room with perfectly even, shadowless lighting—that flat color is the base color.
For non-metallic surfaces (wood, plastic, fabric, skin), the base color is simply the diffuse color you'd expect. For metallic surfaces, the base color defines the reflection tint—gold has an orange-yellow base color, copper has a reddish-brown tint, and so on.
Figure: Base Color represents the pure color of a surface without any lighting effects.
✅ Pro Tip
Real-world surfaces rarely have pure black or pure white base colors. Even coal has some color (dark gray), and even fresh snow isn't perfectly white. Keep your base color values between roughly 30-240 (on a 0-255 scale) to maintain physically accurate results. Pure black absorbs all light unnaturally, and pure white can cause blown-out highlights.
Metallic
The Metallic channel is beautifully simple: it's a grayscale value that tells the engine whether a surface is a metal or not. In practice, this is almost always a binary choice:
0 (Black) = Non-metal: Wood, plastic, fabric, skin, concrete, rubber, glass—anything that isn't a metal uses a value of 0. Non-metals reflect light diffusely (scattering in many directions) and show their base color as the surface color.
1 (White) = Metal: Gold, silver, copper, iron, aluminum, brass—all metals use a value of 1. Metals reflect light specularly (like a mirror) and tint their reflections with their base color.
Figure: The Metallic channel acts as a switch between non-metal (0) and metal (1) surface behavior.
⚠️ Watch Out
Avoid using in-between metallic values like 0.5. In the real world, something is either a metal or it isn't—there's no "half metal." The only time you'd use grayscale metallic values is to represent surfaces where metal and non-metal materials mix, like rusted metal (metal with non-metal rust spots) or painted metal (non-metal paint over metal base).
Roughness
While Metallic determines the type of reflection, Roughness determines the quality of that reflection. It controls how sharp or blurry the surface reflections appear:
0 (Black) = Smooth: Mirror-like reflections. Think polished chrome, still water, or freshly waxed cars. Light rays bounce in a uniform direction, creating sharp, clear reflections.
1 (White) = Rough: Completely diffuse, no visible reflections. Think chalk, unfinished concrete, or rough fabric. Light rays scatter in random directions, eliminating any mirror-like qualities.
Most real materials fall somewhere in between. A wooden floor might have a roughness of 0.6-0.8. Brushed metal might be 0.3-0.5. The beauty of roughness is that you can use the full range of values to achieve exactly the surface finish you want.
Figure: Roughness controls reflection sharpness from mirror-smooth (0) to completely diffuse (1).
Normal Maps
The Normal channel is where material magic really happens. A normal map creates the illusion of surface detail—bumps, scratches, grooves, fabric weave—without adding any actual geometry. It's one of the most powerful tools for creating realistic surfaces efficiently.
Here's how it works: every pixel in a normal map stores a direction (a "normal vector") encoded as RGB color values. The engine uses these directions to calculate how light should bounce off the surface at each pixel. Even though the underlying mesh is flat, the lighting calculations make it appear bumpy and detailed.
Figure: Normal maps modify how light bounces per-pixel, creating the illusion of surface detail on flat geometry.
Normal maps are typically recognizable by their distinctive blue-purple color. This is because a "flat" normal pointing straight up is encoded as RGB (128, 128, 255)—the blue channel is maxed out because "up" in tangent space corresponds to the Z axis.
💡 Texture Channel Summary
Here's a quick reference for the four core PBR channels:
Base Color: The surface color (RGB). Keep values between 30-240 for realism.
Metallic: Metal or not (Grayscale). Use 0 for non-metals, 1 for metals.
Roughness: Reflection sharpness (Grayscale). 0 = mirror, 1 = matte.
Normal: Surface detail direction (RGB). Creates bumps without geometry.
The Material Editor Interface
Now that you understand what goes into a material, let's explore where you'll actually build them: the Material Editor. This is a visual, node-based workspace where you connect inputs and operations to create your final material.
If you've ever used node-based tools like Blender's shader editor, Substance Designer, or even visual programming tools like Blueprints, the Material Editor will feel familiar. If not, don't worry—the concept is straightforward once you see it in action.
Opening the Material Editor
There are several ways to open the Material Editor:
Create a new material: Right-click in the Content Browser, select Material from the menu, name your material, then double-click it to open the editor.
Edit an existing material: Double-click any material asset in the Content Browser.
From a mesh: Select a mesh in your level, find its material in the Details panel, and click the material name to open it.
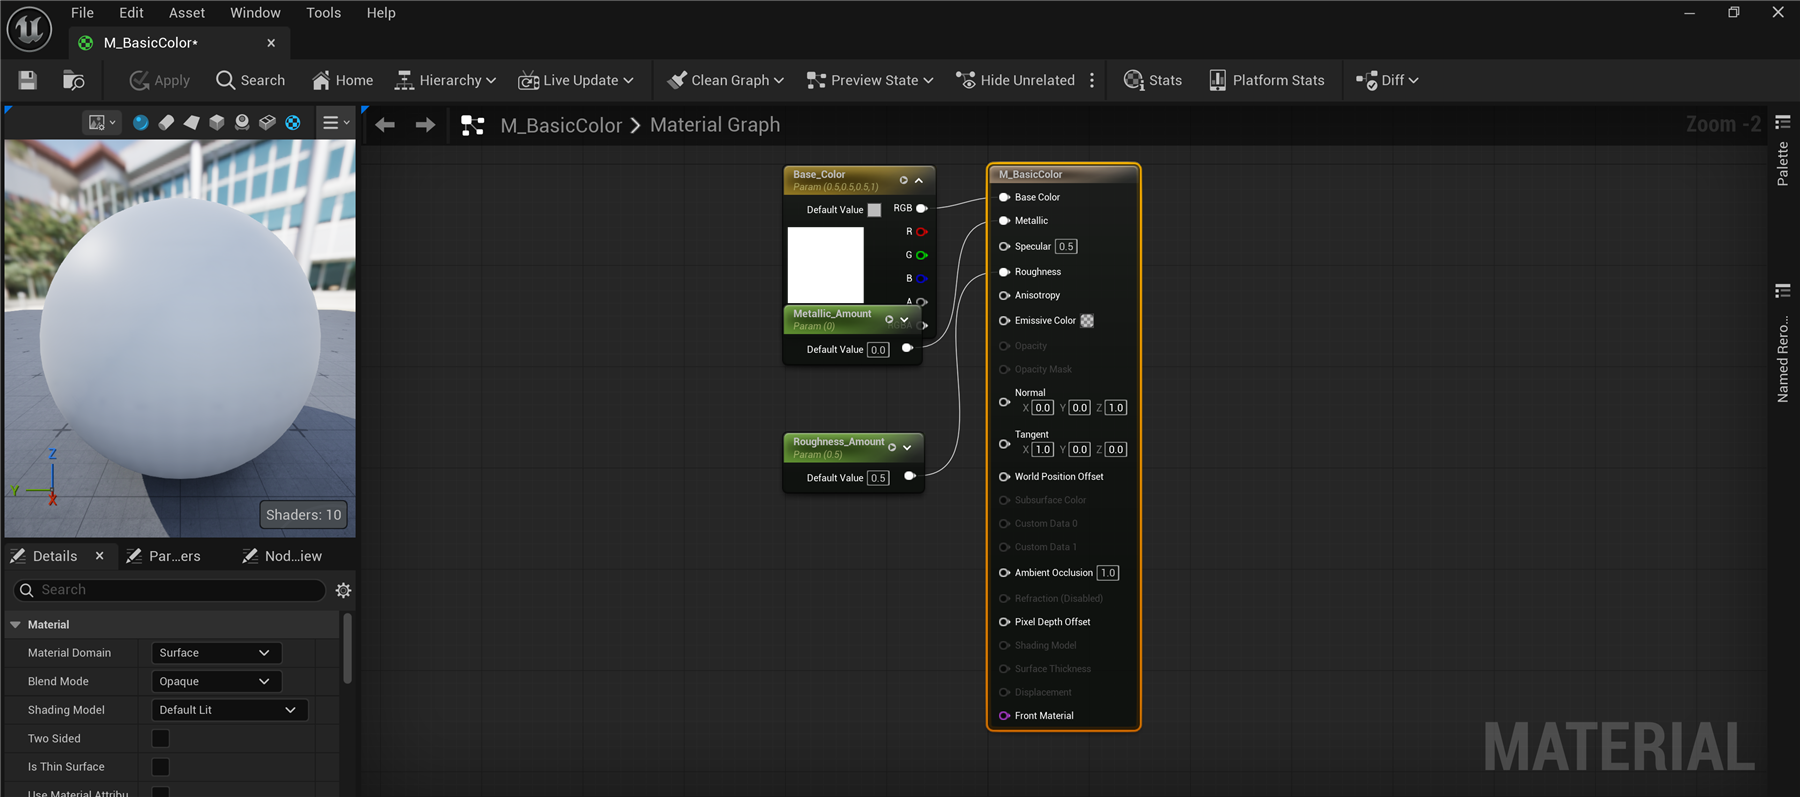
Figure: The real Material Editor in UE 5.8, showing the M_BasicColor material. The parameter nodes (left) feed Base Color, Metallic, and Roughness into the main material node; the live Preview (top-left), Details panel (lower-left), and searchable Palette (right) surround the graph.
Key Interface Elements
Graph Canvas (Center): The main workspace where you build your material by placing and connecting nodes. Pan by holding the right mouse button and dragging. Zoom with the scroll wheel. This is where the creative work happens.
Preview Panel (Top-Left): Shows a real-time preview of your material applied to a shape (sphere by default, but you can change it to a cube, plane, cylinder, or custom mesh). Changes update instantly as you modify the graph.
Details Panel (Lower-Left): When you select a node or the main material output, this panel shows its properties. The main material node has settings for Shading Model, Blend Mode, and many other options.
Palette Panel (Right): This searchable list contains every node type you can add to your material. Nodes are organized into categories like Constants, Math, Texture, Coordinates, and more. You can drag nodes from here onto the canvas, or right-click on the canvas to search and add nodes directly. These panels are dockable, so your own layout may differ·the arrangement shown above is the default.
Understanding Nodes and Connections
The Material Editor uses a "node graph" paradigm. Each node performs a specific operation—providing a color value, sampling a texture, multiplying two values together, etc. You connect nodes by dragging wires from output pins to input pins.
flowchart LR
    subgraph Inputs["Input Nodes"]
        C["🎨 Color\n(Constant3Vector)"]
        R["📊 Roughness\n(Constant)"]
        T["🖼️ Texture\n(TextureSample)"]
    end

    subgraph Processing["Processing Nodes"]
        M["✖️ Multiply"]
        L["↔️ Lerp"]
    end

    subgraph Output["Material Output"]
        O["🎯 Main Material Node\nBase Color | Metallic | Roughness | Normal"]
    end

    C --> M
    T --> M
    M --> O
    R --> O

    style Output fill:#4CAF50,color:#fff
Figure: Data flows from input nodes through processing nodes into the main material output.
Pin colors indicate data types: Yellow pins carry RGB color data, gray pins carry single float values, purple pins carry normal vectors. You can only connect pins of compatible types (though the editor will often auto-convert when possible).
✅ Pro Tip
Hold the 1, 2, 3, or 4 key and click on the canvas to quickly create Constant nodes with 1, 2, 3, or 4 components. This is much faster than searching the palette! Similarly, hold T and click to create a Texture Sample node, or V for a Vector Parameter.
The Main Material Node
Every material has one special node: the Main Material Node. This is the final destination for all your calculations. It has input pins for each PBR channel:
Base Color: Expects an RGB value (0-1 range per channel). Connect a Constant3Vector for solid colors, or a Texture Sample for image-based color.
Metallic: Expects a single float (0-1). Usually either 0 or 1, sometimes driven by a texture for mixed surfaces.
Specular: Controls non-metallic specular intensity. Usually left at the default (0.5) unless you have a specific reason to change it.
Roughness: Expects a single float (0-1). Can be a constant value or driven by a texture for surface variation.
Emissive Color: Makes the surface emit light (glow). Values above 1 create bloom effects with post-processing enabled.
Normal: Expects a normal vector (typically from a Normal Map texture). Adds surface detail without geometry.
⚠️ Watch Out
Any pin you don't connect will use a default value. Base Color defaults to black, Metallic to 0, Roughness to 0.5. This means an "empty" material will look like semi-shiny black plastic. Always set at least your Base Color to see something meaningful!
Material Instances: Why They Matter
Imagine you've created the perfect brick material. It has the right color, the right roughness, beautiful normal map detail. Now you need brick walls in three different colors—red, tan, and weathered gray. Do you create three separate materials from scratch?
Absolutely not. This is where Material Instances save the day.
📖 Definition
Material Instance: A child of a parent material that inherits all its functionality but allows you to override specific parameter values without recompiling. Changes to instances are instant and don't require shader recompilation.
The Parent-Child Relationship
Think of it like a template system. Your parent material (also called the "Master Material") defines the complete logic—which textures to use, how to combine them, what calculations to perform. But instead of hardcoding values, you expose certain inputs as parameters.
A Material Instance inherits everything from the parent but lets you change those exposed parameters. Want red bricks? Change the color parameter. Want smoother bricks? Adjust the roughness parameter. The underlying logic stays the same; only the values change.
flowchart TD
    subgraph Parent["🎨 M_Brick (Parent Material)"]
        P["Complete shader logic\nTexture sampling\nNormal mapping\nPBR calculations"]
        Params["📋 Exposed Parameters:\n• Base Color Tint\n• Roughness Multiplier\n• Normal Intensity\n• Tiling Scale"]
    end

    subgraph Instances["Material Instances (No Recompile!)"]
        I1["MI_Brick_Red\nColor: Red\nRoughness: 0.7"]
        I2["MI_Brick_Tan\nColor: Tan\nRoughness: 0.8"]
        I3["MI_Brick_Weathered\nColor: Gray\nRoughness: 0.9"]
    end

    Parent --> I1
    Parent --> I2
    Parent --> I3

    style Parent fill:#667eea,color:#fff
    style I1 fill:#c0392b,color:#fff
    style I2 fill:#d4a574,color:#333
    style I3 fill:#7f8c8d,color:#fff
Figure: One parent material can spawn unlimited instances, each with unique parameter values.
Why Use Material Instances?
Performance: When you modify a regular material, Unreal must recompile the shader—a process that can take seconds to minutes depending on complexity. Material Instances skip this entirely because the shader code doesn't change, only the input values. Changes are instantaneous.
Organization: Instead of dozens of nearly-identical materials cluttering your Content Browser, you have one master material and clearly-named instances. Finding and managing assets becomes much easier.
Consistency: If you need to update the underlying logic (say, adding a detail texture layer), you change the parent material once. All instances automatically inherit the improvement.
Runtime changes: Material Instances can be modified during gameplay through Blueprints. This enables effects like color shifts, damage states, or environmental reactions—all without the overhead of creating new materials.
✅ Pro Tip
Professional projects almost never apply parent materials directly to objects. The workflow is: create a parameterized parent material, then create instances for every variation you need. Even if you only need one version right now, using an instance means you're ready to create variations later without refactoring.
Creating Parameters in Parent Materials
To make a value adjustable in instances, you convert it from a Constant node to a Parameter node. The process is simple:
For scalar values (Roughness, Metallic): Instead of a Constant node, use a Scalar Parameter node. Give it a descriptive name like "Roughness_Amount" and set a default value.
For colors: Use a Vector Parameter node (specifically Constant3Vector converted to parameter, or create directly). Name it something like "Base_Color_Tint".
For textures: Use a Texture Parameter node instead of a regular Texture Sample. This lets instances swap in different textures entirely.
Figure: Converting Constants to Parameters enables customization in Material Instances.
Creating a Material Instance
Once your parent material has parameters, creating an instance is straightforward:
Method 1: Right-click your parent material in the Content Browser and select Create Material Instance.
Method 2: Right-click in the Content Browser and choose Material Instance from the creation menu, then assign the parent material in the Details panel.
When you open a Material Instance, you'll see a simple interface listing all available parameters with checkboxes. Check a parameter to override it, then adjust the value. The preview updates in real-time.
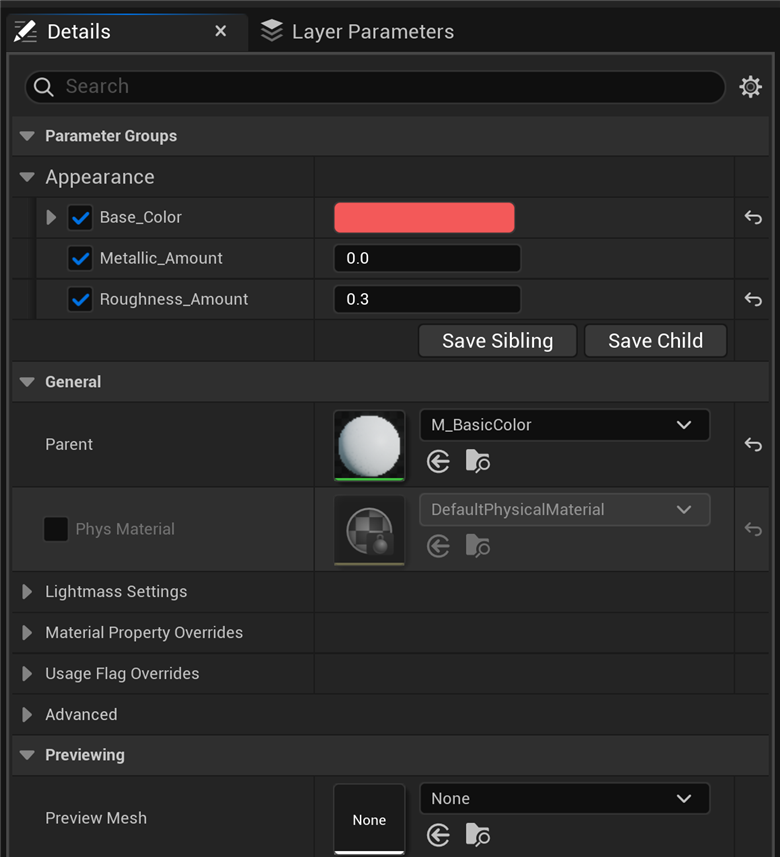
Figure: The Material Instance editor for MI_BasicColor_RedPlastic. Each parameter has an override checkbox·all three are checked here, with Base_Color set to red and Roughness_Amount to 0.3·while the General section shows the parent, M_BasicColor.
💡 Naming Convention
A common naming convention helps keep materials organized:
Parent Material: M_MaterialName (e.g., M_Brick, M_Metal, M_Fabric)
Material Instance: MI_MaterialName_Variant (e.g., MI_Brick_Red, MI_Metal_Rusty, MI_Fabric_Velvet)
The "M_" and "MI_" prefixes make it instantly clear what type of asset you're looking at.
🏋️ Hands-On: Create Your First Material
Let's put everything together by creating a simple colored material with adjustable properties. By the end of this exercise, you'll have a parent material and two instances—proof that you understand the core material workflow.
What You'll Create
A basic PBR material with parameters for Base Color, Metallic, and Roughness. Then you'll create two instances: one for shiny red plastic, one for matte blue rubber.
Estimated Time: 15-20 minutes
Step 1: Create a New Material
Open your Unreal project (or create a new Blank project if needed). In the Content Browser, navigate to a folder where you want to store your materials—or create a new folder called "Materials".
Right-click in the Content Browser and select Material. Name it M_BasicColor. Double-click to open the Material Editor.
🔍 Hint: Can't find the Material option?
Make sure you're right-clicking in an empty area of the Content Browser, not on an existing asset. The context menu should list Material among the asset types you can create, or use the green +Add button.
Step 2: Create a Color Parameter
We want the base color to be adjustable in instances, so we'll use a Vector Parameter instead of a regular Constant.
Right-click on the graph canvas and search for VectorParameter (or hold V and click). Place the node on the left side of the canvas.
With the node selected, look at the Details panel on the left:
- Set Parameter Name to:
Base_Color - Click the color swatch next to Default Value and choose a medium gray (we'll override this in instances)
Drag a wire from the Vector Parameter's output pin to the Base Color input on the Main Material Node.
Step 3: Create Metallic and Roughness Parameters
Right-click and search for ScalarParameter (or hold S and click). Create two of these nodes.
For the first Scalar Parameter:
- Set Parameter Name to:
Metallic_Amount - Set Default Value to:
0.0 - Connect it to the Metallic input
For the second Scalar Parameter:
- Set Parameter Name to:
Roughness_Amount - Set Default Value to:
0.5 - Connect it to the Roughness input
🔍 Hint: Organizing your nodes
Keep your graph tidy! Place input nodes on the left, processing nodes in the middle, and the Main Material Node on the right. You can select multiple nodes and press C to add a comment box around them for organization.
Step 4: Save and Apply
Your material graph should now have three parameter nodes connected to Base Color, Metallic, and Roughness. The Preview sphere in the right panel should show a gray, semi-shiny surface.
Click the Apply button in the toolbar (or press Enter). This compiles the shader. Then click Save (or press Ctrl+S).
Figure: The completed M_BasicColor material graph with three parameter nodes.
Step 5: Create Material Instances
Close the Material Editor and return to the Content Browser. Right-click on M_BasicColor and select Create Material Instance. Name it MI_BasicColor_RedPlastic.
Double-click to open the Material Instance editor. You'll see your three parameters listed with checkboxes. Check the boxes to enable overriding, then set:
- Base_Color: Bright red (e.g., RGB: 0.9, 0.1, 0.1)
- Metallic_Amount: 0.0 (plastic is non-metallic)
- Roughness_Amount: 0.3 (shiny plastic)
Save this instance. Now create a second instance named MI_BasicColor_BlueRubber with:
- Base_Color: Blue (e.g., RGB: 0.1, 0.2, 0.8)
- Metallic_Amount: 0.0
- Roughness_Amount: 0.9 (matte rubber)
Step 6: Test Your Materials
Add some primitive shapes to your level (Place Actors panel → Basic → Cube or Sphere). Drag your material instances from the Content Browser directly onto the shapes in the viewport.
You should see one object with shiny red plastic and another with matte blue rubber—both created from the same parent material!
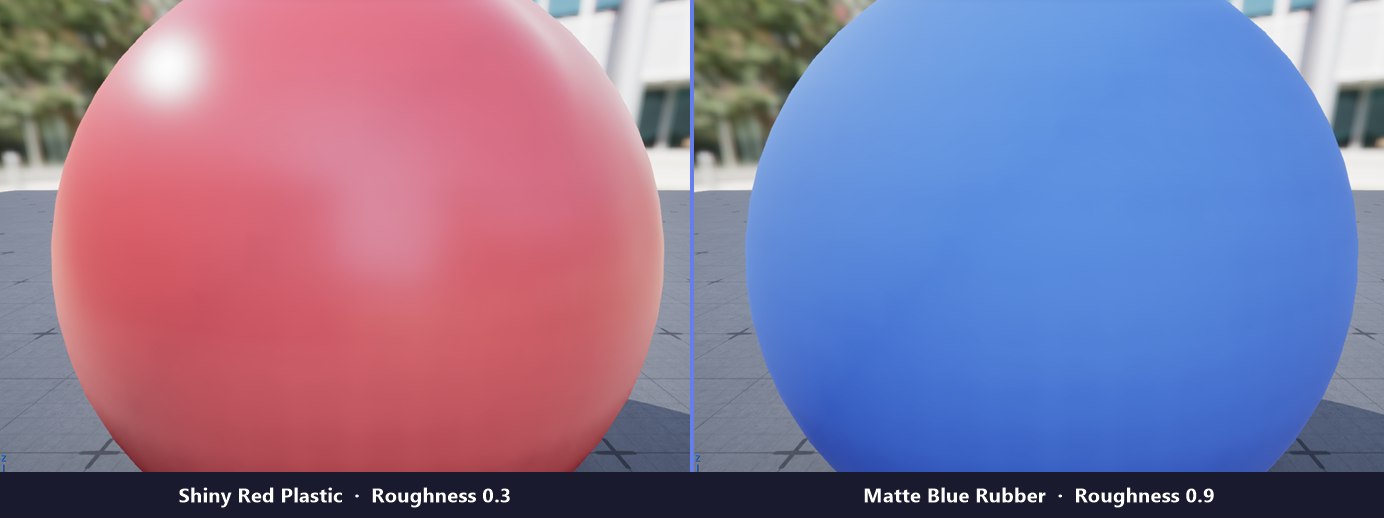
Figure: The two instances rendered live in UE 5.8·shiny red plastic (Roughness 0.3, sharp highlight) versus matte blue rubber (Roughness 0.9, fully diffuse). One parent material, two very different surfaces.
✅ Success Check: How do you know it worked?
Your materials are working correctly if:
- The red plastic sphere has visible specular highlights (shiny reflection spots)
- The blue rubber object looks flat and diffuse with no sharp reflections
- Both objects respond to lighting in the scene (rotate around them to see)
- You can change instance parameters and see instant updates (no shader recompile)
🎉 Congratulations!
You've just created your first parameterized material and instances in Unreal Engine! This parent-instance workflow is the foundation of professional material creation. Every complex material you encounter in production games uses this same pattern.
Summary
In this lesson, you've built a solid foundation for understanding Unreal Engine's material system. Let's recap the key concepts:
Materials define surface appearance by controlling how light interacts with objects. They combine colors, textures, and mathematical operations to create everything from realistic metals to glowing sci-fi panels.
Physically Based Rendering (PBR) grounds material creation in real-world physics, ensuring surfaces look correct under any lighting condition. Unreal uses the Metallic/Roughness workflow as its standard.
The four core PBR channels are Base Color (surface color), Metallic (metal vs. non-metal), Roughness (reflection sharpness), and Normal (surface detail without geometry). Understanding these channels is essential for creating believable materials.
The Material Editor is a node-based visual workspace where you build materials by connecting nodes. Data flows from input nodes through processing operations into the Main Material Node.
Material Instances let you create variations of a parent material without duplicating work or recompiling shaders. This is the professional workflow for material management.
🔑 Key Takeaways
- Materials are recipes; textures are ingredients
- PBR = physics-based, works under any lighting
- Metallic: 0 = non-metal, 1 = metal (no in-between)
- Roughness: 0 = mirror, 1 = matte (full range is valid)
- Normal maps add detail without geometry cost
- Always use Material Instances in production
- Parameters enable instance customization
What's Next?
In the next lesson, Texture Basics, you'll learn how to import and configure textures properly—the images that feed into your materials to create detailed, realistic surfaces. You'll explore texture formats, compression settings, UV coordinates, and how to connect texture samples in the Material Editor.