🗺️ Understanding Levels
Think of Levels as the containers that hold your game worlds. They're like the stages in a theater production· each one is a complete environment where your interactive experience takes place. In this lesson we'll explore how Unreal Engine 5.8 organizes these virtual spaces, and how World Partition now streams huge worlds for you automatically.
🎯 Learning Objectives
By the end of this lesson, you will be able to:
- Define what a Level is in Unreal Engine and its purpose
- Explain how World Partition streams large open worlds automatically in UE 5.8
- Describe persistent levels and streaming levels, and where each still fits
- Choose an organization strategy for complex game worlds, including Data Layers
- Navigate and use the World Settings panel
- Create and save new levels using the UE 5.8 level templates
Estimated Time: 30-40 minutes
Prerequisites: Lesson 1.4 - The Unreal Editor Interface
In This Lesson
What is a Level?
Imagine you're building a museum. Each room contains different exhibits· ancient artifacts in one room, modern art in another, dinosaur fossils in a third. The building itself is your project, but each room is a distinct space with its own contents, lighting, and purpose. In Unreal Engine, a Level serves a similar role: it's a self-contained space that holds all the objects, lighting, and environmental elements for a particular scene or area.
📖 Definition
Level: A Level (also called a "map") is a collection of all the objects, actors, lighting, and gameplay elements that make up a specific area or scene in your project. Think of it as a complete 3D environment file that can be loaded, modified, and saved independently.
When you create a new Unreal project, you always start with at least one level. This is your blank canvas where you'll place 3D objects, set up lighting, add interactive elements, and build your experience. Everything visible in your game at any given moment exists within a level.
What's Inside a Level?
A level contains several types of content, all working together to create your interactive environment:
- Actors: Any object placed in the world· 3D models, lights, cameras, sound sources, triggers, and more
- Environment Settings: Lighting configuration, sky atmosphere, fog, and post-process effects that define the scene's mood
- Gameplay Elements: Player start locations, spawn points, navigation meshes, and collision volumes
- World Settings: Level-specific configuration like physics settings, gravity, and game mode rules
💡 Real-World Analogy
Think of a Level like a movie set. When filming a scene, everything you need for that particular location is assembled on one set: props, lighting rigs, actors, cameras, and sound equipment. When you move to a different scene, you might switch to a completely different set with different elements. Similarly, when your game transitions between areas, it loads a new level with all its unique content.
File Structure
Levels are saved as files with the .umap extension (short for "Unreal Map"). You'll find them in your project's Content folder, typically organized in a Maps or Levels subfolder. When you open a project, Unreal loads one of these .umap files into the editor, displaying all the actors and settings it contains.
✅ Pro Tip
Always organize your levels into a dedicated folder like Content/Maps/. This makes your project easier to navigate, especially as it grows larger with more levels. Professional studios often use naming conventions like ENV_ForestLevel or MAP_City_Downtown to make levels easy to identify at a glance.
Why Multiple Levels Matter
While you could build an entire game in a single level, there are compelling reasons to split your project into multiple levels:
- Performance: Loading and rendering everything at once is inefficient. Splitting your world into separate areas means the engine only loads what's currently needed, improving performance and reducing memory usage. (As you'll see next, World Partition can do this splitting for you inside a single level.)
- Organization: Smaller, focused levels are easier to manage, especially when working with a team. One person can work on the forest area while another builds the cave system.
- Testing: You can quickly jump to specific areas to test gameplay without navigating through the entire world each time.
- Variety: Different levels can have completely different aesthetics, lighting, and gameplay styles· think of transitioning from a sunny village to a dark dungeon.
Figure: A typical game project organized into multiple distinct levels
World Partition & Level Streaming
How does Unreal load a massive, seamless world without running out of memory? The answer has changed. In Unreal Engine 4 and the earliest UE5 releases, developers built large maps by hand: you sliced the world into sublevels and used the Level Streaming system to load and unload each one as the player moved. This worked, but it was manual, error-prone, and awkward for teams. Unreal Engine 5 introduced World Partition to automate the whole process, and in UE 5.8 it is the standard way to build large worlds.
📖 Definition
World Partition: An automatic world-streaming system that stores your entire world in a single persistent level divided into a grid of cells. As the player moves, Unreal loads the cells near them and unloads the ones far away· no hand-authored sublevels required.
In Epic's own words, "Building large maps used to require developers to manually divide maps into sublevels, then use the Level streaming system to load and unload them as the player traversed the landscape." World Partition removes that manual step entirely: you build in one continuous level, and the engine handles the streaming grid for you.
How World Partition Works
When World Partition is enabled, a few systems work together behind the scenes:
- Grid-based streaming: The world is divided into square cells. Only cells within a loading range of the player (or camera) are kept in memory, so a 10 km world costs about the same to run as a small one.
- One File Per Actor (OFPA): Each actor is saved as its own small file instead of everything living in one giant .umap. This is what makes World Partition great for teams· two people can edit different parts of the same world at once without locking each other out of the file.
- HLOD (Hierarchical Level of Detail): Distant cells that aren't loaded are still represented by lightweight, auto-generated proxy meshes, so faraway mountains and skylines remain visible without their full geometry in memory.
- The World Partition editor: A minimap grid inside the editor lets you load, unload, and focus on regions of the world while you work, so you never have to open the entire map at once.
✅ Where you'll see it
When you create a new level from the Open World or Empty Open World template (covered later in this lesson), World Partition is already set up for you. You can also confirm it on any level: it lives in the World Partition Setup category at the top of the World Settings panel, with an Enable Streaming checkbox and a runtime hash class that defines the streaming grid.
Persistent Levels and Streaming Levels
World Partition doesn't throw away the older ideas· it builds on them. It's worth knowing the two terms it automates, because they still appear throughout the editor and in many existing projects.
A persistent level is the "main" level that stays loaded for the whole session. It's the foundation. With World Partition, your single world is a persistent level, and the streaming grid loads content into it. In a small project with just one level, that level is simply persistent by default.
📖 Definition
Persistent Level: The primary level that is always loaded and serves as the foundation for your scene. Any streamed content (World Partition cells, or manually added streaming levels) is loaded in addition to the persistent level, not instead of it.
A streaming level (also called a "sublevel") is a level that loads or unloads dynamically at runtime. Before World Partition, you added these by hand in the Levels panel and controlled them yourself. That manual workflow still exists in UE 5.8· it's the right tool for a few specific jobs, but it is no longer how you build a big open world.
⚠️ Legacy vs. modern
World Composition, the UE4-era system for tiling large worlds, is now a legacy feature. Epic's documentation states plainly: "It is recommended to use World Partition for level streaming in projects using Unreal Engine 5.0 or later." If you follow an older tutorial that tells you to enable World Composition or hand-build streaming tiles, reach for World Partition instead.
When to Use Each Approach
| Scenario | Recommended Approach | Reason |
|---|---|---|
| Small game, prototype, or single scene | Single level (Basic or Empty) | Simplicity· the whole world fits in memory, so no streaming is needed |
| Large open world | World Partition (Open World template) | Performance· the grid loads only nearby cells, automatically |
| Distinct, separate spaces (menu, discrete levels) | Multiple persistent levels | Organization· wholly different spaces that never need to coexist |
| Manually triggered sub-area (a specific interior) | Level Streaming via the Levels panel | Control· you decide exactly when a discrete sublevel loads |
The mermaid diagram below shows the streaming idea in the abstract: a persistent level stays put while nearby areas load and far ones unload. With World Partition this happens automatically per grid cell· with manual Level Streaming you wire it up yourself.
Sky, Sun, Global Logic] --> B[Player in City] A --> C[Player in Forest] A --> D[Player in Mountains] A --> E[Player in Dungeon] B --> F[City Cells
Loaded] B --> G[Forest Cells
Unloaded] C --> H[Forest Cells
Loaded] C --> I[City Cells
Unloading] style A fill:#667eea,color:#fff style F fill:#4CAF50,color:#fff style G fill:#999,color:#fff style H fill:#4CAF50,color:#fff style I fill:#999,color:#fff
Figure: Content near the player loads while distant content unloads, all around a constant persistent level
⚠️ Watch Out
Don't confuse streaming with scene transitions. Streaming happens seamlessly in the background as the player moves· there are no loading screens or pauses. Traditional level transitions (loading a completely different persistent level) typically show a loading screen. Modern open worlds use streaming to create the illusion of one continuous world.
Level Organization Strategies
As your projects grow in complexity, having a clear organizational strategy becomes essential. Some of these patterns are about the flow between distinct levels; others are about how you structure a single World Partition world. Let's look at the common ones.
Strategy 1: Linear Level Progression
This is the simplest approach and works well for games with distinct, sequential stages· think of classic platformers or action games where you progress from Level 1 to Level 2 to Level 3.
Structure:
MainMenu.umap- The starting pointLevel_01_Tutorial.umap- First playable levelLevel_02_Forest.umap- Second levelLevel_03_Cave.umap- Third levelLevel_04_Boss.umap- Climactic encounter
Pros: Simple to manage, easy to test individual levels, clear progression flow
Cons: Each transition requires loading a new level, less suitable for open-world designs
Tutorial] B --> C[Level 2
Forest] C --> D[Level 3
Cave] D --> E[Level 4
Boss Fight] style A fill:#667eea,color:#fff style B fill:#f0f0f0,color:#333 style C fill:#f0f0f0,color:#333 style D fill:#f0f0f0,color:#333 style E fill:#4CAF50,color:#fff
Figure: Linear level progression with distinct stages
Strategy 2: Hub-and-Spoke
This pattern uses a central "hub" area that connects to multiple separate zones. Think of games like Dark Souls (Firelink Shrine) or Splatoon (Inkopolis Square), where you return to a central location between missions or areas.
Structure:
Hub_CentralTown.umap- The main hub levelMission_Forest.umap- Accessed from the hubMission_Desert.umap- Accessed from the hubMission_Ruins.umap- Accessed from the hubMission_FinalBoss.umap- Unlocked after completing other missions
Pros: Provides a sense of centralization, easy to add new content, players have a "home base"
Cons: Requires transitions between hub and missions, can feel repetitive if overused
Figure: Hub-and-spoke pattern with a central location connecting to multiple zones
Strategy 3: Open World with World Partition
Modern open-world games use this approach to create vast, seamless environments. In older Unreal versions you hand-authored a region sublevel for every zone (Region_City_North.umap, Region_Forest_East.umap, and so on) and wired up their streaming yourself. In UE 5.8 you don't do that anymore: you build the whole world in one World Partition level, and the streaming grid loads regions automatically based on player proximity.
Structure (a single level):
World_Open.umap- One persistent World Partition level containing the entire landscape- Sky, lighting, and global systems live directly in that level
- Cities, forests, and mountains are just regions of the same map, streamed by the grid
- Each actor is its own file (One File Per Actor), so a whole team can build the world in parallel
Pros: Seamless exploration, no loading screens, feels like one continuous world, no manual streaming setup
Cons: Requires thoughtful optimization (HLOD, cell sizes), and testing a specific spot means loading that region
💡 Under the hood
World Partition still expresses your world as a grid of cells with coordinates, so the old grid-naming intuition (X0_Y0, X1_Y0…) is baked right in· you just don't create those tiles by hand anymore. The World Partition editor's minimap shows the grid and lets you load only the cells you're working on.
Strategy 4: Data Layers (Layered Content)
Sometimes you want to organize content not by location but by purpose: all the lighting together, all the gameplay actors together, a separate day and night dressing of the same space. In UE 5.8 the modern tool for this is Data Layers, a World Partition feature that tags actors into layers you can show, hide, or swap· both in the editor and at runtime· all within a single level.
- Editor Data Layers: Toggle sets of actors on and off while you work (for example, hide all foliage to edit the terrain underneath)
- Runtime Data Layers: Switch content in and out during gameplay (a "day" dressing vs. a "night" dressing, or a quest state that adds rubble to a town)
Pros: Excellent for team collaboration and variations, no separate sublevel files to juggle, integrates with World Partition streaming
Cons: Requires discipline to assign actors to the right layers, and is a World Partition concept (so it lives inside a partitioned world)
💡 Real-World Example
Studios use Data Layers for cinematics and variations: a base layer holds the environment, a lighting layer provides a dramatic setup, and a "story beat" layer adds the actors and props for a particular moment. Because these are layers of one World Partition world rather than separate streaming sublevels, the environment and cinematics teams can work independently without file conflicts.
Choosing Your Approach
Which strategy should you use? Consider these factors:
- Project scope: Small games can use a single level with linear or hub flow; large games use one World Partition world
- Team size: Solo developers might prefer simplicity; teams benefit from World Partition's One File Per Actor and Data Layers
- Performance targets: Mobile or VR projects need careful streaming and HLOD tuning to hold frame rate
- Genre conventions: Platformers often use discrete linear levels; open-world RPGs use World Partition
Don't be afraid to start simple and evolve your structure as needed. Many projects begin with a single Basic level and adopt World Partition or multiple levels only when performance or scope demands it.
The World Settings Panel
Every level in Unreal Engine has a World Settings panel that controls level-specific configuration. Think of it as the "properties" for the entire level· settings that affect everything within that particular world.
Accessing World Settings
To open the World Settings panel, use either route:
- From the menu bar, choose Window → World Settings, or
- From the main toolbar, click the Settings (gear) dropdown and select World Settings
The panel opens as a tab on the right side of the editor, alongside (or where) the Details panel appears. You'll see it has multiple collapsible categories with numerous options.
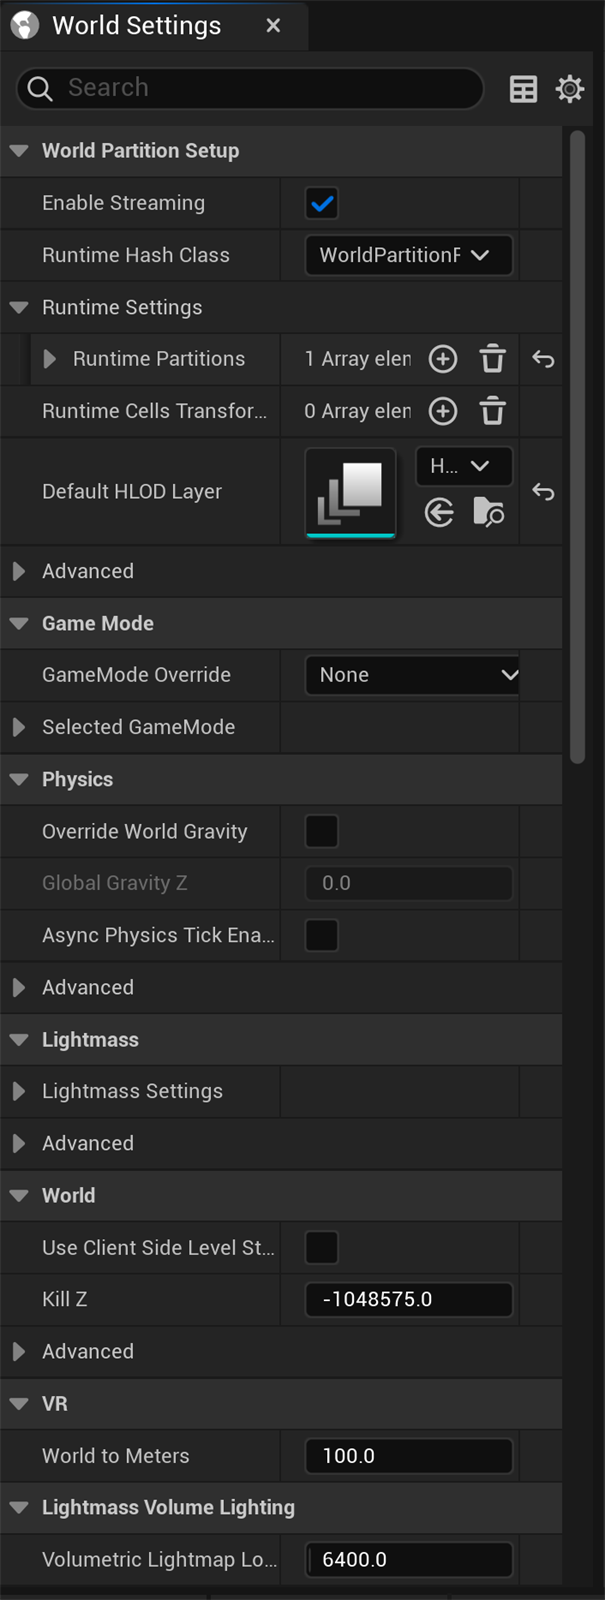
Figure: The World Settings panel in UE 5.8 · note the World Partition Setup category right at the top, with Enable Streaming ticked, followed by Game Mode, Physics, World (Kill Z), and VR settings.
💡 Don't Confuse Them
The Project Settings affect your entire project across all levels. The World Settings only affect the currently open level. For example, you'd set your game's overall rendering quality in Project Settings, but you'd set this level's gravity or game mode in World Settings.
Important World Settings
Let's explore the most commonly used settings you'll encounter, working roughly top to bottom through the panel above:
World Partition Setup
At the very top of World Settings sits the World Partition Setup category· this is where UE 5.8 exposes the automatic streaming system we covered earlier.
- Enable Streaming: Turns the World Partition grid on or off for this level. When it's on, the world streams cell by cell as the player moves.
- Runtime Hash Class: Defines how the world is partitioned into a runtime grid (the default hash set works for most worlds).
- Default HLOD Layer: Sets which Hierarchical LOD layer generates the proxy meshes shown for distant, unloaded cells.
⚠️ You won't find World Composition here
Older tutorials point to a "World Composition" checkbox in World Settings. In UE 5.8 that legacy system has been superseded by World Partition Setup shown above. If you ever need it for an old project, it's tucked away as a legacy option, but new work should stay with World Partition.
Game Mode
The GameMode Override setting determines which set of rules and logic applies to this level. Different levels can use different game modes· for example, your main menu might use one game mode, while gameplay levels use another.
- What it does: Defines player classes, HUD, victory conditions, and gameplay rules
- Common use: Setting a custom game mode for this specific level
- Example: Using a "MainMenuGameMode" for your start screen, then a "FPSGameMode" for shooting levels
Physics Settings
You can override global physics settings for this specific level:
- Override World Gravity: Enables a per-level gravity value instead of the project default
- Global Gravity Z: The gravity strength for the level (the project default is -980 cm/s², which matches Earth's gravity)
- Example use: Creating a moon level with lower gravity (-162 cm/s²) or a zero-gravity space station
✅ Pro Tip
Unreal uses centimeters as its base unit, so gravity is measured in cm/s². Earth's gravity (-980 cm/s²) is roughly equivalent to 9.8 m/s² or 32 ft/s² in real-world units. If you want your characters to feel heavier or lighter, adjusting gravity is often more effective than changing character movement settings.
Kill Z (Death Plane)
Under the World category, the Kill Z setting defines a height below which actors are automatically destroyed. This prevents players who fall off the world from falling forever.
- What it does: Any actor that falls below this Z-coordinate is destroyed
- Default value: Set very low (the level captured above reads -1048575, far below the playable space)
- Example use: In a platformer, ensuring players respawn after falling into a pit
World to Meters & Other Categories
Further down you'll find categories like VR (whose World to Meters value maps Unreal units to real-world scale for XR), Lightmass (baked-lighting quality), and audio-related settings that define how sound behaves in the level. As a beginner you won't need to touch most of these· the defaults work well for typical projects· but knowing they exist helps you understand how Unreal gives you fine-grained control over every level.
Creating and Saving New Levels
Now that you understand what levels are and how they're organized, let's walk through the practical steps of creating and managing levels in Unreal Engine 5.8.
Creating a New Level
Go to File → New Level in the menu bar. The New Level dialog opens with the UE 5.8 template choices:
- Open World: A large, streamable world with sample content and World Partition already enabled· the starting point for open-world projects
- Empty Open World: A World Partition world with no content, ready for you to build a large map from scratch
- Basic: A simple level with a floor plane, lighting, sky atmosphere, and exponential height fog· ideal for smaller scenes and for learning
- Empty Level: A completely blank level with no actors at all
Pick a template and click Create.
💡 Which Template Should You Choose?
Basic is usually the best choice while you're learning. It gives you a floor and a simple outdoor lighting setup so you can immediately see what you're building. Choose Open World when you're starting a large, streaming environment and want World Partition ready to go. Empty Level is literally pitch black until you add lights, so save it for advanced scenarios where you want complete control from scratch.
Creating a Level from the Content Browser
- Open the Content Browser
- Navigate to the folder where you want the level (typically
Content/Maps/) - Click + Add (or right-click in an empty space) and choose Level
- The new level file appears· give it a meaningful name
This keeps the level file directly in your chosen folder, keeping your project organized from the start.
Saving Your Level
After creating or modifying a level, you need to save it. Unreal uses two types of saves:
Save Current Level
- Shortcut: Ctrl + S
- Menu: File → Save Current Level
- What it does: Saves only the currently open level
If this is the first time saving a new level, a dialog appears asking where to save it and what to name it. Choose a descriptive name like Tutorial_Level or Forest_Area_01.
Save All
- Shortcut: Ctrl + Shift + S
- Menu: File → Save All
- What it does: Saves every modified level and asset currently loaded (useful with streaming levels or World Partition, where many actor files may be dirty)
⚠️ Save Early, Save Often
Game engines are complex software and crashes can happen. Get in the habit of pressing Ctrl + S frequently, especially after making significant changes. Unreal also has an auto-save feature (enabled by default), but manual saves give you control over when snapshots are created.
Opening Existing Levels
To open a level you've previously created or one that came with your project:
- Method 1 (File Menu): Go to File → Open Level, then browse to the .umap file
- Method 2 (Content Browser): Navigate to your Maps folder, double-click the level's thumbnail
- Method 3 (Recent Levels): Go to File → Open Recent to see a list of recently opened levels
When you open a different level, Unreal closes the current one. Any unsaved changes prompt a save dialog first.
Level Naming Best Practices
Professional projects use consistent naming conventions. Here are some common patterns:
| Convention | Example | Use Case |
|---|---|---|
| Descriptive names | Forest_Clearing |
Immediately clear what the level contains |
| Prefix-based | LVL_Tutorial_01 |
Groups all levels together in file lists |
| Numbered sequences | Chapter_03_CaveEntrance |
Shows progression order |
| Grid coordinates | World_X0_Y5 |
Region references within a large world |
Avoid generic names like Level1, NewMap, or Untitled. Future-you (and your teammates) will thank you for using clear, descriptive names.
🏋️ Hands-On Exercise: Create Your First Custom Level
Time to put your knowledge into practice! In this exercise, you'll create a new level from scratch, configure its settings, and save it properly.
Part 1: Create a New Basic Level
- Open your Unreal project (the one you created in Lesson 1.3)
- Go to File → New Level
- In the New Level dialog, select the Basic template
- Click Create
You should now see a new level with a floor plane, a sky, a sun (directional light), and fog. The viewport shows a simple gradient sky over a flat ground plane.
💡 Hint: Can't see anything in your viewport?
If your viewport is black or shows nothing, you might have accidentally chosen "Empty Level" instead of "Basic." An Empty Level has no lighting at all. Exit and try creating a new Basic level.
Part 2: Explore the Basic Level Contents
- Look at the Outliner panel (usually on the right side)
- You should see several actors already placed:
- Floor: A static mesh plane to stand on
- Directional Light: Represents the sun
- Sky Atmosphere: Creates the blue sky gradient
- Sky Light: Provides ambient lighting from the sky
- Exponential Height Fog: Atmospheric fog for depth
- Player Start: Where the player spawns when you press Play
- Click on each actor in the Outliner to see its properties in the Details panel
These are the building blocks of a basic environment. You don't need to understand them all yet· we'll cover lighting in Module 4.
🤔 Question: What happens if I delete the Directional Light?
Try it! Select the Directional Light in the Outliner and press Delete. The scene becomes much darker because you've removed the sun. Press Ctrl + Z to undo and bring it back. This demonstrates how levels are composed of individual actors working together.
Part 3: Access World Settings
- From the menu bar, choose Window → World Settings
- The World Settings panel appears (usually docking on the right, near the Details panel)
- At the top, note the World Partition Setup category and its Enable Streaming checkbox· the same one you saw in the figure earlier
- Expand the World category and find the Kill Z value
- Note the default value, then try changing it to
-5000and press Enter
You've just adjusted the "death plane" for this level. Any actor that falls below Z = -5000 will be destroyed.
Part 4: Save Your Level
- Press Ctrl + S to save the level
- A "Save Level As" dialog appears
- Navigate to
Content/Maps/(create this folder if it doesn't exist) - Name your level:
MyFirstLevel - Click Save
Your level is now saved! You can see it in the Content Browser under the Maps folder.
Part 5: Create a Second Level
- Go to File → New Level again
- This time, choose Empty Level
- Notice how different it looks· a completely black viewport
- Save this level as
MyEmptyLevelin the same Maps folder
Part 6: Practice Switching Between Levels
- In the Content Browser, navigate to
Content/Maps/ - Double-click
MyFirstLevelto open it· you see the floor and sky again - Double-click
MyEmptyLevel· you see the black empty space - Go to File → Open Recent· both levels appear in the list
Congratulations! You've created, configured, saved, and navigated between multiple levels. These are fundamental skills you'll use in every Unreal project.
🌍 Bonus: Peek at a World Partition world
Create one more level with the Open World template. Open Window → World Partition to see the streaming grid minimap, and notice in World Settings that Enable Streaming is already on. You don't need to build anything here· just observe that a large world is one level whose grid streams automatically. (You can discard this level afterward.)
✅ Solution Checkpoint: What should you have now?
You should have two .umap files in your Content/Maps/ folder:
MyFirstLevel.umap- A Basic level with floor and outdoor lightingMyEmptyLevel.umap- Completely empty
Summary
In this lesson, you've learned the foundational concepts of how Unreal Engine 5.8 organizes 3D worlds using levels. Let's recap the key points:
Key Takeaways
- 📦 Levels are containers that hold all the objects, lighting, and gameplay elements for a scene or area, saved as
.umapfiles - 🌍 World Partition is the UE 5.8 default for large worlds· it stores the world in one persistent level and streams a grid of cells automatically, with One File Per Actor and HLOD
- 🏗️ Persistent and streaming levels are the concepts World Partition automates; manual Level Streaming still exists for specific cases, while World Composition is now legacy
- 🗂️ Organization strategies range from linear and hub-and-spoke flows between levels to Data Layers inside a single World Partition world
- ⚙️ World Settings control level-specific configuration· World Partition Setup, game mode, physics, and Kill Z
- 💾 Creating and saving levels uses the Open World, Empty Open World, Basic, and Empty Level templates· pick Basic for learning, Open World for large worlds
What's Next?
Now that you understand how levels work, the next step is populating them with content. In Lesson 2.2: Actors and Components, you'll learn about the building blocks that go inside levels· the objects, lights, sounds, and gameplay elements that bring your worlds to life.
✅ Self-Check Quiz
Before moving on, make sure you can answer these questions:
- What is World Partition, and what problem does it solve compared to hand-authored sublevels?
- What is the difference between a persistent level and a streaming level?
- Which New Level template would you use to start a large open world, and why?
- Where do you find the World Settings panel, and what kinds of things can you configure there?
- What file extension do Unreal levels use?
📝 Show Answers
- World Partition automatically streams a single, large persistent level as a grid of cells, loading only what's near the player. It replaces the manual work of splitting a world into sublevels and wiring up Level Streaming by hand, and it stores actors as individual files so teams can collaborate.
- Persistent levels stay loaded throughout gameplay; streaming levels (or World Partition cells) load and unload dynamically based on proximity or triggers.
- Open World (or Empty Open World)· both create a level with World Partition already enabled, so the large world streams automatically.
- Window → World Settings (or the Settings gear dropdown). You can configure World Partition Setup, game mode, gravity, Kill Z, and more.
- .umap (Unreal Map)