🏞️ Assembling a Complete Environment
This is where the track pays off. The overview named the three pillars, and the three lessons since took each one apart: Nanite for geometry without a budget, Lumen for light without baking, PCG for population without hand placing. On their own, each removes one old limit. Together, on a piece of terrain, they build a finished world. This capstone is about that assembly, how a Landscape and World Partition give you the ground to build on, how you layer a scene from block out to hero geometry to procedural scatter to light, where the finished assets come from, and what turns a pile of correctly placed objects into an environment that reads as a real place. At the end you will see all three pillars working in a single frame, and understand how a finished environment becomes the stage that the rest of the course films on.
🏔️ Advanced Track · Environment Art
This is the fifth and final lesson of the Environment Art with Nanite, Lumen & PCG track, and its capstone. The first lesson mapped the whole modern pipeline, then the track went deep on each pillar in turn: Nanite for geometry, Lumen for light, and PCG for populating the world. Here we put them back together. Rather than teach a new pillar, this lesson shows how the three combine on a Landscape inside World Partition, using Fab and Megascans assets, into a single finished vista. It is the synthesis the whole track was building toward.
🎯 Learning Objectives
By the end of this lesson, you will be able to:
- Recall how Nanite, Lumen, and PCG each remove an old limit, and how they combine into one environment
- Explain the role of a Landscape and World Partition as the foundation a world is built on
- Describe the layered assembly order: block out the land, place hero geometry, scatter with PCG, then light
- Explain where finished assets come from, using Fab and Megascans as ready Nanite meshes
- Identify what makes an assembled environment read as finished: composition, depth, atmosphere, and light
- Explain how a finished environment becomes the stage for the Cinematic Production and MetaHuman tracks
Estimated Time: 45 to 60 minutes
Prerequisites: The whole track leading here, the overview and the three pillar lessons on Nanite, Lumen, and PCG, since this capstone assumes all three. A working Unreal Engine 5.8 install with the PCG plugin enabled, and access to Fab for assets.
In This Lesson
The Three Pillars, One World
Before assembling anything, it helps to see why the three pillars belong together. Each one answers a different old question about building a world. Nanite answers, how do I use detailed geometry without a polygon budget, by drawing high detail meshes directly with no hand made levels of detail. Lumen answers, how do I light a scene without baking, by computing bounced light and reflections every frame so nothing has to be precomputed. PCG answers, how do I fill a world without placing every object, by scattering from rules instead of by hand. Three separate problems, three separate answers.
The reason this track treated them one at a time is that each is a deep idea on its own. The reason this lesson puts them back together is that a real environment needs all three at once. A finished world is made of detailed geometry (Nanite), that has to be lit (Lumen), and there is far too much of it to place by hand (PCG), all sitting on terrain that is too big to load at once (Landscape and World Partition). None of the pillars is the whole picture; each removes one limit so that, together, they let you build something that would have been out of reach with any one alone. The capstone is simply the moment where all four ideas act on the same scene.
Figure: The synthesis · Nanite, Lumen, and PCG each remove one old limit, and on a Landscape inside World Partition they combine into a single finished environment. The capstone is where all of them act on the same scene at once.
The Foundation: Landscape and World Partition
Everything you assemble has to sit on something, and that something is the Landscape. A Landscape is the terrain, a large surface you sculpt from a heightmap, raising hills, cutting valleys, flattening a basin. It is the shape of the ground, and it is what the surface sampler in PCG reads when it scatters, what your hero rocks rest on, and what the light falls across. Before any objects go in, the land is the first decision, because it defines where everything else can live.
A finished world is usually far too large to hold in memory all at once, and that is what World Partition solves. Instead of one giant level you load whole, World Partition splits the world into a grid of cells and streams only the cells near the camera into memory, leaving the distant ones unloaded until you get close. That is what lets a world be huge, kilometres across, while staying smooth to build and to run, because the engine is only ever holding the nearby piece. Landscape gives you ground to build on; World Partition lets that ground be as big as the world needs, without paying for all of it at once. Together they are the foundation the three pillars stand on.
💡 The foundation, from terrain to streaming
flowchart LR
    LAND[Landscape
terrain sculpted from a heightmap] --> GROUND[The ground everything sits on
rocks rest, PCG samples, light falls]
    GROUND --> WP[World Partition
splits the world into a grid of cells]
    WP --> STREAM[Streams cells near the camera
leaves distant ones unloaded]
    STREAM --> BIG[A world too big to load at once
stays smooth to build and to run]
    style LAND fill:#faf0e6,stroke:#c1662f
    style GROUND fill:#fdf1e7,stroke:#c1662f
    style WP fill:#e3f2fd,stroke:#2196F3
    style STREAM fill:#ede7f6,stroke:#7e57c2
    style BIG fill:#e8f5e9,stroke:#4CAF50
The Landscape is the shape of the ground, the surface everything else builds on. World Partition streams that ground in cells so the world can be far larger than memory, loading only what is near.
Assembling in Layers
With a foundation in place, a scene comes together in layers, and the order matters. You do not scatter ten thousand rocks and then wonder where the land is; you build up. First, block out the land: sculpt the Landscape into the broad shapes you want, the basin, the ridge, the slope, so the space reads before anything is in it. Next, place the hero geometry by hand: the few pieces that carry intent, a large boulder that anchors a shot, an arch you want the camera to pass under, dropped exactly where they belong. These are the objects a specific position is the whole point of, so they get placed deliberately, as detailed Nanite meshes.
Then comes the population. Everything that is many rather than special, the scatter of smaller rocks, the debris, the grass, gets handed to PCG, which fills the land around your hero pieces from a rule instead of by hand. Finally, you light the whole thing with Lumen, and because nothing is baked you can move the sun, watch the bounce and reflections update, and keep adjusting until it reads. The order is deliberate: land before objects, intent before scatter, and light last so it falls on a scene that is already built. Each layer assumes the one before it, and each pillar does the job it is best at, geometry, then population, then light, on top of the terrain.
Figure: The layered assembly order · sculpt the Landscape, place the hero Nanite geometry by hand where intent matters, scatter the rest with PCG, and light the finished scene with Lumen. Each layer assumes the one before it, and each pillar does the job it is best at.
The Asset Source: Fab and Megascans
An environment is only as good as the pieces you build it from, and you rarely model those pieces yourself. Fab is Unreal's asset marketplace, the library where you find meshes, materials, and whole kits to drop into a project. Inside it lives Megascans, a huge collection of real world objects captured by photogrammetry, scanned rocks, cliffs, plants, and surfaces with photographic detail. Together they are where a modern environment's raw material comes from: instead of sculpting a boulder, you pick a scanned one that already looks real.
What makes this fit the rest of the track is that these assets arrive ready for the pillars. A Megascans mesh is built to be a Nanite mesh, so you can use its full detail directly with no retopology and no hand made levels of detail. That same mesh is exactly what you place by hand as a hero piece, and exactly what you feed to PCG to scatter as a population. So one library supplies both roles: the deliberate pieces and the scattered ones come from the same scanned source, drawn cheaply by Nanite and lit by Lumen. Fab and Megascans are not a fourth pillar; they are the material the pillars work on, the reason you can assemble a detailed world without modelling every rock in it.
💡 From a library to a world
flowchart LR
    FAB[Fab and Megascans
scanned, ready to use assets] --> IMPORT[Bring a mesh in
it arrives as a Nanite mesh]
    IMPORT --> HERO[Place hero pieces by hand
where a spot is intended]
    IMPORT --> SCATTER[Feed the rest to PCG
scattered by rule]
    HERO --> WORLD[One environment
built from a shared library]
    SCATTER --> WORLD
    style FAB fill:#faf0e6,stroke:#c1662f
    style IMPORT fill:#e3f2fd,stroke:#2196F3
    style HERO fill:#fdf1e7,stroke:#c1662f
    style SCATTER fill:#e8f5e9,stroke:#4CAF50
    style WORLD fill:#ede7f6,stroke:#7e57c2
One scanned mesh from Fab or Megascans serves both roles: placed deliberately as a hero piece, and scattered by PCG as a population. Both are Nanite meshes, so the same detailed asset is cheap to draw either way.
What Makes an Environment Read as Finished
Correctly placed objects are not the same as a finished scene. A field of rocks on flat ground can still look like a test level. What turns an assembly into an environment is a handful of composition choices, most of which have nothing to do with which pillar placed what. Depth is the first: a scene reads as real when it has layers, something large and close in front, a middle ground that recedes, and a far horizon behind, so the eye travels through space instead of landing on a flat wall of objects. Scale cues help too, big pieces beside small ones tell you how large the world is.
Atmosphere and light do the rest. A little haze or fog in the distance softens the far ground and separates the layers, so the background sits behind the middle instead of fighting it. And the direction and warmth of the light shape everything, a low, warm sun raking across the forms picks out their silhouettes and casts long, readable shadows, where a flat overhead light would make the same scene look dead. This is why the assembly order ends on Lumen: with the geometry and population in place, light is the layer that finally makes the world read. The figure below is a real assembly built in the course project, and it leans on exactly these choices, a hero boulder in front, a scattered field behind, a hazy dune horizon, and a low warm sun.
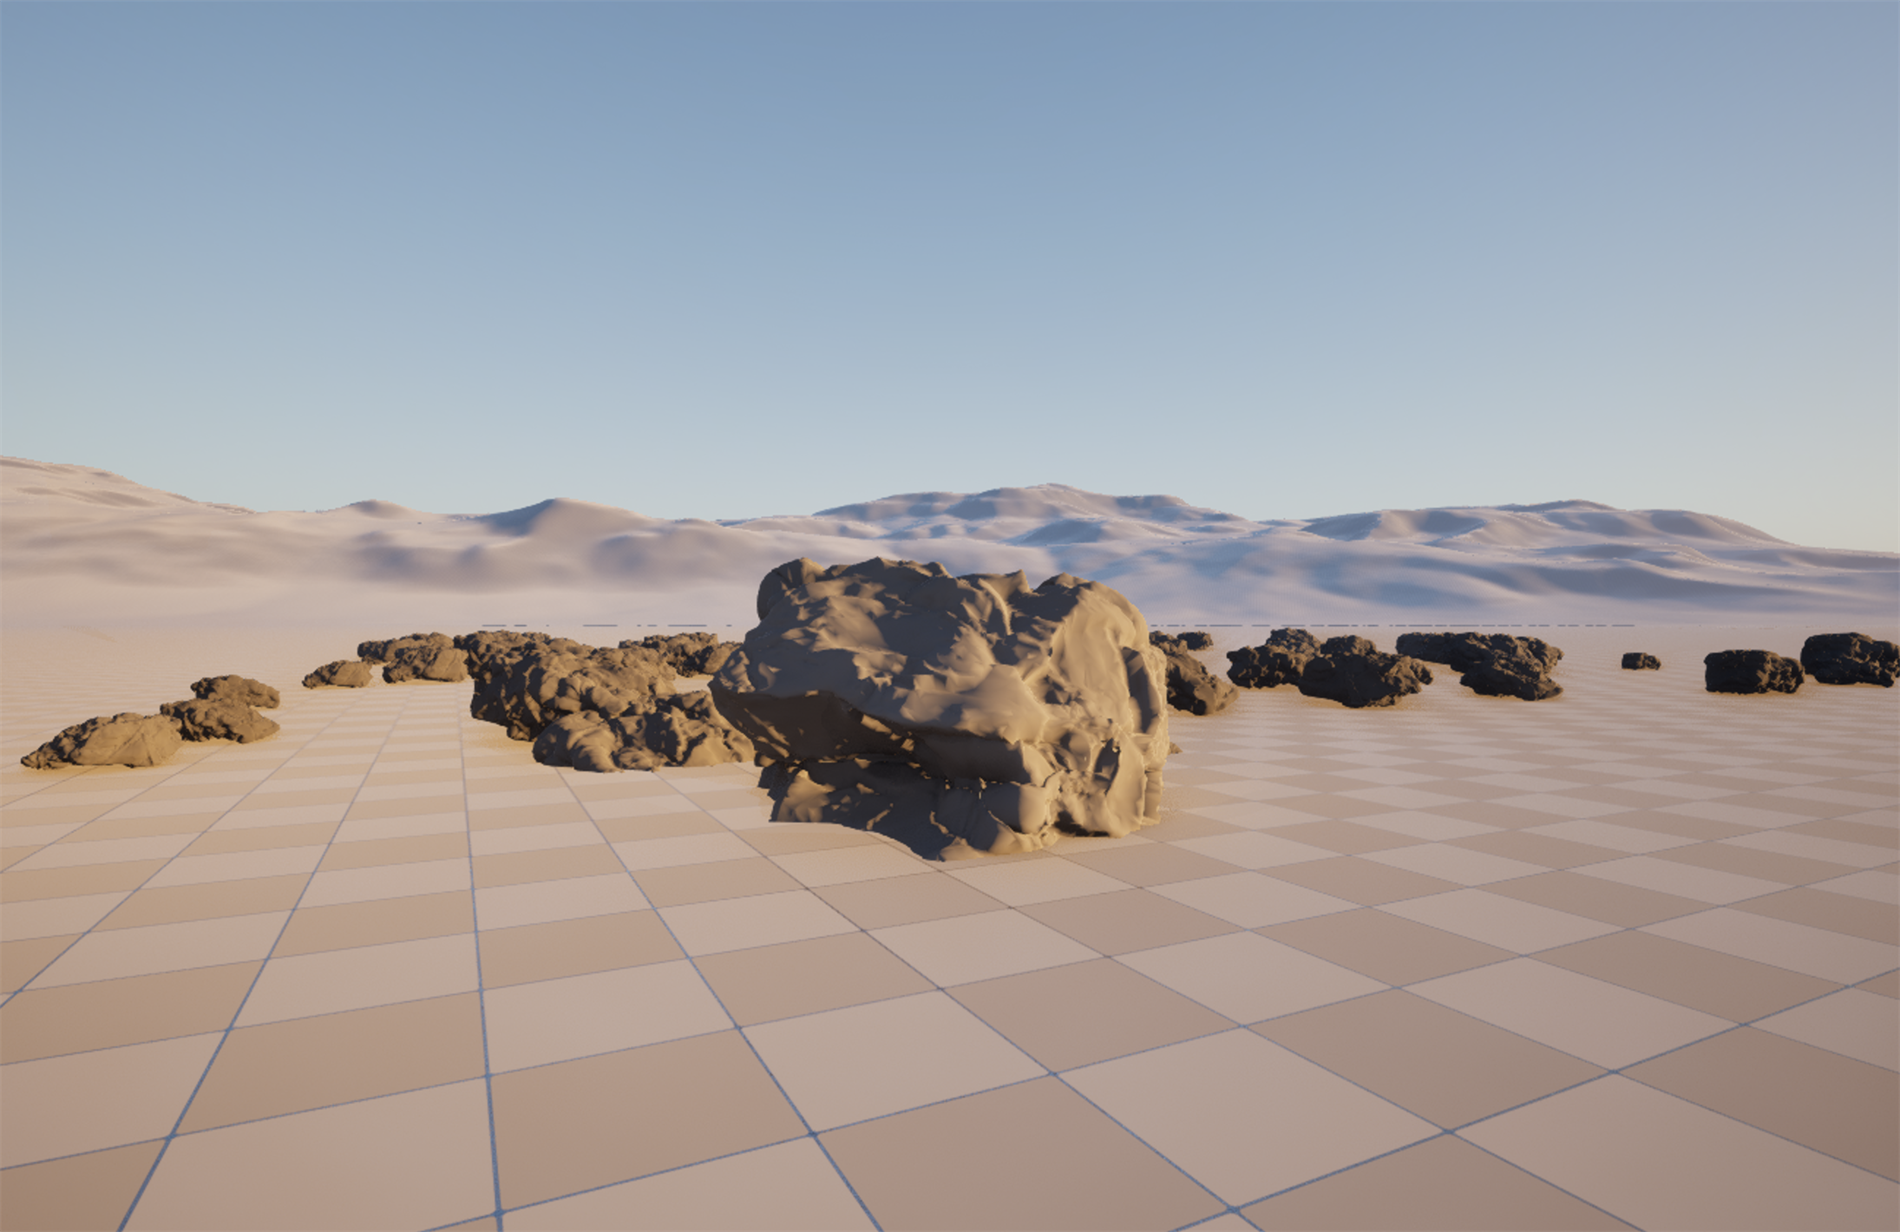
Figure: A finished vista, assembled live in the course's Unreal project · all three pillars in one frame. The large hero boulder in front is a hand-placed Nanite mesh; the field of smaller rocks behind it was scattered by a PCG graph (Get Landscape Data, then a Surface Sampler, then a Transform Points step for random rotation and size, then a Static Mesh Spawner, every rock an instance of the same Nanite mesh); and the whole scene sits on the World Partition desert Landscape, lit by Lumen (verified running for both global illumination and reflections). Hero geometry placed with intent, the rest populated by rule, all lit without baking, composed for depth with a low warm sun.
💡 What turns an assembly into a finished vista
flowchart LR
    DEPTH[Depth
hero in front, scatter mid, dunes far] --> READ[The scene reads as a real place]
    ATMOS[Atmosphere
haze softens and separates the distance] --> READ
    LIGHTDIR[Light direction
a low warm sun rakes the forms] --> READ
    SCALE[Scale cues
large pieces beside small ones] --> READ
    READ --> FINISH[A finished vista
not just correctly placed objects]
    style DEPTH fill:#faf0e6,stroke:#c1662f
    style ATMOS fill:#e3f2fd,stroke:#2196F3
    style LIGHTDIR fill:#ede7f6,stroke:#7e57c2
    style SCALE fill:#fdf1e7,stroke:#c1662f
    style FINISH fill:#e8f5e9,stroke:#4CAF50
The pillars place and light the geometry, but depth, atmosphere, light direction, and scale are the composition choices that make it read as a place rather than a test level. They are the last, and often the most important, layer.
The Finished Environment as a Stage
A finished environment is not the end of anything; it is the beginning of everything the rest of the course does. Look back at where this track sits. The MetaHuman track builds the character. This track builds the world that character stands in. The Cinematic Production track then takes that world and films it, placing cameras, staging the action, and lighting the shot. In that chain, the environment you assemble here is the stage, the physical space the story happens in. Everything the cinematic lessons do, framing, camera moves, sequencing, assumes there is a world already standing to point the camera at.
That is the quiet payoff of building with the three pillars. Because the world is made of Nanite geometry, it holds up to a camera moving close. Because it is lit by Lumen, the light is real and responds when you change it for a shot. Because it was populated by PCG, it is dense and believable without a team hand placing every rock. The environment is built to be filmed. When you finish this capstone, you have not just made a pretty picture; you have made a place that the character track can inhabit and the cinematic track can shoot. That is what an environment artist delivers, the stage on which everyone else's work happens.
Figure: Environment as stage · the world you assemble with the three pillars becomes the space the MetaHuman characters inhabit and the Cinematic Production track films. Built from Nanite, Lumen, and PCG, it holds up to a close camera and relights live, so it is ready to be shot.
Hands-On: Assemble a Small Vista
This exercise is the whole track in miniature. You will not build a finished game world, but you will run the full assembly loop once, foundation, hero geometry, scatter, and light, so the synthesis stops being abstract. Keep it small; the point is the sequence, not the scale.
🏞️ Exercise: build a vista from all three pillars
- Start on terrain. Open a level with a Landscape (or add one) inside World Partition. Sculpt or find a flat basin with a rise in the distance, so the space has a foreground and a horizon. This is your foundation.
- Bring in a scanned asset. From Fab or the Megascans library, add a detailed rock mesh to the project. Confirm it is a Nanite mesh so you can use its full detail directly.
- Place a hero piece. Drop one large rock by hand near the foreground, exactly where you want the eye to land. Scale it up so it reads as a landmark. This is your intent, placed deliberately.
- Scatter the rest. Add a PCG volume behind and around the hero rock, with a graph that samples the surface and spawns the same rock as instances, with a random rotation and a range of sizes. Generate, and watch a field fill in around your hero piece.
- Light it, and compose. Lower the sun toward a warm angle and let Lumen light the scene, no baking. Then move the camera for depth, hero in front, scatter in the middle, horizon behind, and nudge the fog until the distance softens. That last step is what turns the assembly into a vista.
💡 Hint: it looks placed, not finished
If your scene reads as objects on a floor rather than a place, the problem is almost always composition, not the pillars. Check three things. Depth: is there something large and close, something in the middle, and a far horizon, or is everything at one distance? Light: is the sun low and warm and coming from the side, or flat and overhead? Atmosphere: is there any haze in the distance to separate the layers? Fixing those, not adding more rocks, is what makes it read.
✅ Reach exercise: change one thing and re-light
With your vista working, change the sun's angle from morning to late afternoon and watch Lumen re-light the whole scene with no bake, then change the PCG seed and watch the scatter re-arrange with the hero rock untouched. Two edits, each touching a different pillar, and the world stays correct through both. That is the freedom the three pillars buy you, and it is exactly what makes an environment a living stage rather than a fixed picture.
Knowledge Check
Question 1
In a complete environment, what does each of the three pillars contribute?
Correct answer: B · Each pillar removes a different old limit: Nanite draws detailed geometry with no polygon budget, Lumen lights with real-time bounce and reflections and no bake, and PCG fills the world from rules instead of by hand. A finished environment needs all three at once, on terrain.
Question 2
What roles do a Landscape and World Partition play as the foundation?
Correct answer: B · The Landscape is the sculpted terrain, the ground rocks rest on, PCG samples, and light falls across. World Partition splits the world into a grid and streams only the cells near the camera, so a world can be huge while staying cheap to build and run.
Question 3
What is the layered order for assembling a scene, and why does it matter?
Correct answer: B · You build up: sculpt the land so the space reads, place the few hero pieces that carry intent, hand the many objects to PCG, and light last so it falls on a scene already built. Land before objects, intent before scatter, light last.
Question 4
How do Fab and Megascans fit the three pillars?
Correct answer: B · Fab is the marketplace and Megascans the scanned library. A Megascans mesh is built to be a Nanite mesh, used directly with no retopology, and the same asset can be placed by hand as a hero piece or fed to PCG to scatter. They are the material the pillars work on.
Question 5
Beyond placing objects correctly, what makes an environment read as finished, and why is it a stage?
Correct answer: B · Correctly placed objects still need composition: layered depth, a little atmosphere, a low warm side light, and scale cues turn an assembly into a place. And because the world is Nanite geometry lit by Lumen and populated by PCG, it holds up to a moving camera and responds to relighting, so it is ready to be the stage other tracks shoot on.
Summary
This capstone brought the track together. You have taken the three pillars apart one at a time, and here you have seen them combine, on terrain, into a single finished environment. Here is what to carry forward:
The pillars are complementary, not alternatives. Nanite gives geometry without a budget, Lumen gives light without baking, PCG gives population without hand placing, and a real world needs all three at once, standing on a Landscape inside World Partition. Each removes one limit; together they let you build what none could alone.
Assemble in layers, in order. Block out the land, place the hero geometry by hand where intent matters, scatter the rest with PCG, and light with Lumen last. Draw the pieces from Fab and Megascans, which arrive as Nanite meshes ready for both hand placement and scatter. The order is deliberate, because each layer assumes the one before it.
Composition finishes it, and the result is a stage. Depth, atmosphere, light direction, and scale are what turn correctly placed objects into a place that reads. And because the finished world is built from the pillars, it holds up to a close camera and relights live, which is exactly what makes it the stage the Cinematic Production and MetaHuman tracks build their shots on.
🔑 Key Takeaways
- A complete environment combines all three pillars at once: Nanite geometry, Lumen light, and PCG population, on a Landscape inside World Partition
- The Landscape is the terrain everything sits on, and World Partition streams the world in cells so it can be far larger than memory while staying smooth
- Assemble in layers and in order: block out the land, place hero geometry by hand, scatter the rest with PCG, then light with Lumen, because each layer assumes the one before it
- Fab and Megascans supply scanned assets that arrive as Nanite meshes, serving both as hand-placed hero pieces and as PCG scatter from one shared library
- Depth, atmosphere, light direction, and scale make an assembly read as finished, and because it is built from the pillars the world becomes a stage that holds up to a close camera and relights live
👆 A note on this lesson's figures
The desert vista is a genuine live capture from the course's ClaudeTest project, and it really does combine all three pillars in one frame. The large boulder in front is a scanned-style rock placed by hand, with Nanite enabled, so its detail is drawn directly. The field of smaller rocks behind it was generated by PCG: a graph built through the editor, a Get Landscape Data node feeding a Surface Sampler, then a Transform Points node for random rotation and size, then a Static Mesh Spawner set to the same scanned rock, run inside a volume over the desert Landscape, so every rock in the field is an instance of one Nanite mesh placed by rule rather than by hand. The whole scene sits on the project's World Partition desert terrain and is lit by Lumen, which was confirmed running for both global illumination and reflections. The regular tiling you can see on the ground is the project's default working landscape material, left as it is because the point of the shot is the assembly, not a finished ground texture. The synthesis diagram, the foundation flow, the layered build order, the asset flow, the finished-vista map, and the stage handoff are labeled illustrations, because these ideas are clearest as diagrams before you build them in your own viewport. What they show is what the capture demonstrates: three pillars, one world.
Where this fits
This lesson closes the Environment Art track by assembling everything its earlier lessons taught: the pipeline overview, then Nanite for geometry, Lumen for light, and PCG for population, brought together on a Landscape in World Partition. The finished environment is the stage the rest of the course films on: the MetaHuman track builds the character who stands in it, and the Cinematic Production track places the cameras and lights that shoot it. In the larger Story-to-Screen pipeline, this is the world that shot assembly stages and films. With the environment built, you have the place; the rest of the course brings it to life.