🌱 PCG: Procedural Generation
The overview named PCG as the third pillar, the one that removes the hand placement. This lesson is where that promise gets its detail. PCG stands for Procedural Content Generation, and its whole purpose is to let you populate a world by describing rules for where things go rather than dragging every rock, plant, and prop into place by hand. You will see what procedural placement actually means and why describing beats placing at scale, how a PCG graph moves data through a chain of nodes, how a surface is turned into a set of points, and how those points become real instanced meshes that tie straight back to Nanite. Then the part that makes it powerful: the rules that shape a scatter, the seed that makes it repeatable, and the fact that when the land changes you just regenerate, with nothing hand placed to lose.
🏔️ Advanced Track · Environment Art
This is the fourth lesson of the Environment Art with Nanite, Lumen & PCG track. The first lesson mapped the whole modern pipeline, the second went deep on geometry with Nanite, and the third on light with Lumen. Here we take the third pillar, procedural generation. Where Nanite lets a world hold detailed geometry and Lumen lets it be lit without baking, PCG lets it be populated without placing every object by hand, so a landscape can be filled with rocks and foliage from a set of rules. The next and final lesson is a capstone that assembles a complete environment from all three pillars.
🎯 Learning Objectives
By the end of this lesson, you will be able to:
- Explain what procedural placement is and how describing rules differs from placing objects by hand
- Describe a PCG graph as a chain of nodes that passes data from one step to the next
- Explain how a surface is sampled into a set of points that placement can use
- Describe how a Static Mesh Spawner turns those points into instanced meshes, and how that ties back to Nanite
- Explain the rules that shape a scatter, density, bounds, exclusion, and the seed, and why regeneration is non-destructive
- Say what PCG is and is not for, and name its main costs
Estimated Time: 45-60 minutes
Prerequisites: The track overview, The Modern Environment Pipeline, and ideally the geometry and light lessons, Nanite: Virtualized Geometry and Lumen: Real-Time Global Illumination and Reflections, since PCG places the Nanite meshes that Lumen then lights. A working Unreal Engine 5.8 install with the PCG plugin enabled.
In This Lesson
Describing a World Instead of Placing It
Imagine filling a desert valley with ten thousand rocks. The old way is to place them by hand: drag one in, rotate it, scale it, nudge it so it sits in the sand, then do it again, and again, for hours, and if the ground later changes shape you go back and fix every rock that now floats or sinks. It works, but it does not scale, and it makes the world hard to change. Procedural placement flips the problem around. Instead of placing each object, you describe the rule for how objects should be placed: scatter rocks across this surface, at about this density, avoiding the road, at random rotations and a range of sizes. Then the system reads the rule and produces the ten thousand rocks for you.
That is the whole idea behind PCG, Procedural Content Generation. You author intent, not instances. The payoff is not only speed but changeability: because the rocks came from a rule rather than from your mouse, you can change the rule, or change the land underneath, and get a fresh, correct result without touching a single rock. Placing is a list of positions you have to maintain; describing is a recipe the engine re-runs. For a modern world made of thousands of scattered pieces, that difference is what makes the work possible at all. It is the same move the other two pillars made, no fixed polycount with Nanite, no baked lighting with Lumen, and here, no hand placement.
Figure: Placing versus describing · hand placement sets each object one at a time and has to be redone when the world changes. Procedural placement describes a rule once, and PCG produces the whole population from it, then reproduces it correctly whenever the inputs change.
The PCG Graph
The rule you describe is not written in text; it is built as a graph. A PCG graph is a chain of nodes, where each node does one small job and passes its result to the next, the way an assembly line passes a part from station to station. Data flows along the wires between nodes: one node reads the landscape, the next turns it into a set of points, the next adjusts those points, the next spawns a mesh at each point. Nothing in the graph names a specific rock at a specific spot. The graph describes a process, and running that process on the current world produces the actual objects.
This is why PCG is so flexible. Because the world is produced by a process rather than stored as a fixed list, you shape the result by editing the graph, changing a node's setting, inserting a node to add a rule, rewiring the flow, and re-running. You place a graph in the level inside a PCG volume, a box that marks the area to work in, and the graph fills that area according to its nodes. Learn to read a graph as a left-to-right story of what happens to the data, get the surface, sample it into points, transform the points, spawn meshes, and even a large graph becomes legible. The rest of this lesson walks that exact chain.
💡 A scatter graph, read left to right
flowchart LR
    IN[The area to fill
a PCG volume in the level] --> SURF[Get the surface
read the landscape]
    SURF --> PTS[Sample into points
positions on the surface]
    PTS --> XF[Transform the points
random rotation and size]
    XF --> SPAWN[Spawn a mesh
place an object at each point]
    SPAWN --> OUT[The populated area
the result in the level]
    style IN fill:#faf0e6,stroke:#c1662f
    style SURF fill:#e3f2fd,stroke:#2196F3
    style PTS fill:#e3f2fd,stroke:#2196F3
    style XF fill:#ede7f6,stroke:#7e57c2
    style SPAWN fill:#fdf1e7,stroke:#c1662f
    style OUT fill:#e8f5e9,stroke:#4CAF50
Each node does one job and hands its data to the next. The graph never names an individual object; it describes the process that produces them, so editing a node changes the whole result.
Sampling a Surface into Points
Almost every scatter begins by turning a surface into points. A point in PCG is not yet a rock or a tree; it is just a marked location, a position in the world with a little attached data, waiting for something to be placed there. The node that does this, a surface sampler, takes a surface such as the landscape and scatters sample points across its two dimensional footprint, then drops each point down onto the actual surface so it sits on the ground wherever the ground happens to be. The result is a field of positions that follow the terrain, ready for the next step to build on.
How many points, and how they are spread, is where the first rules live. A density setting controls how many points per unit of area, so you can ask for a sparse scattering or a thick carpet. The sampler works within bounds, usually the PCG volume you placed, so points only appear where you want them. Each point also carries data you can use later, its position, and often the surface normal so a later node can tilt an object to match a slope. Nothing is placed yet; you have simply described where things could go. Getting the point field right, the density, the spread, the area, is most of the work of a good scatter, because everything downstream just decorates these points.
Figure: The surface sampler · points are scattered across the surface's flat footprint at a chosen density and within the bounds, then projected down onto the landscape so they follow the terrain. These points are just marked locations carrying data; nothing is placed on them yet.
Spawning Meshes on the Points
Once you have a field of points, a Static Mesh Spawner turns them into visible geometry: it places a chosen mesh at each point, taking the point's position, rotation, and scale. Give it a rock and every point becomes a rock. But it does not create thousands of separate, independent rock actors, which would be heavy. Instead it spawns them as instances: one shared mesh drawn many times, with just a per-point transform for each copy. The engine can render a large batch of identical instances far more cheaply than the same number of unique objects, so a dense scatter stays affordable.
This is exactly where PCG and Nanite meet. The meshes you scatter are typically detailed, scanned Nanite meshes, and Nanite already keeps each one cheap to draw regardless of its triangle count. Layer instancing on top, one mesh reused across thousands of points, and you can carpet a landscape in high detail geometry that would have been unthinkable to place by hand or to render as individual objects. PCG decides where the geometry goes, Nanite makes each piece affordable to draw, and instancing makes the multitude affordable to manage. The three ideas compound: describe the placement, virtualize the detail, share the mesh.
💡 From points to instanced Nanite meshes
flowchart LR
    PTS[A field of points
each with a transform] --> SPAWN[Static Mesh Spawner
place the chosen mesh at each point]
    SPAWN --> INST[Spawned as instances
one shared mesh, a transform per copy]
    INST --> NAN[Each mesh is a Nanite mesh
detail stays cheap to draw]
    NAN --> FIELD[A dense, detailed field
affordable to draw and to manage]
    style PTS fill:#e3f2fd,stroke:#2196F3
    style SPAWN fill:#fdf1e7,stroke:#c1662f
    style INST fill:#ede7f6,stroke:#7e57c2
    style NAN fill:#faf0e6,stroke:#c1662f
    style FIELD fill:#e8f5e9,stroke:#4CAF50
The spawner reuses one mesh across every point as instances, and because that mesh is a Nanite mesh, each instance stays cheap. PCG places it, Nanite draws it, instancing manages the multitude.
Rules, Seeds, and Regeneration
A bare scatter is only the start; the craft is in the rules that shape it. Density sets how thick the population is. Bounds keep it inside the area you marked. Exclusion lets you carve out where nothing should go, subtract a path, a building footprint, or the space near a river, so the scatter respects the rest of your world. And a transform step gives each instance a random rotation and a range of sizes, so a scatter of one rock mesh reads as a natural jumble instead of a grid of clones. Stack a few of these rules and the same handful of nodes can produce a convincing, varied field.
Randomness in PCG is controlled by a seed, and this matters more than it sounds. The seed is the number the graph's random choices start from, so the same seed always produces the same layout. That makes a procedural scatter repeatable: it looks random, but it is not different every time you open the level, and change the seed and you get a fresh arrangement on demand. Best of all, the whole thing is non-destructive. Because the result came from the rules, not from hand editing, you can reshape the landscape, move the volume, or tweak a setting, and PCG simply regenerates the population to match. There is nothing hand placed to break, no thousand rocks to re-seat. You change the inputs and re-run the recipe.
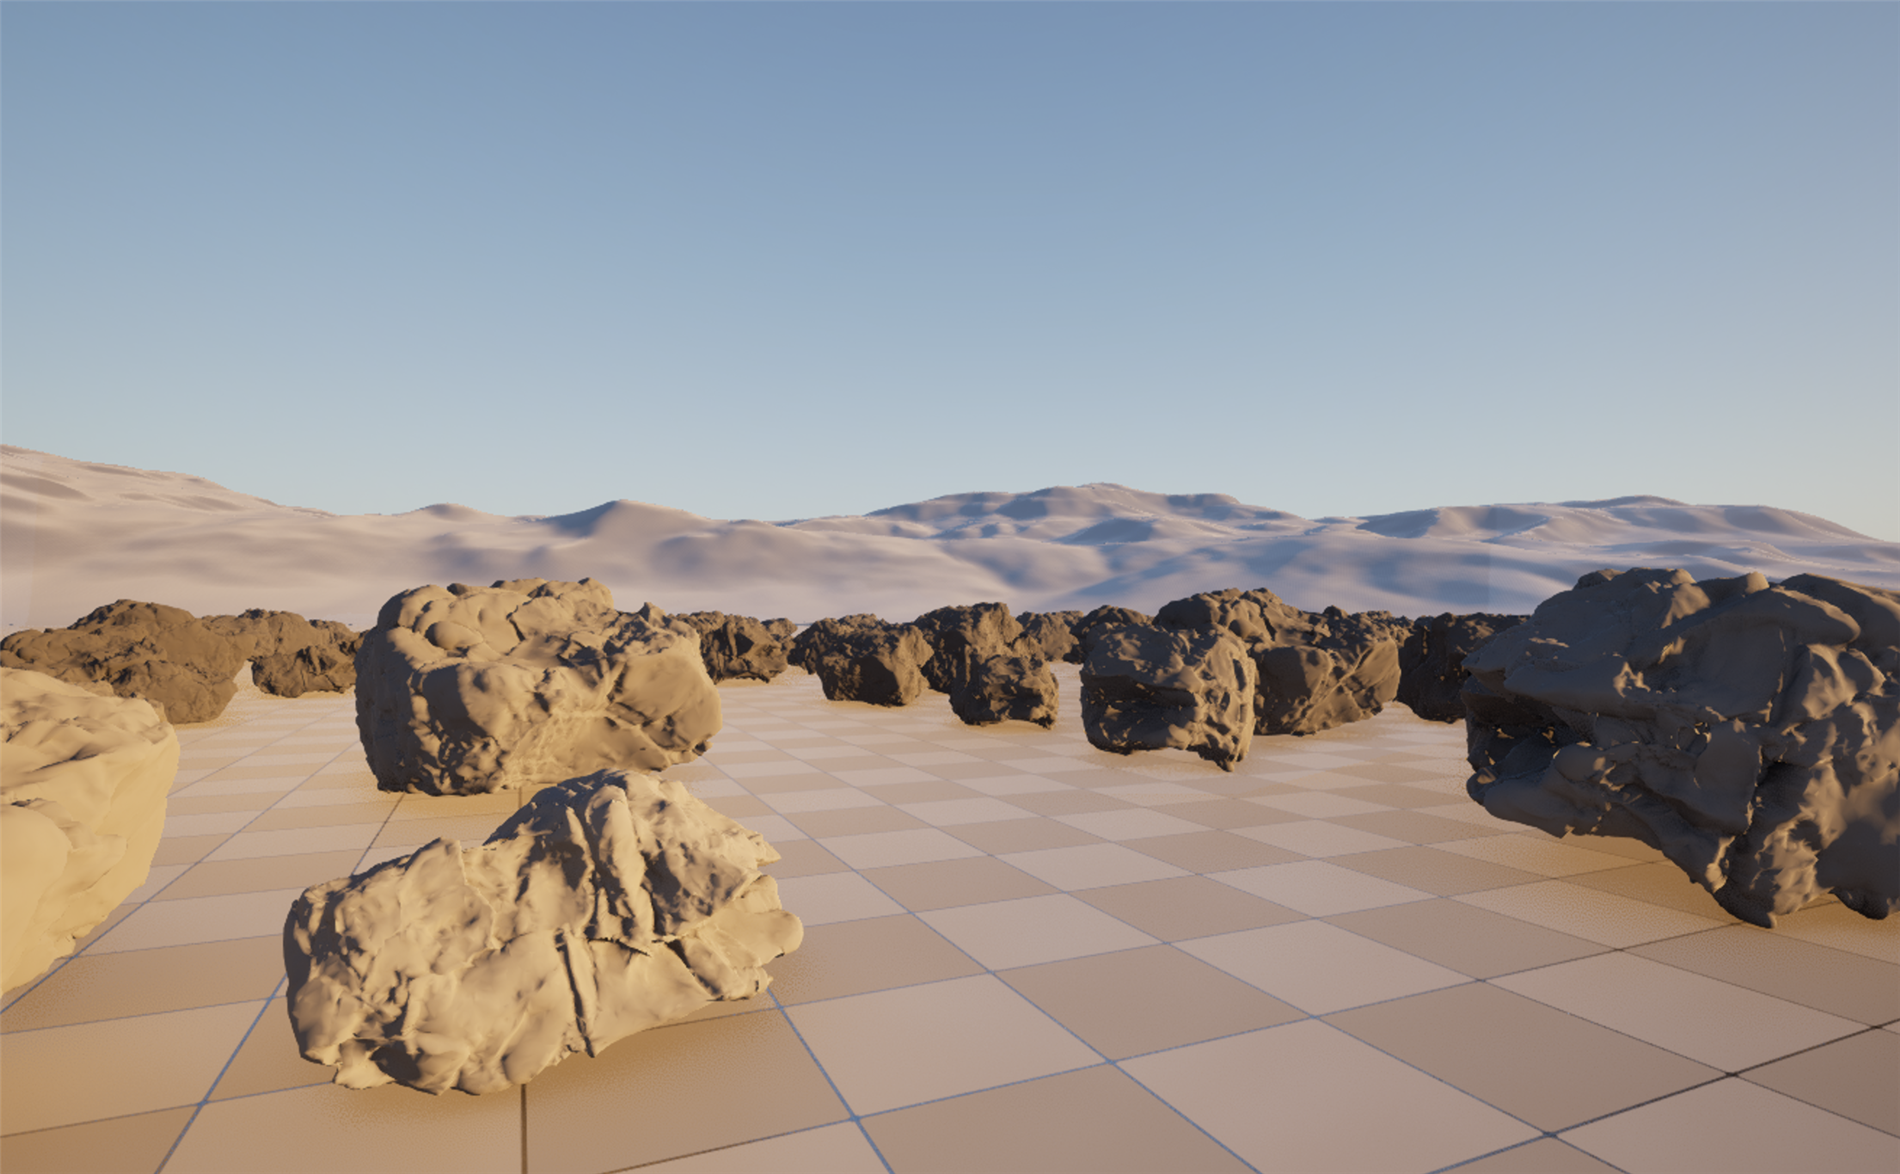
Figure: A real PCG scatter, generated live in the course's Unreal project · this field of rocks was not placed by hand. A PCG graph (Get Landscape Data, then a Surface Sampler, then a Transform Points step for random rotation and size, then a Static Mesh Spawner) scattered one scanned-style rock across a patch of the desert landscape. Every rock is the same Nanite mesh drawn as an instance, and the whole field is lit by Lumen (verified running for global illumination). Change the density or the seed and the graph regenerates the entire scatter.
💡 Non-destructive regeneration
flowchart LR
    EDIT[Change an input
reshape the land, a rule, or the seed] --> RUN[PCG re-runs the graph
the rules produce a new scatter]
    RUN --> RESULT[A fresh, correct population
nothing hand placed to lose]
    RESULT --> AGAIN[Change again
just regenerate]
    AGAIN --> EDIT
    style EDIT fill:#faf0e6,stroke:#c1662f
    style RUN fill:#ede7f6,stroke:#7e57c2
    style RESULT fill:#e8f5e9,stroke:#4CAF50
    style AGAIN fill:#fdf1e7,stroke:#c1662f
Because the scatter comes from rules and a seed, not from hand placement, changing the world just means regenerating. The seed keeps a given result repeatable; changing it gives a new arrangement on demand.
What PCG Is For, and What It Costs
PCG is at its best for scatter and population: rocks and debris across terrain, grass and plants over a field, props along a path, a forest, a boulder field, anything where you want many things placed by a rule rather than a few placed with intent. It shines when the count is high, when the layout should follow the land, and when you expect the world to keep changing. It is not the tool for everything. A hero object that must sit in one exact spot, a hand-composed set piece, a unique landmark, those you still place deliberately, because their whole point is a specific, authored position. PCG populates the world around such moments; it does not replace authored intent where intent is what you want.
And it is not free. A dense graph takes time to generate, and a heavy scatter still spends memory and draw work at runtime even with instancing and Nanite helping, so density is a budget you manage, not an infinite dial. Because the output is driven by a seed, you have to think in terms of determinism: the same seed gives the same result, which is a feature, but it also means you tune the seed and the rules rather than nudging individual objects. The trade PCG offers is clear. You give up direct, per object control and accept some generation cost, and in return you get worlds you can populate at a scale, and change with a freedom, that hand placement could never reach. For filling a landscape, that is the trade you want.
Figure: PCG's fit and its cost · use it to populate a world with many rule-placed objects that follow the land and tolerate change; place unique, intended objects by hand. The cost is generation time, runtime budget, and thinking in terms of a seed rather than per-object edits.
Hands-On: Scatter a Field with a Graph
PCG is best understood by watching a rule fill an area, so this exercise builds the exact chain from this lesson: read a surface, sample it into points, and spawn a mesh at each. The whole point is that you never place a single rock, and yet a field appears.
🌱 Exercise: build a rock scatter from scratch
- Enable PCG and make a graph. With the PCG plugin on, create a PCG Graph asset. This is where you will describe the rule.
- Drop a PCG volume. Place a PCG Volume actor in a level over a piece of landscape and assign your graph to it. The volume is the area the graph will fill.
- Read the surface. In the graph, add a node that gets the landscape data, then a Surface Sampler and connect them. Nothing visible happens yet; you now have a field of points.
- Spawn a mesh. Add a Static Mesh Spawner, connect the sampler into it, and choose a rock mesh. Generate the graph and watch the field of rocks appear across the volume, all from those three nodes.
- Vary and tune. Insert a Transform Points node before the spawner and give it a random rotation and a range of scales, then change the sampler's density. Regenerate and see the field respond, no rock ever touched by hand.
💡 Hint: my scatter looks like a grid of identical clones
That is what a raw scatter looks like before the rules do their work. Add a Transform Points node between the sampler and the spawner: set a random rotation on the up axis so every rock faces a different way, and a scale range such as 0.7 to 1.9 so sizes vary. If they still line up too evenly, raise the sampler's looseness so points sit anywhere in their cell rather than dead center. Small amounts of randomness are what turn a grid into a natural field.
✅ Reach exercise: regenerate after a change
With your scatter working, sculpt or move the landscape under the volume, or just change the seed on the graph, and regenerate. Notice that the entire field re-places itself correctly with no manual fixing, rocks follow the new ground and the new seed gives a fresh arrangement. Then imagine doing that same edit to ten thousand hand-placed rocks. That gap, between fixing every object and re-running one rule, is the whole reason PCG exists.
Knowledge Check
Question 1
What is the core idea of procedural placement in PCG?
Correct answer: B · Procedural placement means authoring intent rather than instances. You describe the rule, scatter these across that surface at this density, and PCG generates the objects, so changing the rule or the land regenerates a correct result with nothing placed by hand.
Question 2
What is a PCG graph?
Correct answer: C · A PCG graph is a chain of nodes, each doing one small job and handing its data to the next, get the surface, sample it, transform the points, spawn a mesh. It describes a process, not a fixed list, which is why editing a node changes the whole result.
Question 3
In a scatter, what does a surface sampler produce?
Correct answer: B · The surface sampler scatters sample points across the surface's footprint at a set density and within the bounds, then projects them onto the terrain so they follow the ground. The points are just marked locations carrying data; nothing is placed on them until a later node does so.
Question 4
How does spawning meshes on points relate to Nanite and performance?
Correct answer: B · The Static Mesh Spawner places one shared mesh at every point as instances, with just a transform per copy, which is far cheaper than thousands of unique objects. Because the mesh is a Nanite mesh, its detail is also cheap to draw, so PCG can carpet a landscape in high detail geometry.
Question 5
Why is PCG regeneration called non-destructive, and what is the seed for?
Correct answer: B · Because the population is produced from rules rather than hand editing, changing the land, the volume, or a setting just regenerates it correctly, with nothing manual to break. The seed is the starting number for the graph's random choices, so the same seed gives the same layout and changing it gives a new one on demand.
Summary
You now know the third pillar in depth. PCG is the reason a modern environment can be populated at scale and stay changeable, filling a world from rules instead of by hand. Here is what to carry forward:
Describe, do not place. Procedural placement means authoring a rule for where objects go, then letting PCG produce the population. That scales to thousands of objects and, more importantly, stays changeable, because a rule can be re-run where a hand-placed list cannot.
The graph is the rule. A PCG graph is a chain of nodes that passes data from one step to the next: get the surface, sample it into points, transform the points, spawn a mesh at each. It describes a process, so you shape the world by editing nodes and regenerating.
Points become instanced, Nanite geometry, and it all regenerates. A surface sampler makes a field of points, a Static Mesh Spawner turns each into an instance of a shared Nanite mesh, and rules for density, bounds, exclusion, and a random transform shape the result. A seed makes it repeatable, and because it came from rules, changing the world just means regenerating, non-destructively, at a cost of generation time and runtime budget.
🔑 Key Takeaways
- Procedural placement describes a rule for where objects go and lets PCG produce the population, instead of placing each object by hand, which scales and stays changeable
- A PCG graph is a chain of nodes that passes data along, get the surface, sample it into points, transform them, spawn a mesh, describing a process rather than a fixed list
- A surface sampler turns a surface into a field of points at a chosen density within bounds, following the terrain, with nothing placed until a later node acts
- A Static Mesh Spawner places one shared mesh at every point as instances, and because the mesh is a Nanite mesh each instance stays cheap, so a dense scatter is affordable
- Density, bounds, exclusion, and a random transform shape the scatter, a seed makes it repeatable, and because it came from rules the world regenerates non-destructively, at a real generation and runtime cost
👆 A note on this lesson's figures
The desert rock field is a genuine live capture from the course's ClaudeTest project, and it was really generated by PCG, not placed by hand. A PCG graph was built through the editor, a Get Landscape Data node feeding a Surface Sampler, then a Transform Points node for random rotation and size, then a Static Mesh Spawner set to a scanned-style rock, and run inside a PCG volume over a patch of the desert landscape; the rocks you see are that graph's output, every one an instance of the same Nanite mesh, and the scene is lit by Lumen, which was confirmed running for global illumination. The point it makes is exactly the lesson's: a whole field of varied, grounded rocks came from a handful of nodes and a rule, with nothing dragged into place. The placing-versus-describing diagram, the graph, the surface sampler, the spawn-to-Nanite flow, the regeneration loop, and the fit-and-cost map are labeled illustrations, because a process is clearest as a diagram before you watch it fill an area in your own viewport. What they show is what you will confirm live when you build the graph and press generate.
Where this fits
This lesson completes the three pillars the overview introduced: Nanite for geometry, Lumen for light, and PCG here for populating the world. The three are made to work together, PCG places the Nanite meshes that Lumen then lights. Next in the track, a capstone assembles a complete environment from all three, on a Landscape inside World Partition, using Fab and Megascans assets. PCG fills the worlds that become the stage for the Cinematic Production track, and in the larger Story-to-Screen pipeline, it is the craft behind populating the environments of shot assembly.