🪨 Nanite: Virtualized Geometry
The overview promised that Nanite removes the polygon budget. This lesson is where that promise gets its detail. Nanite is Unreal's system for virtualized micropolygon geometry, and its whole purpose is to let you drop a mesh of almost any triangle count straight into a scene and render it efficiently, with no low-poly copy and no hand-authored chain of levels of detail. You will see what virtualized geometry actually means, how Nanite breaks a mesh into small clusters and streams only the ones the camera needs at the detail the screen can resolve, and why that ends the level-of-detail chain artists used to build and babysit. Then the practical half: using photo-scanned assets as they are, knowing where Nanite fits and where it does not, and enabling it on a Static Mesh of your own.
🏔️ Advanced Track · Environment Art
This is the second lesson of the Environment Art with Nanite, Lumen & PCG track. The first lesson mapped the whole modern pipeline and named its three pillars. Here we go deep on the first pillar, geometry. The next lessons take Lumen (dynamic light) and PCG (procedural placement) in turn, then a capstone assembles a complete environment. Nanite is the reason a modern world can be built from film-resolution scanned assets and still run in real time.
🎯 Learning Objectives
By the end of this lesson, you will be able to:
- Explain what virtualized micropolygon geometry is and which old constraints it removes
- Describe how Nanite breaks a mesh into clusters and streams only the clusters the camera needs
- Explain why Nanite chooses detail per cluster and per frame, so there is no level-of-detail chain and no popping
- Use photo-scanned Fab Megascans assets directly, without retopology or hand-authored levels of detail
- Identify where Nanite fits (opaque and masked meshes, foliage, tessellation) and where it does not (animated skeletal characters)
- Enable Nanite on a Static Mesh and verify it with the Nanite visualization modes
Estimated Time: 45-60 minutes
Prerequisites: The track overview, The Modern Environment Pipeline, and comfort with the Unreal editor and the Content Browser from the beginner modules. Helpful but not required: the beginner lesson on materials, since Nanite began with opaque and masked surfaces. A working Unreal Engine 5.8 install with Nanite available.
In This Lesson
What Virtualized Geometry Means
Start with the problem Nanite was built to solve. In the older pipeline, geometry had a hard triangle budget. A scene could only draw so many triangles per frame, so every asset was authored to a budget: a rock might be modeled at full detail once, then rebuilt as a handful of cheaper copies, and its fine surface faked with a normal map painted from the high-detail version. On top of that, each asset carried a level-of-detail chain, a series of lower and lower resolution versions, LOD0 through LOD3 or more, that the engine swapped in as the object moved away from the camera. Building that chain, tuning the distances at which each version took over, and hiding the visible pop when they switched was a large part of the job.
Nanite replaces all of that with one idea borrowed from how engines already handle textures. A large texture is not loaded in full everywhere; the engine streams only the resolution it needs for what is on screen, a technique called virtual texturing. Nanite does the same for geometry. You give it a mesh at whatever detail you have, even millions of triangles, and it stores that mesh in a form it can stream and draw a piece at a time, at only the detail the screen can actually show. That is what virtualized micropolygon geometry means: the triangles are managed like a virtual resource, streamed and scaled to the view, rather than all submitted to the GPU at a fixed budget. The single high-detail mesh becomes the only version you keep, and the LOD chain goes away.
Figure: What virtualized geometry replaces · the old pipeline shipped each asset as a hand-authored chain of lower-detail copies that popped as they swapped. Nanite keeps one high-detail mesh and streams it, scaled to the view, so the chain is gone.
Clusters and Streaming: How Nanite Works
How does one mesh of millions of triangles draw efficiently? The answer is that Nanite never treats the mesh as one big lump. When you enable Nanite, the mesh is preprocessed into a hierarchy of small clusters, each cluster a group of roughly a hundred triangles, and the clusters are organized so that a coarse version of the surface and a fine version are both available from the same data. This build happens once, when you enable Nanite or import the asset, and the result is stored alongside the mesh.
At runtime, the work happens on the GPU, every frame. Nanite walks that cluster hierarchy and makes three decisions fast. First it culls: clusters outside the camera view, or hidden behind other geometry, are thrown out before they cost anything. Then for the clusters that remain it selects detail: it picks the level in the hierarchy where each cluster is about the size of a pixel or two on screen, so nothing is drawn finer than the screen can show. Finally it streams: only the clusters actually chosen are pulled in from disk, so memory holds the detail in view and not the whole mesh at full resolution. The chosen clusters are drawn with a rasterizer built for these tiny triangles. The headline to hold onto is that the cost tracks what is on screen, not how detailed the source mesh is.
💡 From one mesh to what the frame needs
flowchart TD
    A[High-detail mesh
millions of triangles] --> B[Build once
split into a hierarchy of clusters]
    B --> C{Each frame, on the GPU}
    C --> D[Cull
drop clusters out of view or hidden]
    C --> E[Select detail
pick the level near pixel size]
    C --> F[Stream
load only the chosen clusters]
    D --> G[Rasterize the chosen clusters]
    E --> G
    F --> G
    G --> H[Cost tracks the screen,
not the source triangle count]
    style A fill:#faf0e6,stroke:#c1662f
    style B fill:#fdf1e7,stroke:#c1662f
    style C fill:#ede7f6,stroke:#7e57c2
    style D fill:#e3f2fd,stroke:#2196F3
    style E fill:#e3f2fd,stroke:#2196F3
    style F fill:#e3f2fd,stroke:#2196F3
    style G fill:#fdf1e7,stroke:#c1662f
    style H fill:#e8f5e9,stroke:#4CAF50
Built once into clusters, then culled, detail-selected, and streamed every frame on the GPU. Only the clusters the frame actually needs are drawn.
Detail Without a LOD Chain
The detail selection deserves a section of its own, because it is what quietly ends the LOD chain. With hand-authored levels of detail, the mesh had a small number of fixed versions, and the engine jumped from one to the next at set distances. Those jumps were discrete, so a rock could visibly snap to a blockier shape as you walked away, and the whole grid of switch distances had to be tuned by hand to make the pops as unobtrusive as possible.
Nanite makes the same decision, but continuously and per cluster. Because the detail lives in a hierarchy rather than a few baked copies, Nanite can pick a slightly different level for the near side of a boulder than for its far side, and it can slide smoothly between levels as the camera moves instead of snapping. There is no small set of versions to jump between and no distance thresholds for you to author. The near clusters of a surface draw fine while the far clusters draw coarse, in the same object, in the same frame, and the transition is gradual enough that there is nothing to see. You get the result the LOD chain was always trying to approximate, without building or tuning the chain at all.
Figure: Continuous detail, no popping · a hand-authored LOD chain steps down in a few discrete jumps, each a visible pop you tune by hand. Nanite follows the same downward trend as a smooth ramp, choosing detail per cluster with no thresholds to author.
Using Scanned Assets As They Are
All of this pays off most clearly in one workflow: using photo-scanned assets directly. Libraries like Megascans, distributed through Epic's Fab marketplace, are built from real-world scans and arrive at film resolution, often millions of triangles per rock or cliff. In the old pipeline those assets could not be used as they were; an artist had to retopologize them down to a budget and bake the lost detail into normal maps, then build a LOD chain on top. With Nanite you skip all of that. You import the scanned mesh, enable Nanite, and place it. No retopology, no baking, no levels of detail to author. The film-resolution surface is what draws, scaled to the view.
The image below is a real frame from this course's project: a small outcrop of Nanite-enabled desert rocks sitting on the landscape, lit by Lumen. Each rock is a Static Mesh with Nanite turned on, so the engine streams each one by clusters and picks its detail per frame rather than swapping between hand-made copies. Nothing here was retopologized for the shot; the rocks are used as the asset set provides them, and Nanite draws them directly. This is the practical shape of the pillar: the detailed geometry a modern world is built from, dropped in and rendered without the budget work that used to stand between the artist and the asset.
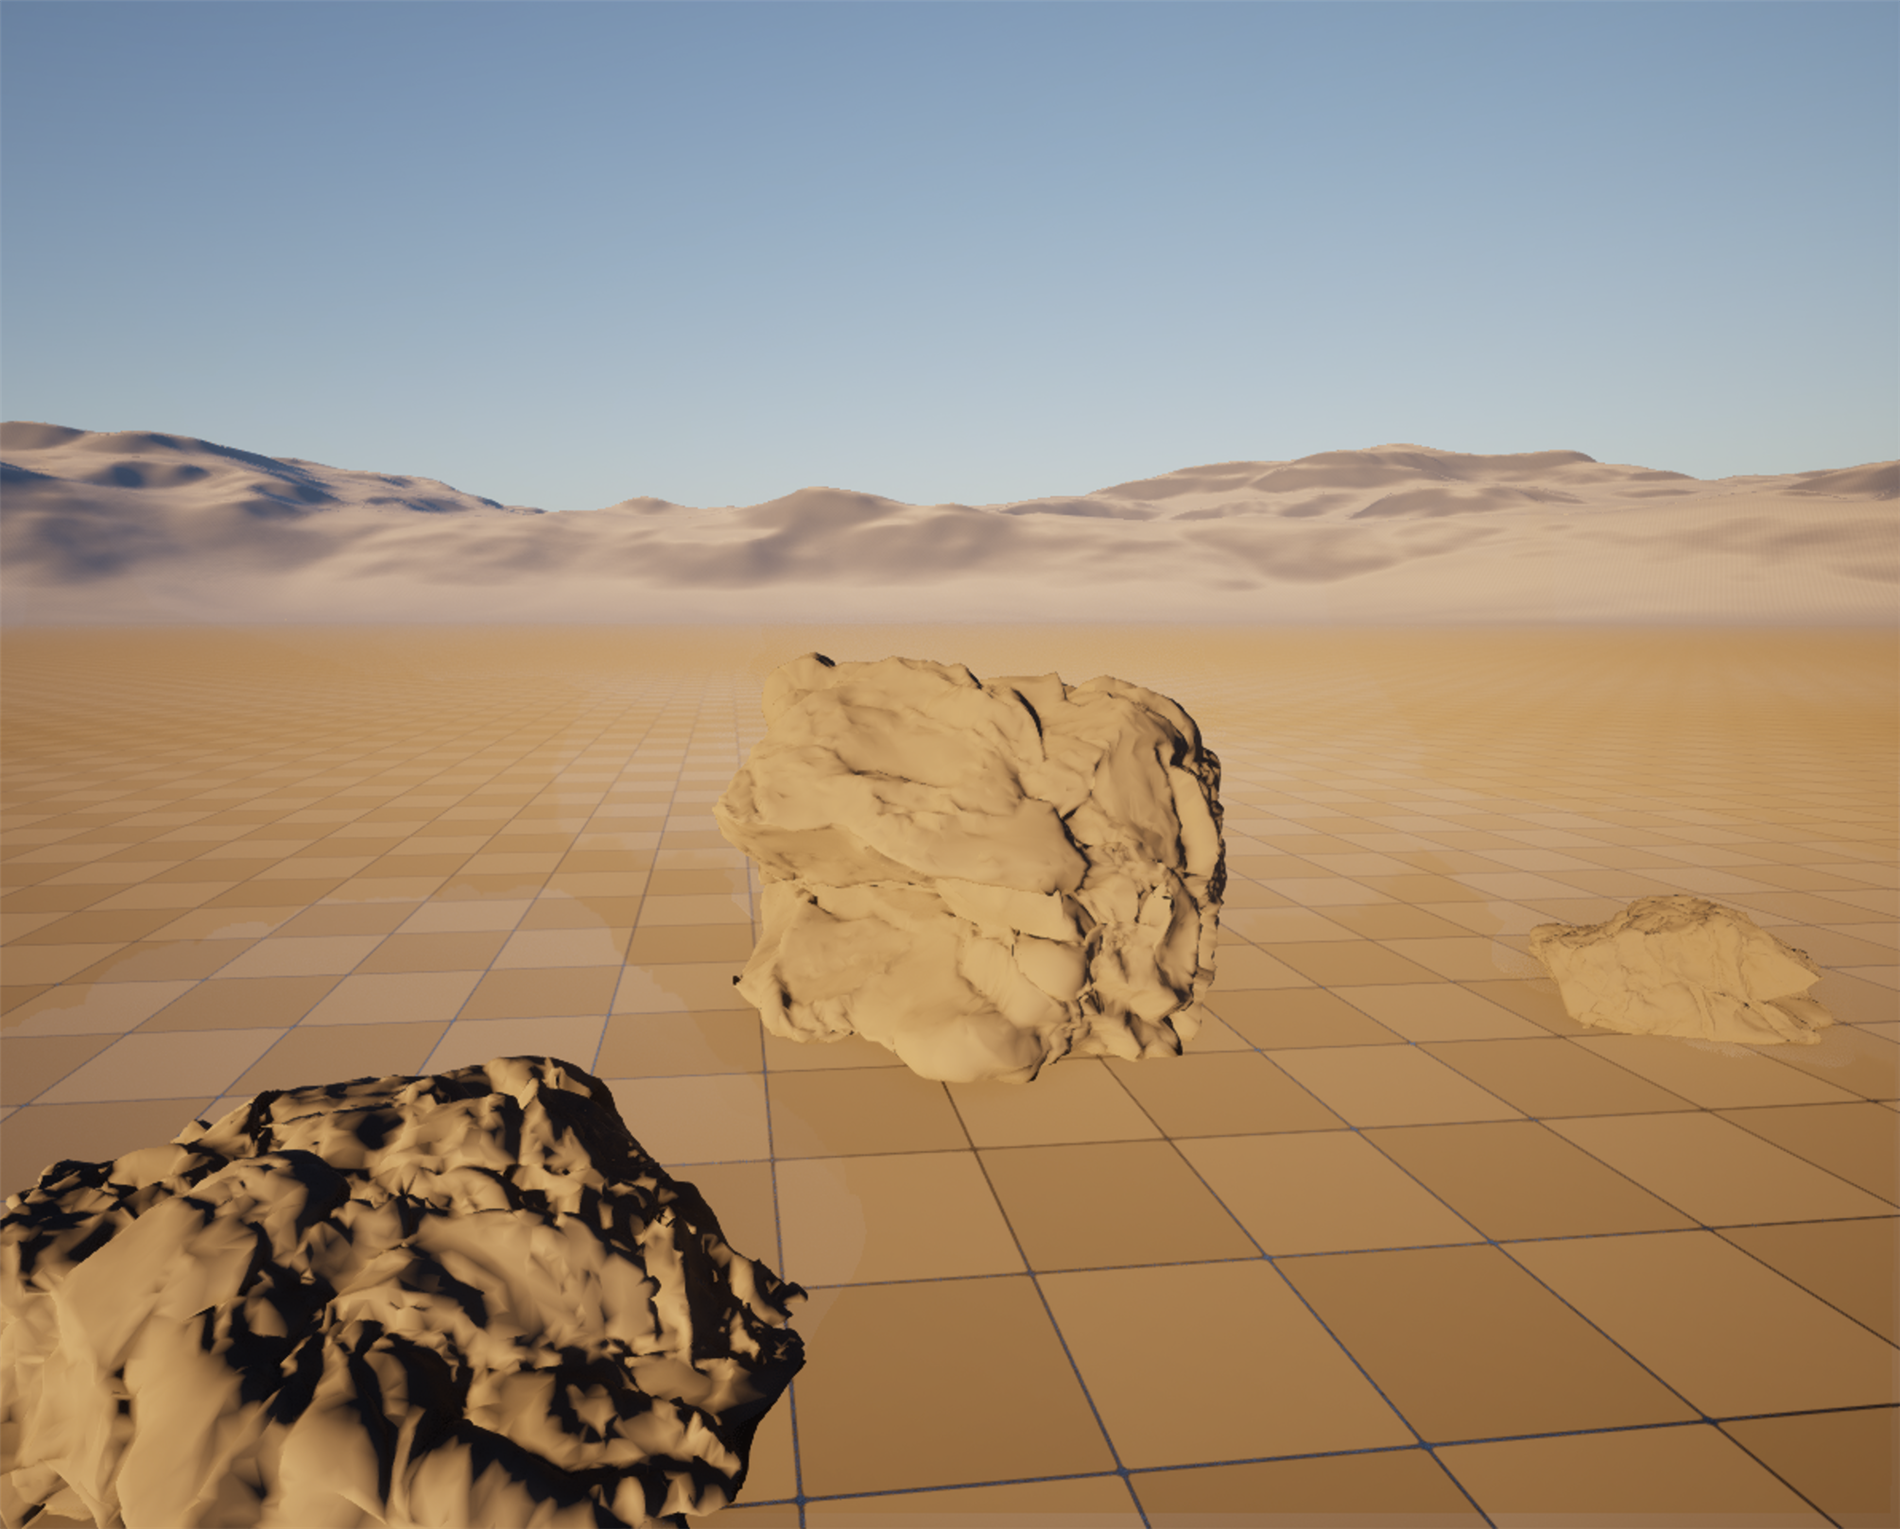
Figure: Nanite-enabled rocks, captured live in the course's Unreal project · scanned-style desert boulders placed on the landscape and lit by Lumen. Each is a Static Mesh with Nanite turned on (verified enabled), so the engine streams clusters and picks detail per frame, with no low-poly copy and no LOD chain. This is geometry used as the asset provides it.
💡 The scanned-asset workflow, with and without Nanite
flowchart LR
    SCAN[Film-resolution scanned mesh
from Fab / Megascans] --> OLD[Old pipeline:
retopologize, bake normals,
build a LOD chain]
    SCAN --> NEW[Nanite:
import and enable Nanite]
    OLD --> PLACE[Place in the world]
    NEW --> PLACE
    PLACE --> DRAW[Drawn at the detail
the screen can show]
    style SCAN fill:#faf0e6,stroke:#c1662f
    style OLD fill:#f3ece4,stroke:#a9772f
    style NEW fill:#e8f5e9,stroke:#4CAF50
    style PLACE fill:#fdf1e7,stroke:#c1662f
    style DRAW fill:#e3f2fd,stroke:#2196F3
Same asset, two routes to the world. Nanite removes the retopology, baking, and LOD authoring the old route required, so a scanned mesh goes straight in.
Where Nanite Fits, and Where It Does Not
Nanite is powerful, but it is not the renderer for every object, and knowing the boundary keeps you from reaching for it in the wrong place. Nanite began as a system for opaque and masked rigid meshes, the rocks, walls, cliffs, and props that make up most of an environment, and that is still its core. Over successive releases Unreal has extended it: it now supports masked foliage, so the grass and leaves that fill a landscape can be Nanite too, and it supports displacement through tessellation, adding real surface relief on top of a mesh rather than faking it. For the world you build in this track, that covers almost everything on the ground.
What Nanite is not built for is geometry that deforms and animates. An animated character is a skeletal mesh: its vertices are skinned to a moving skeleton every frame, and that class of mesh renders the classic way, not through Nanite. This is the exact seam between this track and the MetaHuman track: MetaHuman builds the animated character, which draws in the traditional path, while the environment around that character is where Nanite lives. Heavy translucency has historically been another special case handled outside Nanite's main path. The rule of thumb is simple: reach for Nanite on the static, detailed, rigid geometry of a world, and do not expect it to draw your animated characters.
Figure: The boundary of Nanite · it excels at the static, rigid, detailed geometry that fills a world, including foliage and tessellated surfaces. Animated skeletal characters and heavy translucency stay on the classic rendering path.
Enabling Nanite on a Mesh
Turning Nanite on is a per-mesh setting, and it is quick. Open a Static Mesh in its asset editor and switch on Enable Nanite Support in the details, or right-click the asset in the Content Browser and use the Nanite menu to enable it for one or many meshes at once. Either way, flipping the switch triggers a rebuild: Unreal preprocesses the mesh into the cluster hierarchy described earlier and stores it. From that point the mesh renders through Nanite wherever it is placed. Assets from Fab Megascans often arrive with Nanite already enabled, so for those you may only need to confirm it is on.
To confirm Nanite is actually doing its job, use the viewport's Nanite visualization modes. Switching the view mode to show Nanite clusters or triangles overlays the mesh with the clusters and micro-triangles Nanite is drawing, and you can fly toward and away from an object to watch the detail redistribute in real time, with no popping. One subtle point worth knowing: a mesh can still carry the old hand-authored levels of detail in its data even after Nanite is enabled, but Nanite bypasses them, streaming clusters instead. The rocks in this lesson's figure are exactly that case, Nanite-enabled meshes that happen to still hold a legacy LOD chain the engine now ignores. Enabling Nanite, in other words, does not force you to delete anything; it changes how the mesh is drawn.
💡 Enable, rebuild, verify
flowchart LR
    SEL[Select a Static Mesh
ideally high detail] --> EN[Enable Nanite
asset editor or right-click menu]
    EN --> BUILD[Unreal rebuilds the mesh
into a cluster hierarchy]
    BUILD --> VIS[Verify with Nanite visualization
show clusters and triangles]
    VIS --> USE[Place it: it now draws
through Nanite everywhere]
    style SEL fill:#faf0e6,stroke:#c1662f
    style EN fill:#fdf1e7,stroke:#c1662f
    style BUILD fill:#ede7f6,stroke:#7e57c2
    style VIS fill:#e3f2fd,stroke:#2196F3
    style USE fill:#e8f5e9,stroke:#4CAF50
A per-mesh toggle triggers a rebuild into clusters. Verify with the Nanite visualization modes, then the mesh draws through Nanite anywhere it is placed.
Hands-On: Enable and Read Nanite
This lesson has a real toggle behind it, so the exercise is to enable Nanite on a mesh and then read what it is doing. The goal is to connect the words in this lesson, clusters, streaming, per-cluster detail, to overlays and numbers you can see in your own editor.
🪨 Exercise: turn Nanite on and watch it work
- Pick a detailed mesh. Choose a high-triangle Static Mesh, a scanned rock or a dense prop. Open it in the Static Mesh editor and note its triangle count in the asset statistics.
- Enable Nanite. Switch on Enable Nanite Support in the details, or right-click the asset in the Content Browser and enable Nanite from the menu. Let the rebuild finish.
- Visualize the clusters. In a level viewport, switch the view mode to the Nanite visualization and show clusters, then triangles. You should see the mesh broken into the clusters Nanite draws.
- Fly in and out. Move the camera toward the object and away from it and watch the detail redistribute, finer up close and coarser at distance, with no visible pop. That is per-cluster detail selection, live.
- Find the boundary. Try to enable Nanite on an animated skeletal mesh and notice it is not offered the same way. That is the edge from this lesson: Nanite is for the static, rigid geometry of a world, not for skinned characters.
💡 Hint: where are the visualization modes?
In a level viewport, open the view mode menu (the one that normally reads Lit) and look for the Nanite visualization submenu. Showing clusters colors each Nanite cluster; showing triangles overlays the micro-triangles being rasterized. If the overlays are empty on an object, that object is probably not Nanite-enabled, which is itself a useful thing to confirm.
✅ Reach exercise: use a scanned asset with no LOD work
Bring a photo-scanned rock or cliff into your project from Fab and its Megascans library, confirm Nanite is enabled on it, and place it in a scene. Do the thing the old pipeline would never let you do: use the film-resolution mesh directly, with no retopology and no LOD chain. Then stand a simple object next to it for scale and appreciate that the detailed surface costs you detail on screen, not budget in the scene. That is the whole promise of this pillar in a single placed asset.
Knowledge Check
Question 1
What does Nanite remove from the old geometry pipeline?
Correct answer: B · Nanite virtualizes geometry the way engines already virtualize textures, streaming and scaling the mesh to the view. That removes the fixed triangle budget and the chain of hand-made lower-detail copies, so a single high-detail mesh is all you keep.
Question 2
At runtime, how does Nanite decide what geometry to draw each frame?
Correct answer: B · Nanite stores the mesh as a hierarchy of small clusters. Each frame the GPU culls clusters that are out of view or hidden, selects the detail level where each cluster is about pixel size, and streams only those clusters. The cost tracks what is on screen, not the source triangle count.
Question 3
Why does Nanite avoid the visible popping that hand-authored LODs produced?
Correct answer: A · The old chain jumped between a few discrete versions at set distances, which popped. Nanite selects detail per cluster from a hierarchy and slides between levels smoothly, even choosing different detail for the near and far sides of the same object, so there is nothing to see and no thresholds to author.
Question 4
Which of these does Nanite not draw, and stays on the classic rendering path?
Correct answer: C · Nanite covers opaque and masked rigid meshes, foliage, and tessellated surfaces, the static geometry of a world. Animated skeletal characters deform every frame and render the classic way. That is the seam between this environment track and the MetaHuman character track.
Question 5
What is true about enabling Nanite on a Static Mesh?
Correct answer: B · Nanite is enabled per mesh, in the asset editor or the right-click menu, and flipping it on rebuilds the mesh into the cluster hierarchy. A mesh can even keep its old LOD chain, which Nanite then bypasses. The payoff is using film-resolution scanned assets directly, with no retopology or LOD authoring.
Summary
You now know the first pillar in depth. Nanite is the reason a modern environment can be built from detailed, scanned geometry and still run in real time. Here is what to carry forward:
Virtualized geometry manages triangles like a virtual resource. Instead of submitting a fixed budget of triangles, Nanite stores a mesh so it can stream and scale it to the view, drawing only the detail the screen can show. The single high-detail mesh replaces the whole chain of hand-authored copies.
Clusters and per-frame selection are how it works. A Nanite mesh is built once into a hierarchy of small clusters. Each frame the GPU culls the clusters out of view, selects the detail level near pixel size, and streams only what it needs. Detail is chosen continuously and per cluster, so there is no LOD chain and no popping.
The payoff is using assets as they are, within known limits. Photo-scanned Fab Megascans meshes go straight into a world with no retopology and no LOD authoring. Nanite covers opaque and masked meshes, foliage, and tessellated surfaces, but animated skeletal characters stay on the classic path. Enabling Nanite is a per-mesh toggle that rebuilds the mesh into clusters, and you verify it with the Nanite visualization modes.
🔑 Key Takeaways
- Nanite virtualizes geometry: it streams and scales a mesh to the view, so one high-detail mesh replaces the hand-authored LOD chain
- A Nanite mesh is built into a hierarchy of clusters, then culled, detail-selected, and streamed on the GPU every frame
- Detail is chosen continuously and per cluster, which ends the popping and the distance thresholds of hand-made LODs
- Scanned Fab Megascans assets can be used directly, with no retopology and no LOD authoring
- Nanite draws opaque and masked meshes, foliage, and tessellated surfaces, but not animated skeletal characters; enabling it is a per-mesh rebuild you verify with the Nanite visualization modes
👆 A note on this lesson's figures
The rock image is a genuine live capture from the course's ClaudeTest project: an outcrop of the project's scanned-style desert rocks, placed on the landscape and lit by Lumen, with no character in the scene. Each rock is a Static Mesh with Nanite verified enabled, so it is drawn through Nanite directly, and these particular meshes even still carry a legacy level-of-detail chain that Nanite bypasses, exactly the case described in the enabling section. The LOD-chain diagram, the cluster and streaming flow, the detail-versus-distance chart, the scanned-asset workflow, and the fits-and-does-not-fit map are labeled illustrations, because the internal cluster hierarchy and the visualization overlays are best understood as diagrams before you drive them yourself in the hands-on. What they show is what you will confirm live when you enable Nanite and open the Nanite visualization modes.
Where this fits
This lesson builds out the geometry pillar the overview introduced. Next in the track, Lumen takes the light half and PCG takes placement, before a capstone assembles a full environment. Nanite sits directly upstream of the Cinematic Production track, whose staging and camera work happens inside worlds built from Nanite geometry, and it draws the exact boundary with the Digital Humans with MetaHuman track: the animated character renders the classic way, while the world around it is Nanite. In the larger Story-to-Screen pipeline, this is the craft behind the detailed geometry of shot assembly.