🎮 Player Controllers and Pawns
Every game needs a way to connect the player to the game world. In Unreal Engine, this connection is managed through a carefully designed system of Controllers and Pawns. The Controller represents the player's will—their inputs and decisions. The Pawn represents their physical presence in the world—something that can move, be seen, and interact with the environment. Understanding how these pieces fit together is fundamental to creating any interactive experience in Unreal. In this lesson, you'll learn how Unreal's player system works and how to leverage it for your own games.
🎯 Learning Objectives
By the end of this lesson, you will be able to:
- Explain the role of Player Controllers in Unreal's gameplay framework
- Distinguish between Pawns and Characters and when to use each
- Understand how possession connects controllers to pawns
- Configure the default Pawn class in Project Settings
- Describe how Game Mode orchestrates player spawning
- Navigate and examine the default player setup in a project
Estimated Time: 45-55 minutes
Prerequisites: Module 5 (Introduction to Blueprints)
In This Lesson
The Player Controller Explained
The Player Controller is the brain behind the player's presence in the game. It receives input from the keyboard, mouse, gamepad, or other devices and translates those inputs into actions. Think of it as the bridge between the human playing the game and the virtual character on screen.
What Does the Player Controller Do?
The Player Controller handles several key responsibilities:
Input Reception: The controller receives all input from the player's devices. When you press W to move forward or click to fire, that input goes to the Player Controller first.
Camera Management: The controller often manages camera rotation and view control, especially for first-person and third-person games. The PlayerCameraManager is owned by the controller.
HUD and UI Ownership: The controller typically owns the player's HUD and manages UI interactions. It knows when to show menus, pause screens, or in-game overlays.
Possession: The controller "possesses" a Pawn to control it. This relationship can change—the same controller can possess different pawns during gameplay (like switching vehicles or characters).
Game State Awareness: The controller persists across level loads and pawn deaths. It maintains player-specific information that shouldn't be lost when respawning.
Figure: The Player Controller receives input, manages camera and UI, and possesses a Pawn.
Controller vs. Pawn: Separation of Concerns
You might wonder: why not just put everything in one class? Unreal separates the Controller and Pawn for several good reasons:
Reusability: The same Controller class can possess different Pawn types. A player might control a soldier, then enter a vehicle, then pilot a drone—all with the same Controller adapting to each Pawn's capabilities.
Persistence: When a Pawn dies, it's destroyed. But the Controller survives. This lets you track scores, unlocks, and player state across deaths and respawns.
Network Replication: In multiplayer games, Controllers exist on the server and owning client, while Pawns replicate to all clients. This separation helps manage network authority.
Clean Architecture: Input handling logic stays separate from physics and animation logic. This makes code easier to maintain and modify.
💡 Real-World Analogy
Think of it like remote-controlled cars. The Controller is the remote (and the person holding it). The Pawn is the car. You can use one remote to control different cars, and if a car breaks, you just get a new one while keeping the same remote. The remote (controller) knows which buttons do what; the car (pawn) knows how to actually move.
The PlayerController Class
Unreal provides the APlayerController class (in C++) or PlayerController (in Blueprints) as the base for player-controlled entities. Key aspects include:
One Per Player: Each human player in the game has exactly one Player Controller. In multiplayer, each connected player has their own controller instance.
Created Automatically: The Game Mode spawns Player Controllers when players join. You don't manually create them in most cases.
Customizable: You can create custom Player Controller Blueprints to add game-specific functionality like custom camera controls, special input handling, or player-specific logic.
For most projects, you'll either use the default PlayerController or create a Blueprint child class with your additions.
flowchart TD
    A["AController
(Base Class)"] --> B["APlayerController
(Human Players)"]
    A --> C["AAIController
(AI-Controlled)"]

    B --> D["Your Custom
PlayerController BP"]
    C --> E["Enemy AI Controller"]
    C --> F["NPC Controller"]

    D --> G["Possesses Player Pawn"]
    E --> H["Possesses Enemy Pawn"]

    style A fill:#e0e0e0,color:#333
    style B fill:#667eea,color:#fff
    style C fill:#ff9800,color:#fff
    style D fill:#4CAF50,color:#fff
Figure: Controller class hierarchy. Player Controllers handle human input; AI Controllers handle NPC behavior.
Pawns vs. Characters
While the Controller handles the "thinking," the Pawn is the physical representation in the game world. But Unreal offers two levels of Pawn: the basic Pawn and the more feature-rich Character. Understanding when to use each is crucial.
The Pawn Class
APawn is the base class for anything that can be controlled by a player or AI. A Pawn:
- Can be possessed by a Controller
- Has a root component for transforms
- Can receive input when possessed
- Has no built-in movement logic
- Has no built-in collision handling
Pawns are lightweight and flexible. Use them when you need full control over movement and behavior, or when the built-in Character features don't fit your needs.
Good use cases for Pawn:
- Vehicles (cars, planes, boats)
- Cameras or spectator modes
- RTS-style unit selection (no direct movement)
- Custom movement systems (swimming creatures, zero-gravity)
- Menu or UI-only controllers
The Character Class
ACharacter extends Pawn with features specifically designed for humanoid, walking characters. A Character includes:
Character Movement Component: A powerful component that handles walking, running, jumping, falling, swimming, flying, and more. It manages acceleration, friction, gravity, and all the complex physics of bipedal movement.
Capsule Component: A built-in collision capsule sized for humanoid characters. Handles ground detection, step-up onto small obstacles, and collision with the world.
Skeletal Mesh Component: Ready to attach an animated skeletal mesh for character visuals.
Networking Support: Built-in replication for multiplayer character movement with prediction and correction.
Figure: Pawn is lightweight and flexible; Character adds humanoid movement features.
When to Use Each
✅ Use Character When:
- Your player is a humanoid that walks, runs, and jumps
- You want built-in physics for ground movement
- You need standard FPS/TPS player movement
- You're building a typical action or adventure game
- You want multiplayer movement replication out of the box
✅ Use Pawn When:
- You're making a vehicle (car, plane, spaceship)
- Movement doesn't fit the walking/jumping model
- You need a spectator or camera-only controller
- You want complete control over movement physics
- You're building something unconventional (puzzle piece, abstract entity)
The Default Pawn
Unreal provides a Default Pawn class that's a step between basic Pawn and Character. It includes:
- A sphere collision component
- A simple Floating Pawn Movement component (flies freely, no gravity)
- Good for spectator cameras or simple flying pawns
This is what you get in a blank project if you don't specify a custom pawn—the "flying camera" experience when you hit Play.
Possession and Input Routing
Possession is the mechanism that connects a Controller to a Pawn. When a Controller possesses a Pawn, input flows from the player through the Controller to the Pawn, enabling control.
How Possession Works
When a Controller possesses a Pawn:
- The Controller calls
Possess(Pawn) - The Pawn's
PossessedBy(Controller)event fires - The Controller stores a reference to the Pawn
- The Pawn stores a reference to the Controller
- Input starts flowing from Controller to Pawn
- The Pawn's
OnPossessedBlueprint event triggers
When unpossessing:
- The Controller calls
UnPossess() - The Pawn's
UnPossessedBy(Controller)event fires - References are cleared
- Input stops flowing to that Pawn
Figure: Possession creates the connection that allows input to flow from Controller to Pawn.
Input Routing
Once possessed, input follows this path:
- Hardware: Physical input occurs (key press, mouse move, button)
- Engine Input System: Unreal captures the raw input
- Player Controller: Input is routed to the owning Player Controller
- Enhanced Input: Input Actions and Mappings process the raw input
- Pawn: Bound input actions trigger events on the possessed Pawn
This chain means you can handle input at different levels:
- Controller level: UI inputs, menu toggles, camera control
- Pawn level: Movement, actions specific to that pawn type
⚠️ Input Enable/Disable
Pawns can enable or disable input reception. When input is disabled (via Disable Input node), the Pawn ignores player input even while possessed. This is useful for cutscenes, death states, or menu screens where you don't want the player moving around.
Switching Pawns
A powerful feature of the Controller/Pawn separation is the ability to switch between different Pawns:
Example: Entering a Vehicle
- Player walks up to car (controlling Character pawn)
- Player presses "Enter Vehicle" button
- Controller unpossesses the Character
- Controller possesses the Vehicle pawn
- Input now controls vehicle movement
- Character can be hidden or remain visible in driver seat
This transition is seamless because the Controller persists—it just switches which Pawn it's controlling.
sequenceDiagram
    participant P as Player
    participant PC as PlayerController
    participant Char as Character
    participant Veh as Vehicle

    Note over PC,Char: Initial State: Possessing Character
    P->>PC: Press "Enter Vehicle"
    PC->>Char: UnPossess()
    Char-->>PC: Input disabled
    PC->>Veh: Possess()
    Veh-->>PC: Input enabled
    Note over PC,Veh: Now controlling vehicle

    P->>PC: Press "Exit Vehicle"
    PC->>Veh: UnPossess()
    PC->>Char: Possess()
    Note over PC,Char: Back to character
Figure: Possession switching allows one controller to operate different pawns.
Getting References
In Blueprints, you'll often need to get references between Controllers and Pawns:
From Controller to Pawn:
Get Controlled Pawn— returns the currently possessed PawnGet Pawn(on PlayerController) — same result
From Pawn to Controller:
Get Controller— returns the Controller possessing this PawnGet Player Controller(if you know it's a player) — casts to PlayerController
From Anywhere:
Get Player Controller (index 0)— gets the first player's controllerGet Player Pawn (index 0)— gets the first player's pawn directly
Game Mode Basics
The Game Mode is the rulebook of your game. It defines what classes are used for players, how players spawn, and the fundamental rules of gameplay. While Controllers and Pawns handle individual players, the Game Mode orchestrates the entire game session.
What Does Game Mode Control?
The Game Mode is responsible for:
Default Classes: Specifies which classes to use for the Player Controller, Default Pawn, HUD, Player State, and Game State. When a player joins, the Game Mode spawns these classes automatically.
Player Spawning: Determines where and how players spawn into the level. It finds Player Start actors and places new players at those locations.
Match Flow: Manages game states like "waiting for players," "match in progress," and "match ended." Controls when players can join or leave.
Game Rules: Defines win/lose conditions, scoring rules, and other game-specific logic at the session level.
Figure: Game Mode specifies default classes and handles player spawning.
Game Mode vs. Game Mode Base
Unreal provides two Game Mode classes:
AGameModeBase: The simpler version with basic functionality. Good for single-player games or when you want full control over game flow.
AGameMode: Extends GameModeBase with additional features for competitive multiplayer: match states, ready-up systems, and team management. More complex but feature-rich.
For most single-player projects, GameModeBase is sufficient. Use GameMode when building competitive multiplayer games that need match flow management.
Setting Up Default Classes
In your Game Mode Blueprint (or Project Settings), you specify:
Default Pawn Class: The Pawn or Character that spawns for each player. This is where you'd set your custom character Blueprint.
Player Controller Class: The controller class for human players. Usually the default PlayerController unless you need custom functionality.
HUD Class: The HUD class displayed for each player. Can be None if using UMG widgets instead.
Player State Class: Stores replicated per-player information (score, name, team). Important for multiplayer.
Game State Class: Stores replicated game-wide information (match timer, team scores). Important for multiplayer.
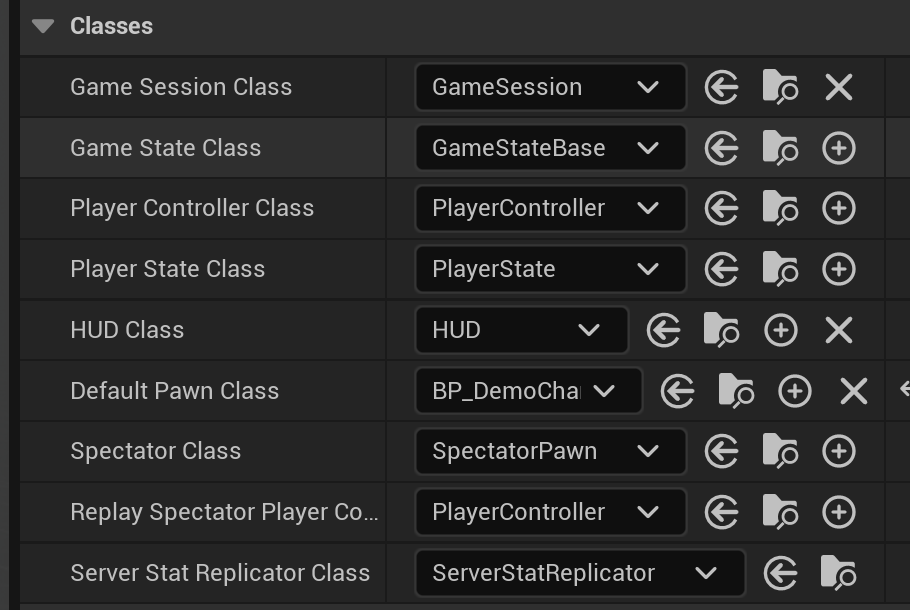
Figure: The Classes category in a Game Mode Blueprint's Class Defaults (UE 5.8). Default Pawn Class points to the Character Blueprint the player will control · the remaining rows set which Player Controller, HUD, Player State, and Game State classes the mode spawns.
Where to Set the Game Mode
Game Mode can be set at different levels of specificity:
Project Settings (Global Default): Edit → Project Settings → Maps & Modes → Default GameMode. This applies to all levels unless overridden.
World Settings (Per Level): With a level open, Window → World Settings → GameMode Override. This level will use this Game Mode regardless of project default.
URL Parameter: When launching with command line or loading levels via code, you can specify Game Mode as a URL parameter.
flowchart TD
    A["Level Loads"] --> B{"World Settings
GameMode Override?"}

    B -->|"Yes"| C["Use World Settings
Game Mode"]
    B -->|"No"| D{"Project Settings
Default GameMode?"}

    D -->|"Yes"| E["Use Project Default
Game Mode"]
    D -->|"No"| F["Use Engine Default
GameModeBase"]

    C --> G["Spawn Players with
specified classes"]
    E --> G
    F --> G

    style C fill:#4CAF50,color:#fff
    style E fill:#2196F3,color:#fff
    style F fill:#FF9800,color:#fff
Figure: Game Mode selection priority—World Settings overrides Project Settings.
Player Start Actors
The Game Mode needs to know where to spawn players. This is determined by Player Start actors placed in your level.
Placing Player Starts:
- Open Place Actors panel
- Search for "Player Start"
- Drag into your level at desired spawn location
- Rotate to set initial facing direction
When Play is pressed or a player joins, the Game Mode:
- Finds available Player Start actors
- Chooses one (first available, or by custom logic)
- Spawns the Default Pawn at that location
- Player Controller possesses the spawned Pawn
✅ Multiple Player Starts
You can place multiple Player Start actors for multiplayer games or to randomize spawn points. In multiplayer, the Game Mode distributes players across available starts. You can also create custom spawn logic by overriding FindPlayerStart or ChoosePlayerStart in your Game Mode.
The Gameplay Framework Overview
Let's see how all these pieces connect:
Figure: The complete Unreal Gameplay Framework—Game Mode orchestrates, Controllers possess Pawns.
💡 Framework Summary
Game Mode: The rules—exists only on server in multiplayer, defines what classes to use.
Game State: Shared data everyone can see (match time, scores).
Player Controller: One per player—handles input, owns camera and HUD.
Player State: Per-player data that others can see (name, score).
Pawn/Character: The physical body in the world that moves and interacts.
Hands-On: Examine the Default Player Setup
Let's explore how these concepts work in practice by examining a real project's player setup. We'll look at the default classes, trace the possession chain, and understand how the pieces connect.
🎯 Exercise Goal
Examine the Third Person template's player setup to understand how Player Controller, Pawn, and Game Mode work together. Trace the connection between input and character movement.
Step 1: Create or Open a Third Person Project
- Open the Epic Games Launcher
- Launch Unreal Engine 5
- Select Games → Third Person template
- Choose Blueprint, include Starter Content
- Create the project and let it load
If you already have a Third Person project, open it instead.
Step 2: Find the Game Mode
- Go to Edit → Project Settings
- Navigate to Project → Maps & Modes
- Look at Default GameMode
- You should see something like
BP_ThirdPersonGameMode
Click the magnifying glass icon next to the Game Mode to find it in the Content Browser, or double-click to open it.
Step 3: Examine the Game Mode Classes
- Open
BP_ThirdPersonGameMode(double-click) - In the Details panel (right side), find the Classes section
- Note the Default Pawn Class—this is the character that spawns
- Note the Player Controller Class—usually the default PlayerController
✅ Checkpoint
You should see the Default Pawn Class set to something like BP_ThirdPersonCharacter. This is the Character Blueprint that the player controls. The Game Mode tells Unreal to spawn this character for each player.
Step 4: Examine the Character
- In Content Browser, find
BP_ThirdPersonCharacter - Double-click to open it
- In the Components panel (left), you'll see:
- CapsuleComponent — collision capsule
- CharacterMovement — handles walking, jumping
- Mesh — the skeletal mesh (character model)
- CameraBoom — spring arm for third-person camera
- FollowCamera — the actual camera
This is a Character (not just a Pawn), so it inherits all the movement functionality we discussed earlier.
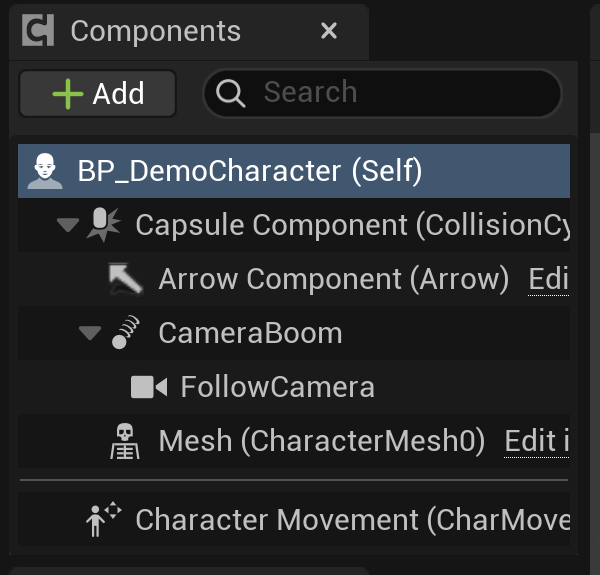
Figure: A Character Blueprint's Components panel (UE 5.8). The Capsule Component is the collision root · the CameraBoom (spring arm) holds the FollowCamera · the Mesh is the skeletal model · Character Movement drives walking and jumping.
Step 5: Find Input Handling
- With the Character Blueprint open, go to the Event Graph
- Look for Enhanced Input Action events
- You should see events like:
IA_Move— handles WASD movementIA_Look— handles mouse lookIA_Jump— handles jump input
These events fire when the player provides input. The Character Blueprint responds by calling movement functions.
Figure: The Third Person Character Blueprint structure showing components and input flow.
Step 6: Find the Player Start
- In the main editor, look at the Outliner panel
- Search for "PlayerStart"
- Select it—you'll see a flag icon in the viewport
- This is where your character spawns when you hit Play
Step 7: Test the Complete Flow
- Press Play (or Alt+P)
- Use WASD to move, mouse to look, Space to jump
- While playing, press F8 to "eject" from the pawn
- You can now fly around freely as a spectator
- Notice your character is still there, but you're no longer controlling it
- Press F8 again to re-possess the character
The F8 key demonstrates possession in action—you're temporarily unpossessing and repossessing the pawn!
✅ Checkpoint
When ejected (F8), your Player Controller stops sending input to the Character. The Character stands idle. When you re-possess (F8 again), input flows again and you can control the character. This is exactly what happens when switching between pawns in gameplay.
Step 8: Examine at Runtime (Optional)
For deeper understanding, examine the runtime hierarchy:
- Play the game (Alt+P)
- Press ` (backtick) to open the console
- Type
showdebugto see debug information - Or in Outliner, check "Show Runtime" to see spawned actors
- You'll see:
- Your spawned Character instance
- A PlayerController (might be named PlayerController_0)
- The Game Mode instance
Step 9: Trace the Blueprint Flow
To see exactly how input becomes movement:
- Open
BP_ThirdPersonCharacter - Find the
IA_MoveEnhanced Input event - Follow the wires—you'll see it:
- Gets the input action value (a 2D vector)
- Calculates movement direction based on camera
- Calls
Add Movement Input
- The
Add Movement Inputfunction tells the Character Movement Component to move
✅ Exercise Complete!
You've traced the complete player setup from Game Mode → Player Controller → Character → Input → Movement. You understand how Unreal's gameplay framework orchestrates player interaction. This foundation applies to every Unreal project you'll build.
Bonus: Modify the Setup
Try these modifications to reinforce your understanding:
- Change spawn location: Move the Player Start to a different position and play again
- Add another Player Start: Place a second one and see which one is chosen
- Change default pawn: In Project Settings, change Default Pawn Class to "DefaultPawn" and see what happens (you'll get a floating sphere instead of a character)
- Create a custom Game Mode: Create a new Blueprint based on GameModeBase, set your own Default Pawn, and assign it in World Settings
Summary
In this lesson, you've learned the foundational architecture that connects players to the game world in Unreal Engine 5. Understanding Player Controllers, Pawns, and Game Modes is essential for building any interactive experience—from simple walking simulators to complex multiplayer games.
Key Concepts
Player Controller: The brain behind the player's presence. It receives input from devices, manages camera and HUD, and possesses a Pawn to control. One Player Controller exists per human player. It persists across pawn deaths and level transitions, maintaining player-specific state.
Pawn vs. Character: Pawns are the base class for controllable entities—lightweight and flexible, ideal for vehicles or custom movement. Characters extend Pawns with humanoid-specific features: the Character Movement Component for walking/jumping/swimming, a collision capsule, and skeletal mesh support. Use Character for humanoid players; use Pawn for everything else.
Possession: The mechanism connecting Controller to Pawn. When possessed, input flows from the Controller to the Pawn. Controllers can switch between Pawns (like entering vehicles). The Pawn stores a reference to its Controller, and vice versa.
Game Mode: The rulebook that defines default classes, handles player spawning, and manages game flow. It specifies which Controller, Pawn, HUD, and State classes to use. Player Start actors mark spawn locations. Game Mode can be set project-wide or per-level.
Gameplay Framework: The complete system where Game Mode orchestrates everything, spawning Player Controllers that possess Pawns at Player Start locations. Player State tracks per-player data; Game State tracks shared game data. This architecture scales from single-player to multiplayer seamlessly.
Best Practices
- Use Character for humanoids: Don't reinvent the wheel—the Character Movement Component handles countless edge cases
- Use Pawn for non-humanoids: Vehicles, cameras, and custom movement benefit from the lighter base class
- Create custom classes when needed: Extend PlayerController or Character when you need project-specific functionality
- Set up Game Mode early: Define your default classes in Project Settings before building gameplay
- Place Player Starts intentionally: Consider spawn points, facing directions, and multiplayer distribution
- Keep Controller and Pawn responsibilities separate: Input logic in Controller; movement/physics in Pawn
Figure: The flow from Game Mode → Controller → Pawn → World, with player input driving the Controller.
What's Next?
Now that you understand how players connect to the game world, the next lesson introduces the Enhanced Input System—Unreal's modern approach to handling player input. You'll learn how to create Input Actions, bind them to keys and buttons, and respond to player input in your Blueprints. This builds directly on the Controller/Pawn foundation you've learned today.
Knowledge Check
Question 1
What is the primary role of the Player Controller in Unreal's gameplay framework?
Correct answer: B — The Player Controller receives input from the player's devices, manages the camera and HUD, and possesses a Pawn to control. It's the bridge between the human player and their in-game representation.
Question 2
What is the main difference between a Pawn and a Character in Unreal Engine?
Correct answer: B — Character extends Pawn with humanoid-specific features: the Character Movement Component (walking, jumping, swimming), a collision capsule, and skeletal mesh support. Pawns are lighter weight and better suited for vehicles or custom movement systems.
Question 3
What does "possession" mean in the context of Controllers and Pawns?
Correct answer: B — Possession is when a Controller takes control of a Pawn. The Controller calls Possess(), creating a two-way reference. Input then flows from the Controller to the Pawn. Controllers can unpossess and possess different Pawns (like entering vehicles).
Question 4
What is the Game Mode responsible for?
Correct answer: C — The Game Mode is the rulebook of your game. It specifies which classes to use for Controllers, Pawns, HUD, and States. It handles spawning players at Player Start locations and manages overall game flow and rules.
Question 5
Where do players spawn in a level, and what determines the spawn location?
Correct answer: B — Players spawn at Player Start actors placed in the level. When play begins, the Game Mode finds available Player Starts, chooses one, spawns the Default Pawn at that location, and has the Player Controller possess it.