🏃 Character Movement
Movement is the foundation of gameplay feel. A character that feels heavy, responsive, floaty, or sluggish creates an immediate impression on players. Unreal Engine's Character Movement Component is a powerful system that handles walking, running, jumping, falling, swimming, and flying—all with physics-based simulation. In this lesson, you'll explore every aspect of character movement, learning how to tune parameters to create exactly the gameplay feel you want.
🎯 Learning Objectives
By the end of this lesson, you will be able to:
- Explain the role of the Character Movement Component in Unreal
- Configure walking and running speed, acceleration, and friction
- Set up jumping with customizable height and air control
- Understand and switch between movement modes
- Implement sprinting as a gameplay mechanic
- Tune movement parameters for different gameplay feels
Estimated Time: 50-60 minutes
Prerequisites: Lesson 6.2 (Enhanced Input System)
In This Lesson
The Character Movement Component
The Character Movement Component (often called CMC) is the engine behind all character locomotion in Unreal. It's a complex, battle-tested system that handles ground detection, physics simulation, network replication, and smooth movement interpolation. Rather than writing movement code from scratch, you configure this component to achieve your desired feel.
What the CMC Handles
The Character Movement Component manages:
Ground Detection: Continuously checks if the character is on the ground, on a slope, or in the air. Handles step-up onto small obstacles and prevents walking up walls.
Physics Simulation: Applies gravity, calculates velocity based on acceleration and friction, and handles collisions with the world.
Movement Modes: Supports Walking, Falling, Swimming, Flying, and Custom modes. Each mode has different physics and behavior.
Network Replication: Handles client prediction and server correction for smooth multiplayer movement without excessive bandwidth.
Root Motion: Can integrate with animation-driven movement for realistic locomotion.
Figure: The Character Movement Component takes input and physics data to move the character.
Accessing the CMC
Every Character Blueprint has a Character Movement Component by default. To access it:
In the Components Panel: Select your Character Blueprint and find "CharacterMovement" in the component list. Click it to see its properties in the Details panel.
In Blueprints: Use Get Character Movement node to get a reference to the component. From there, you can read or modify any property.
In Details Panel Categories: The CMC has many properties organized into categories:
- Character Movement: Walking — Ground movement settings
- Character Movement: Jumping / Falling — Air movement settings
- Character Movement: Swimming — Water movement settings
- Character Movement: Flying — Flying mode settings
- Character Movement (General Settings) — Gravity, rotation, etc.
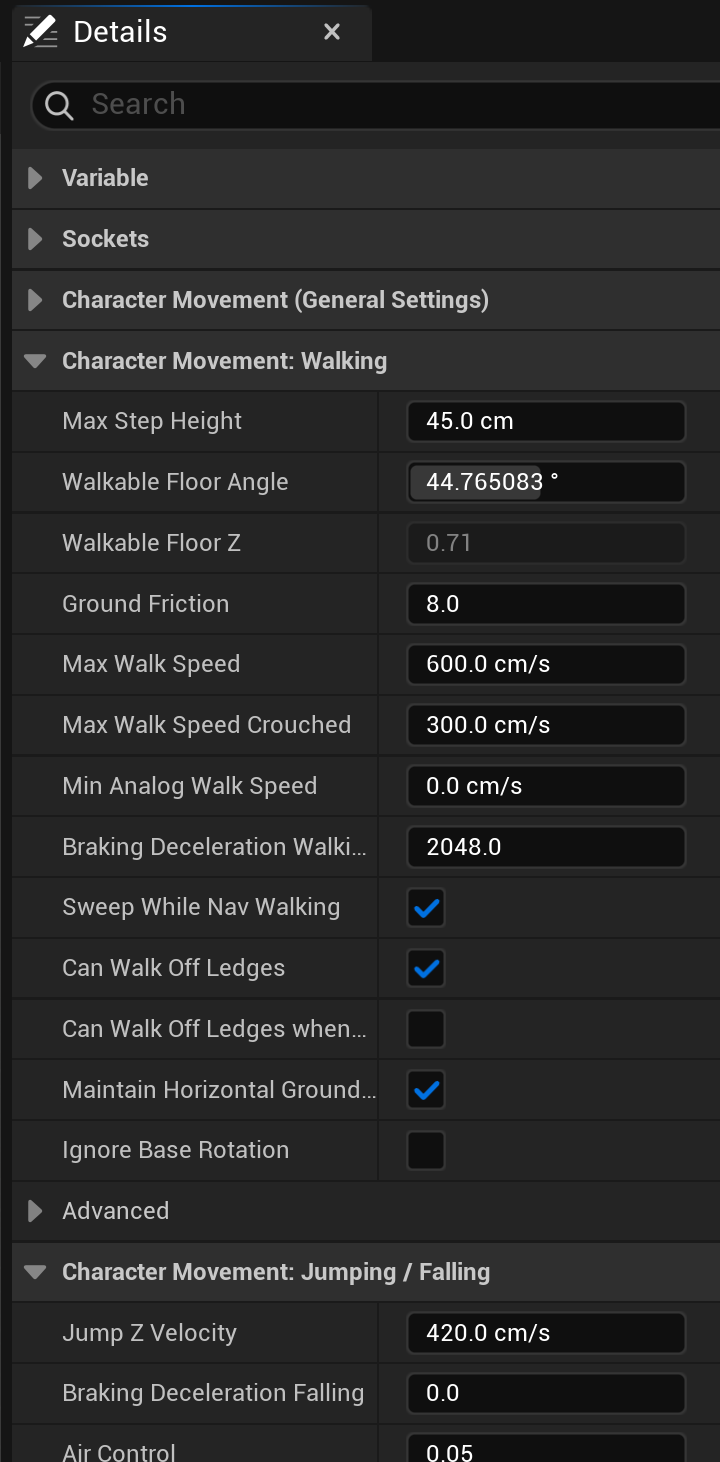
Figure: The real Character Movement Component Details panel (UE 5.8) · the Walking category sets Ground Friction (8.0) and Max Walk Speed (600 cm/s), while Jumping / Falling sets Jump Z Velocity (420 cm/s) and Air Control (0.05). These are the defaults for a brand-new Character.
How Movement Input Works
The CMC doesn't directly receive input. Instead, your Blueprint calls Add Movement Input with a direction vector. The CMC then:
- Accumulates input direction for the frame
- Calculates desired velocity based on acceleration
- Applies friction to slow down when no input
- Clamps velocity to maximum speed
- Moves the capsule and handles collisions
This separation means the CMC doesn't care how you get input—keyboard, gamepad, AI, or network commands all work the same way.
💡 Velocity vs. Input
The CMC maintains a Velocity vector that represents current movement. Input influences velocity through acceleration, but they're not the same. When you stop pressing forward, velocity gradually decreases due to friction rather than instantly stopping. This creates momentum and weight.
Walking, Running, and Sprinting
Ground movement is controlled by several key parameters. Understanding how they interact lets you create characters that feel heavy and realistic or light and responsive.
Max Walk Speed
Max Walk Speed is the maximum ground speed in cm/s. This is the speed limit—your character can't exceed this while walking, no matter how long they accelerate.
Typical values:
- 200-300: Slow, careful movement (horror games, stealth)
- 400-600: Standard walking/jogging (most games)
- 800-1200: Fast running (action games)
- 1500+: Very fast (arcade, superhero games)
The default is 600 cm/s, which feels like a comfortable jog.
Ground Friction
Ground Friction determines how quickly the character slows down when not receiving input. Higher friction = faster stopping. Lower friction = more sliding.
Typical values:
- 0-2: Very slippery (ice, oiled floors)
- 4-8: Standard ground (default is 8)
- 12-20: Very grippy (instant stops)
Friction interacts with Braking Deceleration Walking which is the explicit deceleration applied when stopping.
Max Acceleration
Max Acceleration controls how quickly the character reaches maximum speed. Higher values = snappier response. Lower values = gradual buildup.
Typical values:
- 500-1000: Sluggish, heavy character
- 2000-2500: Standard (default is 2048)
- 4000+: Very responsive, arcade feel
Figure: Key ground movement parameters and their effects on gameplay feel.
Implementing Sprinting
Sprinting is typically implemented by changing Max Walk Speed at runtime. When the player holds sprint, increase the speed; when they release, return to normal.
Blueprint Implementation:
- Create an Input Action
IA_Sprint(Digital) - Map it to Left Shift and Left Stick Click
- In your Character Blueprint:
On Sprint Started (Pressed):
- Get Character Movement → Set Max Walk Speed to sprint value (e.g., 1000)
On Sprint Ended (Released/Completed):
- Get Character Movement → Set Max Walk Speed back to normal (e.g., 600)
Figure: Simple sprint implementation by modifying Max Walk Speed.
Advanced: Crouch Speed
The CMC has a separate Max Walk Speed Crouched property (default 300). When the character crouches, this speed is used instead. Crouch is built into the Character class—just call Crouch and UnCrouch functions.
⚠️ Smooth Speed Transitions
Instantly changing Max Walk Speed works but can feel abrupt. For smoother transitions, use FInterpTo or a Timeline to gradually change speed over a few frames. This creates a more natural acceleration/deceleration into sprint.
Jumping and Falling
Jumping is one of the most "feel-critical" aspects of character movement. The height, duration, and air control of a jump dramatically affect how a game plays. The CMC provides many parameters to fine-tune jumping behavior.
Jump Z Velocity
Jump Z Velocity is the initial upward velocity when jumping (cm/s). Higher values = higher jumps.
Typical values:
- 300-450: Small hop (realistic, grounded games; the Character default is 420)
- 500-700: Standard jump (the Third Person template raises this to 700)
- 900-1200: High jump (platformers)
- 1500+: Super jump (superhero, sci-fi)
Jump height is also affected by gravity. The same Jump Z Velocity results in different heights at different gravity scales.
Gravity Scale
Gravity Scale multiplies the world gravity (default -980 cm/s²). A scale of 1.0 is normal Earth gravity.
- 0.5: Half gravity (floaty, moon-like)
- 1.0: Normal gravity (default)
- 1.5-2.0: Heavy gravity (faster falls, snappier jumps)
Many platformers use higher gravity (1.5-2.0) for snappier, more responsive jumping that still allows good height with higher Jump Z Velocity.
Figure: The same jump velocity creates different arcs at different gravity scales.
Air Control
Air Control determines how much the player can influence horizontal movement while airborne. A value of 0 means no air control (projectile motion); a value of 1 means full control.
- 0.0: No air control (realistic physics)
- 0.2-0.3: Slight adjustment possible
- 0.5: Moderate control (default is 0.05)
- 1.0: Full control (can completely change direction mid-air)
Most action games use 0.2-0.5 for responsive air control. The default (0.05) is very low for realistic feel but can feel unresponsive for platformers.
Air Control Boost Multiplier and Velocity
These advanced settings allow more control at low speeds:
Air Control Boost Multiplier: Multiplies air control when below the boost velocity threshold. Useful for fine-tuning landings.
Air Control Boost Velocity: Speed threshold below which the boost applies.
Jump Hold Time
Jump Max Hold Time allows variable-height jumps based on how long the player holds the jump button. Set to 0 for fixed-height jumps.
How it works: While the player holds jump (up to this duration), upward velocity is maintained. Releasing early = shorter jump. Holding = full jump.
This is a classic platformer technique used in Mario, Hollow Knight, Celeste, and most modern platformers.
Figure: Variable jump height based on button hold duration.
Falling and Landing
Several parameters control falling behavior:
Falling Lateral Friction: Friction applied while falling. Higher values slow horizontal movement in air.
Braking Deceleration Falling: How quickly horizontal velocity decreases when not providing input while falling.
Landing detection is automatic—the CMC detects when the capsule contacts ground and transitions from Falling to Walking mode.
Double Jump and Multi-Jump
The CMC supports multiple jumps via Jump Max Count:
- 1: Single jump (default)
- 2: Double jump
- 3+: Triple jump or more
The Jump Current Count tracks how many jumps have been used. It resets when landing.
✅ Platformer Jump Feel
For responsive platformer-style jumps, try these adjustments:
- Jump Z Velocity: 800-1000
- Gravity Scale: 1.5-2.0
- Air Control: 0.3-0.5
- Jump Max Hold Time: 0.2-0.4
- Jump Max Count: 2 (for double jump)
This creates snappy, high jumps with good air control—the classic platformer feel.
stateDiagram-v2
    [*] --> Walking: On Ground
    Walking --> Falling: Jump Pressed
    Walking --> Falling: Walk Off Edge

    Falling --> Falling: Air Control Input
    Falling --> Walking: Land on Ground
    Falling --> Falling: Double Jump (if available)

    Walking --> [*]: Game Over

    note right of Falling
        Jump Current Count tracked
        Air Control applies
        Gravity pulls down
    end note
Figure: State transitions between Walking and Falling modes.
Movement Modes
The Character Movement Component supports several Movement Modes, each with its own physics behavior and parameters. The CMC automatically switches between some modes (like Walking to Falling), while others require explicit activation (like Swimming or Flying).
Available Movement Modes
The CMC defines these standard movement modes:
Walking: Standard ground movement. Applies ground friction, respects Max Walk Speed, handles slopes and steps. This is the default mode when on ground.
Falling: Airborne movement. Applies gravity, air control, and falling friction. Automatically entered when jumping or walking off edges.
Swimming: Water movement. Uses buoyancy, water friction, and swimming speed. Must be triggered by entering a water volume.
Flying: Free 3D movement without gravity. Used for spectators, flying characters, or no-clip modes. Must be explicitly enabled.
Custom: User-defined movement. Implement your own physics for unique movement types.
None: No movement processing. Character is stationary.
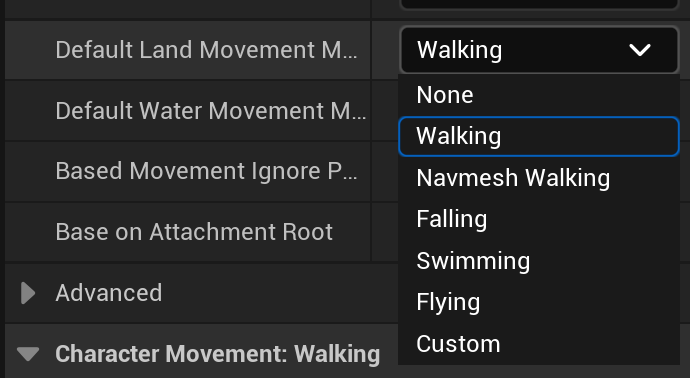
Figure: The Movement Mode enum in UE 5.8 · every mode the CMC supports (None, Walking, Navmesh Walking, Falling, Swimming, Flying, Custom) appears in this dropdown. The Set Movement Mode node in Blueprints offers the same list.
Figure: Movement modes and their characteristics. Some switch automatically; others require explicit activation.
Switching Movement Modes
To manually change movement mode in Blueprints:
- Get Character Movement component
- Call
Set Movement Mode - Select the desired mode from the dropdown
Example: Enable Flying
- On key press (e.g., F key)
- Get Character Movement → Set Movement Mode → Flying
- Character now ignores gravity and can move freely in 3D
Example: Disable Flying
- On another key press
- Set Movement Mode → Walking (or Falling if not on ground)
- Gravity resumes; character falls if airborne
Flying Mode Parameters
When in Flying mode, these parameters apply:
Max Fly Speed: Maximum speed while flying (default 600). Increase for faster flight.
Braking Deceleration Flying: How quickly the character stops when not providing input (default 0, meaning no automatic stopping).
Flying movement doesn't apply gravity, so the character hovers in place when not moving. Good for spectator cameras, flying vehicles, or superhero games.
Swimming Mode Parameters
Swimming mode simulates water physics:
Max Swim Speed: Maximum speed in water (default 300). Usually slower than walking.
Buoyancy: How much the character floats. 1.0 = neutral buoyancy, >1 = floats up, <1 = sinks.
Water volumes trigger swimming automatically. Create a Physics Volume actor, check "Water Volume," and the CMC will switch to Swimming mode when the character enters.
Figure: Create a Physics Volume with Water Volume enabled to automatically trigger swimming mode.
Checking Current Mode
To check the current movement mode in Blueprints:
Get Movement Mode— Returns the current enum valueIs Walking— Returns true if in Walking modeIs Falling— Returns true if in Falling modeIs Swimming— Returns true if in Swimming modeIs Flying— Returns true if in Flying mode
Use these checks to enable/disable abilities, change animations, or modify UI based on movement state.
Movement Mode Events
The Character class provides events for mode changes:
On Movement Mode Changed: Fires whenever the movement mode changes. Provides both the previous and new mode. Great for triggering sounds, particles, or animation changes.
On Landed: Fires specifically when transitioning from Falling to Walking (landing). Provides the hit result for the landing surface.
flowchart LR
    W["Walking"] -->|"Jump/Fall off"| F["Falling"]
    F -->|"Land"| W
    W -->|"Enter water"| S["Swimming"]
    F -->|"Enter water"| S
    S -->|"Exit water"| F
    S -->|"Exit at surface"| W
    W -->|"SetMovementMode"| FL["Flying"]
    F -->|"SetMovementMode"| FL
    FL -->|"SetMovementMode"| F

    style W fill:#4CAF50,color:#fff
    style F fill:#2196F3,color:#fff
    style S fill:#00BCD4,color:#fff
    style FL fill:#9C27B0,color:#fff
Figure: Movement mode transitions. Solid lines show automatic transitions; dashed show manual.
Advanced: Custom Movement Modes
For unique movement (wall running, climbing, swinging), you can use Custom mode:
- Set Movement Mode to
Custom - Override
PhysCustomin a C++ Character subclass, or - Handle movement manually in Tick using the Custom mode flag
Custom modes require more work but allow complete control over movement physics.
💡 Common Mode Combinations
Platformer: Walking + Falling with high air control and double jump.
Swimming Game: Walking + Swimming with water volumes throughout.
Flying Game: Start in Flying mode; never enable Walking.
Spectator: Flying mode with high speed for free camera movement.
Hands-On: Customize Movement Parameters
Let's create three different movement feels by adjusting Character Movement Component parameters. This exercise demonstrates how small parameter changes dramatically affect gameplay feel.
🎯 Exercise Goal
Create and test three movement presets: Heavy Tank, Standard Action, and Arcade Platformer. Implement sprinting and double jump. Understand how parameters interact to create different gameplay feels.
Step 1: Set Up the Project
Use your project from the previous lesson, or create a new Third Person project:
- Open your Third Person project
- Open the Character Blueprint (
BP_ThirdPersonCharacteror your custom character) - Select the CharacterMovement component in the Components panel
- The Details panel shows all movement parameters
Step 2: Note the Default Values
Before changing anything, note these default values:
| Parameter | Default Value | Category |
|---|---|---|
| Max Walk Speed | 600 | Walking |
| Max Acceleration | 2048 | General |
| Ground Friction | 8.0 | Walking |
| Braking Deceleration Walking | 2048 | Walking |
| Jump Z Velocity | 420 | Jumping |
| Air Control | 0.05 | Falling |
| Gravity Scale | 1.0 | General |
Test the default feel—run around, jump, stop suddenly. This is your baseline.
Step 3: Create Heavy Tank Preset
Adjust parameters for a slow, heavy, momentum-based character:
| Parameter | Heavy Tank Value | Effect |
|---|---|---|
| Max Walk Speed | 350 | Slower movement |
| Max Acceleration | 800 | Slow to reach max speed |
| Ground Friction | 3.0 | Slides when stopping |
| Braking Deceleration Walking | 800 | Takes time to stop |
| Jump Z Velocity | 350 | Low jump |
| Air Control | 0.1 | Minimal air steering |
| Gravity Scale | 1.2 | Falls faster |
Test it: Press Play and move around. Notice:
- Takes time to get moving
- Slides past your target when stopping
- Jump is short with little air control
- Feels heavy and momentum-based
🎮 Heavy Tank Feel
Good for: Mech games, tank characters, realistic soldiers with heavy gear, survival horror where you want to feel vulnerable.
Step 4: Create Standard Action Preset
Reset to defaults or use these balanced values:
| Parameter | Standard Action Value | Effect |
|---|---|---|
| Max Walk Speed | 600 | Comfortable jog |
| Max Acceleration | 2048 | Responsive acceleration |
| Ground Friction | 8.0 | Quick stops |
| Braking Deceleration Walking | 2048 | Responsive stopping |
| Jump Z Velocity | 500 | Good height |
| Air Control | 0.35 | Moderate air steering |
| Gravity Scale | 1.0 | Normal gravity |
Test it: This is the default Third Person template feel—balanced, responsive, suitable for most games.
Step 5: Create Arcade Platformer Preset
Adjust for snappy, responsive, platformer-style movement:
| Parameter | Arcade Platformer Value | Effect |
|---|---|---|
| Max Walk Speed | 800 | Fast movement |
| Max Acceleration | 5000 | Instant response |
| Ground Friction | 12.0 | Precise stops |
| Braking Deceleration Walking | 5000 | Instant stops |
| Jump Z Velocity | 900 | High jump |
| Air Control | 0.8 | Full air steering |
| Gravity Scale | 1.8 | Snappy falls |
| Jump Max Count | 2 | Double jump! |
Test it: Press Play and experience:
- Instant acceleration and stopping
- High, responsive jumps
- Full control while airborne
- Double jump for extended air time
- Fast falls that feel snappy, not floaty
🎮 Arcade Platformer Feel
Good for: Platformers, action games, arcade shooters, any game where tight controls and responsiveness matter more than realism.
Figure: Three movement presets creating distinctly different gameplay feels.
Step 6: Add Sprint Functionality
Using the Arcade Platformer preset, add sprinting:
- In Event Graph, add
EnhancedInputAction IA_Sprint(Started) - Get Character Movement → Set Max Walk Speed to 1200
- Add another
EnhancedInputAction IA_Sprint(Completed) - Get Character Movement → Set Max Walk Speed back to 800
Test: Hold Shift while moving to sprint at 1200 cm/s.
Step 7: Add Variable Jump Height (Optional)
For even more responsive platformer feel:
- Select CharacterMovement component
- Find Jump Max Hold Time
- Set to 0.3 seconds
Test: Tap jump for short hops, hold for full height jumps.
✅ Exercise Complete!
You've created three distinct movement feels by adjusting the same parameters. You understand how speed, acceleration, friction, and jump settings interact. You've implemented sprinting and optionally variable jump height. These techniques apply to any Unreal project.
Bonus Challenges
- Ice Level: Create a preset with very low friction (1-2) for slippery movement
- Moon Gravity: Set Gravity Scale to 0.4 for floaty lunar movement
- Superhero: Max Walk Speed 1500, Jump Z Velocity 1200, Air Control 1.0
- Water Area: Create a Physics Volume with Water Volume enabled and test swimming
Summary
In this lesson, you've explored the Character Movement Component in depth—the powerful system that controls how characters move through the game world. Understanding these parameters gives you the tools to create exactly the gameplay feel your project needs, from heavy realistic simulation to snappy arcade responsiveness.
Key Concepts
Character Movement Component: The CMC handles all character locomotion: ground detection, physics simulation, movement modes, and network replication. It processes input through Add Movement Input and applies acceleration, friction, and gravity to create smooth movement.
Ground Movement Parameters: Max Walk Speed sets the speed limit. Max Acceleration controls how fast you reach that speed. Ground Friction and Braking Deceleration determine how quickly you stop. High values create responsive, snappy movement; low values create heavy, momentum-based feel.
Jump and Air Movement: Jump Z Velocity determines jump height. Gravity Scale affects both jump arc and fall speed. Air Control (0-1) determines how much you can steer while airborne. Jump Max Hold Time enables variable-height jumps based on button duration. Jump Max Count enables double/triple jumps.
Movement Modes: Walking for ground movement, Falling for airborne, Swimming for water, Flying for gravity-free 3D movement. The CMC auto-switches between Walking/Falling and can enter Swimming via water volumes. Flying requires manual activation via Set Movement Mode.
Gameplay Feel: Movement parameters work together to create overall feel. Heavy characters use low acceleration, low friction, low air control. Responsive characters use high acceleration, high friction, high air control. The combination matters more than individual values.
Parameter Quick Reference
| Parameter | Low Value Effect | High Value Effect |
|---|---|---|
| Max Walk Speed | Slow movement | Fast movement |
| Max Acceleration | Sluggish start | Instant response |
| Ground Friction | Slippery, slides | Grippy, precise stops |
| Jump Z Velocity | Low hop | High jump |
| Gravity Scale | Floaty, slow falls | Snappy, fast falls |
| Air Control | Committed trajectory | Full air steering |
Best Practices
- Start with defaults: The default values are reasonable for most games. Adjust from there rather than starting from scratch.
- Test frequently: Small parameter changes have big feel impacts. Playtest after each adjustment.
- Consider your genre: Platformers need high air control and snappy response. Realistic games need momentum and weight.
- Match expectations: Players have learned movement from other games. Match conventions unless you have good reason not to.
- Use presets: Create different CMC configurations for different character types or game states.
- Don't forget audio: Movement feel includes footstep sounds, landing impacts, and jump sounds. Add these to complete the experience.
Figure: Movement feel is the combination of speed, friction, and air physics parameters.
What's Next?
Now that you can move through the world, the next lesson covers Collision and Physics Interaction. You'll learn about collision channels, overlap vs. block responses, trigger volumes, and how to detect when the player touches or enters specific areas. This enables interactive environments, pickups, damage zones, and much more.
Knowledge Check
Question 1
What does the Max Acceleration parameter control in the Character Movement Component?
Correct answer: B — Max Acceleration controls how quickly the character accelerates to maximum speed. Higher values create snappier, more responsive movement; lower values create sluggish, momentum-based movement where it takes time to get up to speed.
Question 2
What happens when you increase the Gravity Scale above 1.0?
Correct answer: B — Gravity Scale multiplies the world gravity. Values above 1.0 (like 1.5 or 2.0) increase gravity, making the character fall faster and creating snappier, more responsive-feeling jumps. Many platformers use higher gravity with higher Jump Z Velocity for this effect.
Question 3
What does the Air Control parameter (ranging from 0 to 1) determine?
Correct answer: C — Air Control determines how much the player can steer horizontally while in the air. A value of 0 means no air control (pure projectile motion); a value of 1 means full control (can completely reverse direction mid-air). Most action games use 0.2-0.5 for responsive but not unrealistic air steering.
Question 4
How do you enable double jump in the Character Movement Component?
Correct answer: B — Jump Max Count determines how many jumps the character can perform before landing. Setting it to 2 enables double jump, 3 enables triple jump, and so on. The Jump Current Count tracks jumps used and resets when landing.
Question 5
Which movement mode is automatically activated when a character enters a Physics Volume with "Water Volume" enabled?
Correct answer: C — The Character Movement Component automatically switches to Swimming mode when the character enters a Physics Volume that has "Water Volume" enabled. Swimming mode uses buoyancy, water friction, and Max Swim Speed instead of the normal walking parameters.