🎛️ Material Instances and Parameters
You've learned to build complex materials—now it's time to make them truly flexible. Parameters transform rigid materials into customizable systems that artists can tweak without touching shader code. In this lesson, you'll master the parameter workflow that powers professional material libraries.
🎯 Learning Objectives
By the end of this lesson, you will be able to:
- Explain the relationship between parent materials and Material Instances
- Create and configure Scalar, Vector, and Texture parameters
- Organize parameters into logical groups for artist-friendly interfaces
- Use Static Switch parameters to create material variants without shader duplication
- Preview dynamic material changes at runtime through Blueprints
- Design efficient material libraries with proper parameter architecture
Estimated Time: 45-55 minutes
Prerequisites: Lesson 3.3 - Building Complex Materials
In This Lesson
Material Instance Fundamentals
We touched on Material Instances in Lesson 3.1, but now it's time to go deeper. Understanding the instance system isn't just helpful—it's essential for building materials that scale to production projects with hundreds or thousands of assets.
The Parent-Instance Relationship
Think of a parent material as a template or blueprint for how a surface should look. It contains all the logic: which textures to sample, how to blend them, what calculations to perform. But crucially, it exposes certain values as parameters—adjustable knobs that can be tweaked without changing the underlying code.
A Material Instance is a child of that parent. It inherits all the parent's logic but can override any exposed parameter with its own value. The magic? Changing a parameter in an instance doesn't require recompiling the shader. Changes are instant.
Figure: One parent material can spawn unlimited instances, each with unique parameter values.
Why This Architecture Matters
The instance system provides massive advantages for production workflows:
Speed: Shader compilation is slow—complex materials can take minutes to compile. Material Instances bypass compilation entirely because the shader code doesn't change. Artists can iterate on values in real-time without waiting.
Memory efficiency: The shader itself is stored once (in the parent). Instances only store their parameter overrides—a tiny amount of data. A project with 1000 material instances doesn't use 1000× the shader memory.
Maintainability: Need to fix a bug or add a feature to your material? Update the parent once, and every instance inherits the change automatically. No need to track down and update hundreds of individual materials.
Consistency: All instances share the same underlying behavior. A "metal" instance and "wood" instance from the same parent will respond to lighting identically—only the surface properties differ.
flowchart LR
    subgraph Traditional["Without Instances"]
        M1["Material A\n⏱️ 30s compile"]
        M2["Material B\n⏱️ 30s compile"]
        M3["Material C\n⏱️ 30s compile"]
        Total1["Total: 90 seconds"]
    end

    subgraph Instances["With Instances"]
        Parent["Parent Material\n⏱️ 30s compile"]
        I1["Instance A\n⚡ Instant"]
        I2["Instance B\n⚡ Instant"]
        I3["Instance C\n⚡ Instant"]
        Total2["Total: 30 seconds"]
        Parent --> I1
        Parent --> I2
        Parent --> I3
    end

    style Total1 fill:#e74c3c,color:#fff
    style Total2 fill:#4CAF50,color:#fff
Figure: Material Instances eliminate redundant compilation, dramatically speeding up iteration.
Creating Material Instances
There are several ways to create a Material Instance:
From the Content Browser: Right-click your parent material → Create Material Instance. This creates an instance with the parent already assigned.
From scratch: Right-click in Content Browser and choose Material Instance from the creation menu. Then in the Details panel, assign the Parent property to your desired parent material.
Duplicate an existing instance: Right-click an instance → Duplicate. The new instance shares the same parent but starts with the duplicated instance's parameter values.
✅ Pro Tip: Instance Chains
Material Instances can parent other instances! This creates inheritance chains:
M_Master → MI_Metal_Base → MI_Metal_Rusty
The middle instance sets common metal properties, while the final instance adds rust-specific overrides. This is powerful for building material hierarchies with shared traits.
The Material Instance Editor
Double-click any Material Instance to open its editor. Unlike the full Material Editor with its node graph, the Instance Editor shows a clean interface focused entirely on parameters.
You'll see a list of all parameters exposed by the parent material, organized into groups. Each parameter has a checkbox to enable/disable the override. When unchecked, the instance uses the parent's default value. When checked, you can specify a custom value.
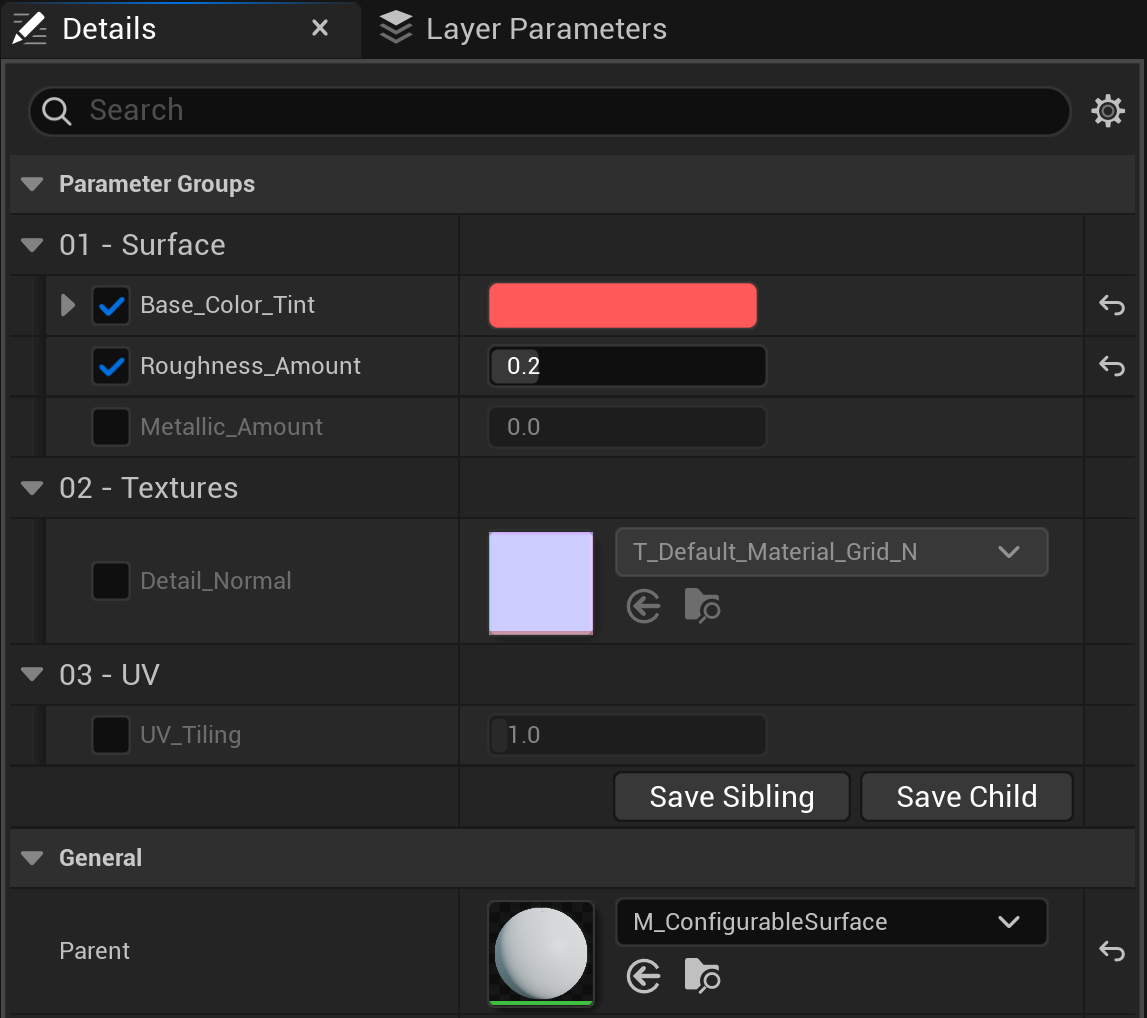
Figure: The real Material Instance Editor in UE 5.8 · each parameter has an override checkbox (checked = custom value, unchecked = inherited from the parent) · groups keep the interface organized.
⚠️ Watch Out
If you don't see any parameters in the Instance Editor, the parent material hasn't exposed any! Parameters must be explicitly created in the parent using Parameter nodes (Scalar Parameter, Vector Parameter, etc.) instead of regular Constant nodes. We'll cover this in detail in the next section.
Scalar and Vector Parameters
Parameters are the building blocks of customizable materials. Each parameter type serves a specific purpose, and choosing the right type affects both functionality and performance.
Scalar Parameters
A Scalar Parameter holds a single floating-point number. Use it for any single-value property:
Common uses: Roughness, Metallic, Opacity, Tiling amount, Blend factors, Intensity multipliers, Normal strength
To create a Scalar Parameter in the Material Editor, right-click and search for "ScalarParameter" (or press S and click). In the Details panel, configure:
Figure: Scalar Parameter properties control how the parameter appears and behaves in instances.
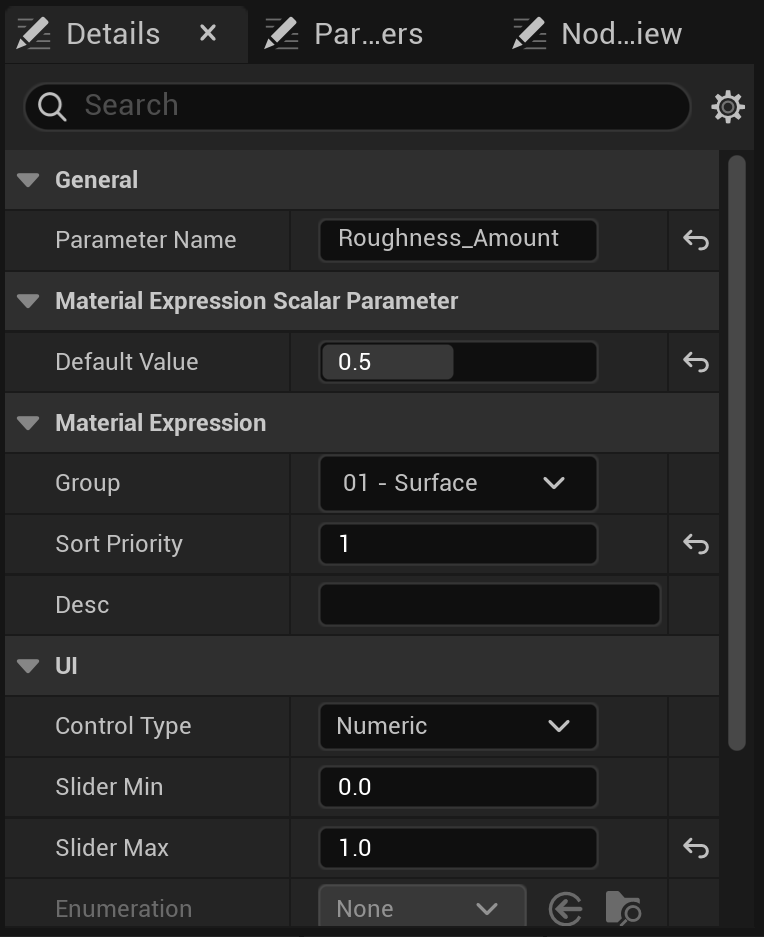
Figure: The same properties in the real Material Editor · selecting the Roughness_Amount node shows its Name, Default Value, Group, Sort Priority, and Slider Min/Max.
✅ Pro Tip: Slider Ranges
Always set meaningful Slider Min and Slider Max values. For roughness, use 0-1. For tiling, maybe 0.1-10. For intensity multipliers, 0-5 or higher. This prevents artists from accidentally entering extreme values that break the material.
Vector Parameters
A Vector Parameter holds multiple values—typically 3 (RGB color) or 4 (RGBA). Despite the name, they're most commonly used for colors.
Common uses: Base Color tint, Emissive color, Subsurface color, UV offset (2 values), Custom data
Create a Vector Parameter by right-clicking and searching for "VectorParameter" (or press V and click).
Figure: Vector Parameters provide color pickers in the Instance Editor and output multiple channels.
Naming Conventions
Good parameter names make materials self-documenting. Follow these conventions:
Be descriptive: Use Roughness_Amount not R or Param1
Use underscores: Base_Color_Tint reads better than BaseColorTint in the UI
Include units when relevant: Tiling_Scale, Emission_Intensity
Group related parameters: Prefix with category: Layer1_Color, Layer1_Roughness, Layer2_Color, etc.
💡 Parameter Names Are Identifiers
Parameter names serve two purposes: display in the Instance Editor AND identification in Blueprints when changing materials at runtime. A descriptive name like Damage_Blend_Amount is much easier to find in code than Param7. Choose names you'll understand months later!
Texture Parameters
While Scalar and Vector parameters handle numbers and colors, Texture Parameters let you swap entire textures in Material Instances. This is incredibly powerful—one parent material can serve brick, wood, metal, and fabric surfaces just by changing which textures each instance uses.
Creating Texture Parameters
Instead of using a regular Texture Sample node, use a Texture Sample Parameter 2D node. Right-click and search for it, or convert an existing Texture Sample by right-clicking it and selecting "Convert to Parameter."
Configure the parameter in the Details panel:
Parameter Name: Descriptive name like BaseColor_Texture or Normal_Map
Group: Category for organization (e.g., "Textures")
Texture: The default texture to use when no override is set
Figure: Texture Parameters allow texture swapping in Material Instances.
Default Textures Matter
Always assign a sensible default texture to your parameters. When an artist creates a new instance, they see the default in the preview. A good default helps them understand what kind of texture belongs there.
For certain parameter types, Unreal provides built-in defaults:
Normal maps: If left empty, consider using the engine's default flat normal (or create a 1x1 pixel normal texture pointing straight up)
Masks: White or black textures depending on whether the default state should be "on" or "off"
✅ Pro Tip: Texture Parameter Groups
For materials with multiple texture sets (like a terrain blend), organize parameters clearly:
Group "Layer 1 - Grass": Grass_BaseColor, Grass_Normal, Grass_Roughness
Group "Layer 2 - Dirt": Dirt_BaseColor, Dirt_Normal, Dirt_Roughness
This makes the Instance Editor much easier to navigate.
Sampler Type Consistency
When creating Texture Parameters, ensure the Sampler Type matches the intended texture type:
Color (sRGB): For Base Color, Emissive, and any texture meant to display colors
Linear Color: For masks, roughness, metallic, AO—data textures
Normal: For normal maps (uses special compression handling)
⚠️ Watch Out
If an artist swaps in a texture with the wrong type (e.g., puts a normal map in a Color slot), results will look wrong. While you can't prevent this entirely, clear parameter naming (Normal_Map vs BaseColor_Texture) reduces mistakes.
Organizing Material Libraries
As materials grow complex, parameter organization becomes critical. A material with 30 unorganized parameters is a nightmare to use. A well-organized material with those same parameters grouped logically is a joy.
Parameter Groups
Every parameter has a Group property in its Details panel. Parameters with the same group name appear together in the Instance Editor under a collapsible header.
Think about groups from the artist's perspective—what settings do they typically adjust together?
Figure: Proper grouping transforms a confusing parameter list into an intuitive interface.
Common Group Categories
Here's a proven grouping structure for general-purpose materials:
"01 - Surface" or "Surface Properties": Base Color tint, Roughness, Metallic, Normal intensity—the core PBR values
"02 - Textures": All swappable texture parameters
"03 - UV/Tiling": Tiling scale, UV offset, rotation
"04 - Effects": Emissive color/intensity, detail textures, weathering amount
"05 - Blending": For multi-layer materials: blend masks, height blend contrast, layer weights
💡 Numbering Groups
Prefix group names with numbers (01 - Surface, 02 - Textures) to control their order in the Instance Editor. Unreal sorts groups alphabetically, so numbers ensure your most-used parameters appear at the top.
Sort Priority
Within a group, parameters are sorted by their Sort Priority value (found in the parameter's Details panel). Lower numbers appear first.
Set priorities strategically: put the most commonly adjusted parameters at the top (priority 0-10), with less-used advanced options lower (priority 50-100).
Material Library Architecture
For large projects, plan your material hierarchy carefully. A common pattern:
flowchart TD
    subgraph MasterMaterials["Master Materials (Full Logic)"]
        M1["M_Master_Opaque\n(standard PBR)"]
        M2["M_Master_Transparent\n(glass, water)"]
        M3["M_Master_Foliage\n(subsurface, wind)"]
    end

    subgraph BaseMaterials["Base Material Instances"]
        B1["MI_Base_Metal"]
        B2["MI_Base_Wood"]
        B3["MI_Base_Stone"]
        B4["MI_Base_Glass"]
        B5["MI_Base_Leaf"]
    end

    subgraph FinalMaterials["Final Material Instances"]
        F1["MI_Metal_Steel_Clean"]
        F2["MI_Metal_Steel_Rusty"]
        F3["MI_Wood_Oak"]
        F4["MI_Wood_Pine_Weathered"]
        F5["MI_Stone_Granite"]
    end

    M1 --> B1
    M1 --> B2
    M1 --> B3
    M2 --> B4
    M3 --> B5

    B1 --> F1
    B1 --> F2
    B2 --> F3
    B2 --> F4
    B3 --> F5

    style MasterMaterials fill:#667eea,color:#fff
    style BaseMaterials fill:#FF9800,color:#fff
    style FinalMaterials fill:#4CAF50,color:#fff
Figure: A three-tier hierarchy provides flexibility while maintaining consistency.
Tier 1 - Master Materials: A small number of parent materials containing all shader logic. These compile once and define your project's visual capabilities.
Tier 2 - Base Instances: Category-specific instances that set common properties for a material type (all metals share certain roughness ranges, all woods have similar tiling defaults).
Tier 3 - Final Instances: The actual materials applied to assets. These inherit from base instances and add asset-specific customization.
✅ Pro Tip: Start Simple, Scale Up
Don't over-architect from day one. Start with a single master material and create instances directly from it. As patterns emerge (you keep making similar metal variations), introduce base instances for those categories. Let the hierarchy grow organically based on actual needs.
Static Switch Parameters
Sometimes you need material variants that aren't just different values—they need different logic. Maybe some instances should use a detail texture overlay while others skip it entirely. Or some need vertex color blending while others use a mask texture.
Static Switch Parameters enable this by letting instances toggle entire branches of material logic on or off.
📖 Definition
Static Switch Parameter: A boolean (true/false) parameter that controls which branch of material logic compiles into an instance. Unlike regular parameters, static switches cause shader recompilation when changed—but they completely remove unused code paths, improving performance.
How Static Switches Work
A Static Switch node has three inputs: True, False, and the switch value itself (set by a Static Bool Parameter). When an instance sets the switch to True, only the True input's node chain is compiled. The False branch is completely eliminated.
Figure: Static Switches select which code path compiles, eliminating the unused branch entirely.
Creating Static Switch Parameters
Step 1: Create a Static Bool Parameter node (right-click → search "StaticBoolParameter"). Name it descriptively, like Use_Detail_Texture.
Step 2: Create a Static Switch Parameter node (search "StaticSwitch").
Step 3: Connect your True and False branch outputs to the respective inputs on the switch.
Step 4: In the Static Switch's Details panel, set the Parameter Name to match your Static Bool's name exactly.
When to Use Static Switches
Good use cases:
• Optional features that many instances won't use (detail textures, vertex color blending, emissive effects)
• Platform-specific optimizations (high/low quality branches)
• Completely different texturing approaches (world-aligned vs UV-based)
Avoid for:
• Anything that needs to change at runtime (static switches only change at instance compile time)
• Simple value differences (use regular scalar parameters instead)
⚠️ Watch Out: Shader Variants
Each combination of static switch states creates a separate shader permutation. A material with 3 static switches has up to 8 variants (2³). Too many switches can explode your shader count and increase memory usage. Use them strategically for meaningful feature toggles, not minor variations.
✅ Pro Tip: Quality Scalability
Static switches are perfect for scalability settings. Create switches like Use_High_Quality_Normals or Enable_Parallax_Occlusion. On lower-end hardware, instances with these disabled run faster because the expensive code paths don't exist in their compiled shaders.
Dynamic Material Changes at Runtime
Everything we've covered so far involves setting up materials in the editor. But what if you want materials to change while the game is running? A health bar that shifts from green to red? Damage effects that intensify over time? A magic spell that pulses with energy? Dynamic Material Instances make this possible.
📖 Definition
Dynamic Material Instance (DMI): A Material Instance created at runtime through Blueprints or C++ that allows parameter values to be changed in real-time during gameplay. Unlike editor-created instances, DMIs exist only in memory and are created per-object.
The Runtime Material Pipeline
When you apply a Material Instance to an object in the editor, that instance is shared. If you change a parameter, every object using that instance changes. That's fine for editor work, but at runtime you often want individual objects to have unique material states.
The solution: create a Dynamic Material Instance from your base material, then modify that unique copy.
flowchart LR
    subgraph Editor["Editor Time"]
        MI["MI_Character_Skin\n(shared instance)"]
        Obj1["Character A"]
        Obj2["Character B"]
        MI --> Obj1
        MI --> Obj2
    end

    subgraph Runtime["Runtime (with DMI)"]
        Base["MI_Character_Skin\n(source)"]
        DMI1["DMI Copy A\nHealth: 100%\nColor: Green"]
        DMI2["DMI Copy B\nHealth: 30%\nColor: Red"]
        CharA["Character A"]
        CharB["Character B"]
        Base -.->|Create DMI| DMI1
        Base -.->|Create DMI| DMI2
        DMI1 --> CharA
        DMI2 --> CharB
    end

    style MI fill:#667eea,color:#fff
    style DMI1 fill:#4CAF50,color:#fff
    style DMI2 fill:#e74c3c,color:#fff
Figure: Dynamic Material Instances let each object have independently modifiable material parameters.
Creating Dynamic Material Instances in Blueprints
The Blueprint node you need is Create Dynamic Material Instance. Here's the typical workflow:
Step 1: Get a reference to the mesh component whose material you want to modify (usually through a variable or "Get Component by Class").
Step 2: Call Create Dynamic Material Instance on that component. Specify which material slot (Element Index) if the mesh has multiple materials.
Step 3: Store the returned Dynamic Material Instance in a variable—you'll need it to change parameters later.
Step 4: Use Set Scalar Parameter Value or Set Vector Parameter Value on the stored DMI to modify parameters.
Figure: Blueprint flow for creating and modifying Dynamic Material Instances.
Common Parameter Modification Nodes
Once you have a DMI reference, these nodes let you modify parameters in real-time:
Set Scalar Parameter Value: Changes a single float parameter (roughness, opacity, blend amount, etc.)
Set Vector Parameter Value: Changes a color or multi-value parameter. Use "Make Linear Color" to construct RGBA values.
Set Texture Parameter Value: Swaps textures at runtime—useful for damage states, customization systems, etc.
✅ Pro Tip: Parameter Names Must Match Exactly
The "Parameter Name" string in your Blueprint must exactly match the parameter name in your material (case-sensitive!). If they don't match, the node silently does nothing. Double-check spelling and use copy-paste when possible.
Performance Considerations
Dynamic Material Instances are powerful but have costs:
Memory: Each DMI is a separate material in memory. 1000 objects with unique DMIs = 1000 material copies. For large crowds, consider alternative approaches like vertex colors or material parameter collections.
Draw calls: Objects with identical materials can be batched together. Objects with unique DMIs cannot. Heavy DMI usage can increase draw calls significantly.
Update frequency: Changing parameters every frame is expensive. When possible, only update when values actually change (on damage events, not every tick).
⚠️ Watch Out: Don't Create DMIs Every Frame
A common mistake is calling "Create Dynamic Material Instance" inside Tick or frequently-called functions. This creates new DMIs constantly, leaking memory. Create the DMI once (usually in BeginPlay), store it, and reuse that reference for all parameter changes.
Material Parameter Collections
For global parameters that affect many materials simultaneously (time of day, weather intensity, global tint), use Material Parameter Collections instead of DMIs.
Create one in Content Browser: right-click and choose Material Parameter Collection from the creation menu. Add scalar or vector parameters to the collection. In your materials, use Collection Parameter nodes to read these values.
At runtime, a single Blueprint node (Set Scalar Parameter Value or Set Vector Parameter Value on the collection) updates the parameter across ALL materials using that collection—far more efficient than updating thousands of individual DMIs.
Figure: Choose DMIs for per-object control, MPCs for global synchronized changes.
Hands-On: Build a Customizable Material
Time to put everything together! In this exercise, you'll create a master material with multiple parameter types, build instances from it, and set up a simple runtime parameter change.
🏋️ Exercise: Configurable Surface Material
Goal: Create a flexible PBR material that can represent metal, plastic, or painted surfaces through parameter adjustments alone.
Time: 20-30 minutes
What you'll practice:
- Creating Scalar, Vector, and Texture parameters
- Organizing parameters into groups
- Building Material Instances with different looks
- Setting up a Dynamic Material Instance in Blueprints
Part 1: Create the Master Material
Step 1: In Content Browser, create a new Material: Right-click → Material. Name it M_ConfigurableSurface.
Step 2: Double-click to open the Material Editor. We'll add parameters for complete surface control.
Step 3: Create surface property parameters:
Add a Vector Parameter (press V, click). Name it Base_Color_Tint. Set Group to 01 - Surface. Set default to a neutral gray (0.5, 0.5, 0.5). Connect to Base Color.
Add a Scalar Parameter (press S, click). Name it Roughness_Amount. Set Group to 01 - Surface. Set default to 0.5, Slider Min to 0, Slider Max to 1. Connect to Roughness.
Add another Scalar Parameter. Name it Metallic_Amount. Set Group to 01 - Surface. Set default to 0, Slider Min to 0, Slider Max to 1. Connect to Metallic.
💡 Hint: Quick Parameter Creation
Hold down the appropriate key and click to quickly create parameter nodes:
- S + Click = Scalar Parameter
- V + Click = Vector Parameter
- T + Click = Texture Sample (then convert to parameter)
Step 4: Add texture parameters for optional detail:
Create a Texture Sample Parameter 2D (search for it). Name it Detail_Normal. Set Group to 02 - Textures. Leave the default texture empty for now. Connect to Normal.
Step 5: Add a tiling control:
Create a Scalar Parameter named UV_Tiling. Set Group to 03 - UV. Default: 1.0, Slider Min: 0.1, Slider Max: 10.
Create a Texture Coordinate node. Create a Multiply node. Connect TexCoord → Multiply A, UV_Tiling → Multiply B. Connect Multiply output to the UVs input of your Detail_Normal texture parameter.
Step 6: Click Apply to compile the material.
Figure: Complete node layout for the configurable surface material.
Part 2: Create Material Instances
Step 7: Right-click M_ConfigurableSurface in Content Browser → Create Material Instance. Name it MI_ShinyPlastic_Red.
Step 8: Double-click to open the Instance Editor. Configure for shiny red plastic:
- Enable and set Base_Color_Tint to bright red (1.0, 0.1, 0.1)
- Enable and set Roughness_Amount to 0.2 (shiny)
- Leave Metallic_Amount at 0 (plastic is non-metallic)
Step 9: Create another instance: MI_BrushedMetal_Gold. Configure:
- Base_Color_Tint: Gold color (1.0, 0.8, 0.3)
- Roughness_Amount: 0.4 (slightly brushed)
- Metallic_Amount: 1.0 (fully metallic)
Step 10: Create a third: MI_MattePaint_Blue. Configure:
- Base_Color_Tint: Blue (0.2, 0.4, 0.9)
- Roughness_Amount: 0.85 (very matte)
- Metallic_Amount: 0 (painted surface)
Step 11: Place three cubes or spheres in your level and apply each instance to see the variety from one parent material!
✅ Solution Check: What You Should See
Your three objects should look distinctly different:
- Red Plastic: Bright red with clear highlights, no metallic reflection
- Gold Metal: Warm gold with metallic reflections, slightly diffuse highlights
- Blue Matte: Flat blue with very soft, spread-out highlights
All three use the exact same shader code—only parameter values differ!
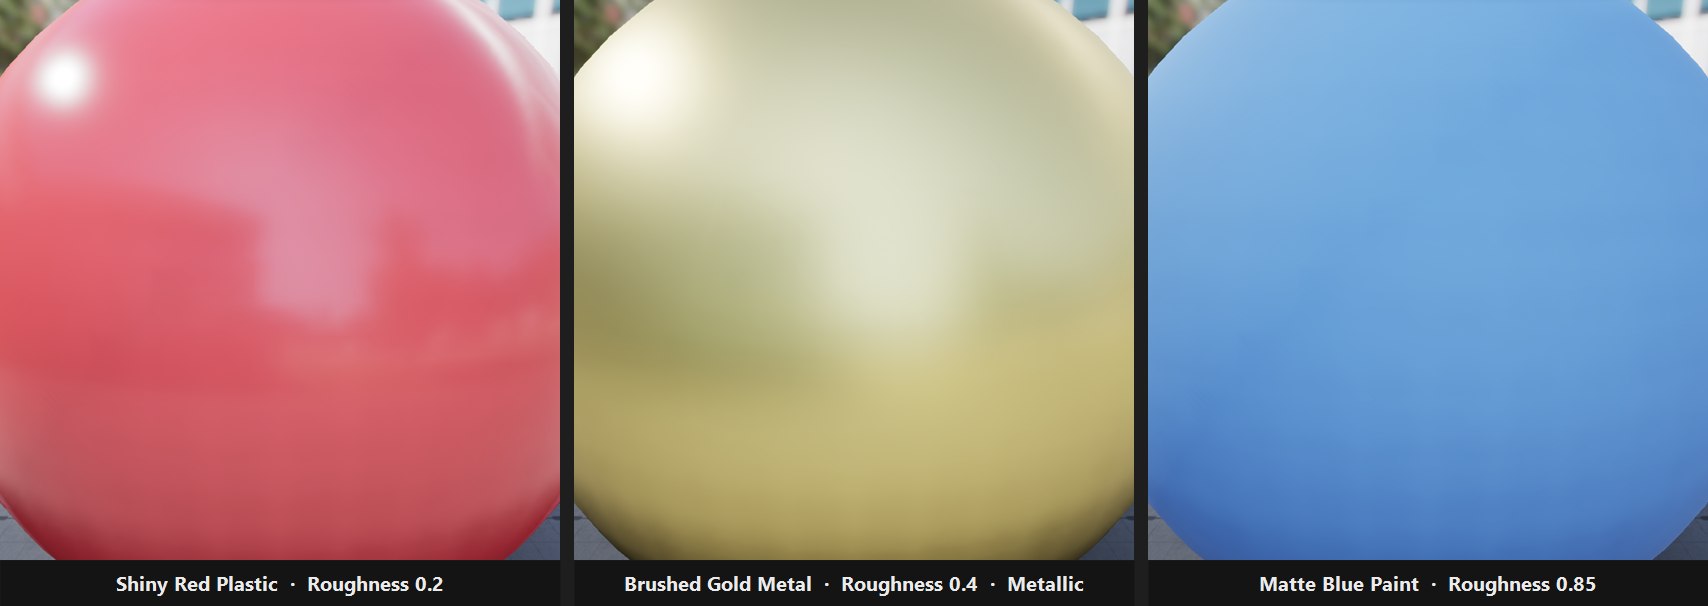
Figure: Three instances of one parent material · only the Base Color, Roughness, and Metallic values differ · the shader code is identical.
Part 3: Dynamic Material at Runtime (Bonus)
Step 12: Create a new Blueprint Actor: Right-click in Content Browser → Blueprint Class → Actor. Name it BP_ColorChangingCube.
Step 13: Open the Blueprint. In the Components panel, add a Static Mesh component. Set its mesh to a cube and assign MI_ShinyPlastic_Red as the material.
Step 14: Create a variable: Name it DynamicMat, type Material Instance Dynamic (Object Reference).
Step 15: In the Event Graph, from Event BeginPlay:
- Drag from the execution pin → search Create Dynamic Material Instance
- For Target, drag in your Static Mesh component reference
- Element Index: 0
- Drag from the Return Value → Set DynamicMat (to store the reference)
Step 16: Add a custom event called ChangeToRandomColor. From this event:
- Get your
DynamicMatvariable - Call Set Vector Parameter Value
- Parameter Name:
Base_Color_Tint(must match exactly!) - Value: Use Make Linear Color with Random Float in Range (0-1) for R, G, B
Step 17: To test, add a Keyboard Event (like pressing "C") that calls your ChangeToRandomColor event.
Step 18: Compile, place the Blueprint in your level, and press Play. Hit "C" to see the cube change to random colors instantly!
🔧 Troubleshooting: Color Not Changing?
Check these common issues:
- Parameter name mismatch: Ensure "Base_Color_Tint" is spelled exactly as in the material
- DMI not stored: Verify you're setting the DynamicMat variable in BeginPlay
- Wrong component: Make sure Create Dynamic Material Instance targets your Static Mesh component
- Event not firing: Add a Print String after the keyboard event to confirm it's being called
Summary
Material Instances and Parameters are the foundation of efficient, artist-friendly material workflows in Unreal Engine. Let's recap what you've learned:
🎯 Key Takeaways
Material Instances inherit from parent materials, allowing parameter customization without shader recompilation. This enables instant iteration and massive memory savings.
Scalar Parameters control single float values (roughness, metallic, opacity, tiling). Always set sensible slider ranges to guide artists.
Vector Parameters control colors and multi-value data. They provide color pickers in the Instance Editor for intuitive adjustment.
Texture Parameters allow texture swapping in instances—one material can serve countless surface types by swapping texture sets.
Parameter Groups organize complex materials into logical categories. Number prefixes control display order. Good organization transforms confusing parameter lists into intuitive interfaces.
Static Switch Parameters toggle entire shader branches at compile time. Use them for optional features that should be completely eliminated when disabled.
Dynamic Material Instances enable runtime parameter changes through Blueprints. Create once in BeginPlay, store the reference, and modify parameters as needed.
Material Parameter Collections provide efficient global parameters that update across all materials simultaneously—perfect for time-of-day or weather systems.
Material Architecture Best Practices
flowchart TD
    subgraph Planning["1. Plan Your Hierarchy"]
        P1["Identify common surface types"]
        P2["Design master materials with\nall needed parameters"]
        P3["Create base instances\nfor categories"]
    end

    subgraph Building["2. Build Smart"]
        B1["Use descriptive parameter names"]
        B2["Organize into logical groups"]
        B3["Set sensible defaults\nand slider ranges"]
    end

    subgraph Runtime["3. Runtime Considerations"]
        R1["Create DMIs once, reuse reference"]
        R2["Use MPCs for global effects"]
        R3["Update only when values change"]
    end

    Planning --> Building --> Runtime

    style Planning fill:#667eea,color:#fff
    style Building fill:#FF9800,color:#fff
    style Runtime fill:#4CAF50,color:#fff
Figure: The three phases of effective material architecture.
Common Pitfalls to Avoid
❌ Creating DMIs every frame — Memory leak! Create once, store, reuse.
❌ Misspelled parameter names — Blueprint changes silently fail. Copy-paste names when possible.
❌ Too many static switches — Each combination creates a shader variant. Use sparingly.
❌ Unorganized parameters — A flat list of 30 parameters is unusable. Group everything.
❌ Missing default values — Instances with no defaults show unexpected results. Always set sensible defaults.
What's Next?
With solid parameter and instance skills, you're ready to explore special material types. In the next lesson, we'll cover:
- Translucent and masked materials for glass, foliage, and cutouts
- Emissive materials for glowing effects and light sources
- Decals for adding detail without extra geometry
- Introduction to landscape materials for terrain
These specialized techniques build directly on the parameter knowledge you've gained today!