🔥 Creating Particle Effects
Now that you understand Niagara's architecture, it's time to build real effects. This lesson teaches you to create fire, smoke, and spark effects from scratch—the building blocks for countless game visuals. You'll learn essential techniques for spawning, movement, appearance, and the materials that make particles look great.
🎯 Learning Objectives
By the end of this lesson, you will be able to:
- Create particle effects from an empty system
- Configure spawn behavior (rate, burst, location)
- Set up particle movement (velocity, gravity, drag)
- Create and apply particle materials
- Build fire, smoke, and spark effects
Estimated Time: 45-55 minutes
Prerequisites: Lesson 9.1 (Niagara Overview)
In This Lesson
Effect Building Blocks
Every particle effect is built from the same fundamental elements: spawning (how particles are created), movement (how they travel), and appearance (how they look). Mastering these building blocks lets you create any effect.
Spawning: Creating Particles
Particles need to be born before they can do anything. Niagara offers several spawn modes:
| Spawn Type | Module | Use Case |
|---|---|---|
| Continuous | Spawn Rate | Fire, smoke, fountain, rain |
| Burst | Spawn Burst Instantaneous | Explosion, impact, muzzle flash |
| Per Distance | Spawn Per Unit | Footsteps, tire tracks, trails |
| Event-Based | Spawn from Event | Secondary effects, chain reactions |
Spawn Location
Where particles appear matters as much as how many. Common location modules:
- Point: All particles spawn at emitter origin (default)
- Sphere: Random positions on/within a sphere
- Box: Random positions within a box volume
- Cylinder: Random positions on/within a cylinder
- Mesh Surface: Spawn on the surface of a mesh
- Skeletal Mesh: Spawn on bones of an animated character
Movement: Velocity and Forces
Movement makes particles feel alive. Key movement modules:
Initial Velocity (Particle Spawn):
- Sets starting direction and speed
- Can be uniform, random range, or cone-shaped
- Common: upward for fire, outward for explosions
Forces (Particle Update):
- Gravity Force: Pulls down (or any direction)
- Drag: Slows particles over time (air resistance)
- Curl Noise Force: Adds organic, swirling motion
- Point Attraction: Pulls toward a location
- Vortex: Spins particles around an axis
Figure: Common forces that affect particle movement.
Appearance: Visual Properties
How particles look depends on several factors:
Size:
- Initial size in Particle Spawn
- Scale over lifetime (grow or shrink)
- Random variation for natural look
Color:
- Initial color in Particle Spawn
- Color over lifetime curves (fade, color shift)
- Alpha (transparency) for fading out
Rotation:
- Initial rotation (random for variation)
- Rotation rate (spinning particles)
- Face camera or align to velocity
Material:
- Texture and shader that renders the particle
- Crucial for final appearance
- Covered in detail next section
Lifetime
Every particle has a lifetime—how long it exists before dying. This affects:
- How far particles travel
- How "over lifetime" curves are evaluated
- Overall density of the effect
💡 Lifetime + Spawn Rate = Particle Count
The number of particles visible at once equals (roughly) Spawn Rate × Lifetime. Spawning 50/sec with 2-second lifetime means ~100 particles. Balance these for performance and visual density.
Particle Materials
Materials are what make particles look like fire instead of colored squares. A good particle material handles transparency, texture animation, and responds to particle data like color and alpha.
Material Requirements
Particle materials need specific settings:
- Blend Mode: Usually Translucent or Additive
- Shading Model: Unlit (particles don't receive lighting)
- Two Sided: Often enabled for billboards
- Used with Niagara Sprites: Check in Usage
Blend Modes
| Blend Mode | Effect | Use For |
|---|---|---|
| Translucent | Standard transparency | Smoke, dust, clouds |
| Additive | Adds color (brightens) | Fire, sparks, magic, glow |
| Modulate | Multiplies (darkens) | Shadows, dark smoke |
| Alpha Composite | Pre-multiplied alpha | Complex transparency |
Figure: Additive brightens (fire), Translucent darkens/blocks (smoke).
Simple Particle Material Setup
Here's how to create a basic particle material:
- Right-click in Content Browser → Material
- Name it
M_Particle_Fire - Open and set these properties in Details:
- Blend Mode: Additive
- Shading Model: Unlit
- In Usage, check Used with Niagara Sprites
Material Graph for Particles
A typical particle material connects:
Texture Sample → Multiply → Emissive Color
                     ↓
Particle Color → Multiply ↗

Texture Alpha → Opacity (if translucent)
Key Nodes:
- Texture Sample: Your particle texture (smoke puff, spark, etc.)
- Particle Color: Receives color from Niagara (essential!)
- Multiply: Combines texture with particle color
Figure: Particle material multiplies texture by Particle Color from Niagara.
Particle Textures
Good particle textures have these qualities:
- Soft edges: Fade to transparent at edges
- Centered: Main shape in the middle
- Alpha channel: Defines shape transparency
- Power of 2: Dimensions like 64, 128, 256, 512
Common textures:
- Radial gradient: Bright center, fades outward (fire core, glow)
- Soft circle: Fuzzy dot (smoke puff, dust)
- Star/spark: Sharp points (sparks, magic)
- Noise: Organic variation (smoke detail)
✅ Starter Content Has Particles
If you enabled Starter Content when creating your project, check StarterContent/Particles for ready-to-use textures and materials. These include smoke puffs, sparks, and radial gradients.
Creating a Fire Effect
Fire is one of the most common particle effects. It combines upward movement, color shifting from yellow/white to orange/red, and additive blending for that glowing look. Let's build one step by step.
Fire Effect Characteristics
- Movement: Upward velocity, slight randomness, maybe curl noise
- Color: Hot core (white/yellow), cooler edges (orange/red), fades out
- Size: Starts small, grows slightly, shrinks at end
- Material: Additive blend, radial gradient texture
- Spawn: Continuous rate from a point or small area
Step-by-Step Fire Creation
1. Create the System
- Right-click → FX → Niagara System
- Select New system from selected emitter(s)
- Choose Empty emitter template
- Name it
NS_Fire
2. Add Spawn Rate
- In the emitter stack, find Emitter Update
- Click + → search for Spawn Rate
- Set Spawn Rate: 30
3. Initialize Particles
- In Particle Spawn, click +
- Add Initialize Particle
- Configure:
- Lifetime: Random Range (0.8 - 1.2)
- Sprite Size: Random Range (20 - 40)
- Color: Will set via Scale Color
4. Add Velocity
- In Particle Spawn, add Add Velocity
- Set velocity mode to Add Velocity in Cone (or manual)
- Configure:
- Speed: Random Range (50 - 100)
- Cone Axis: (0, 0, 1) — upward
- Cone Angle: 15-20 degrees
5. Add Update Behaviors
- In Particle Update, add these modules:
- Gravity Force: Set to (0, 0, -50) — light upward fight
- Drag: 0.5-1.0 to slow particles
- Scale Sprite Size: Curve that grows then shrinks
- Scale Color: Color gradient over lifetime
6. Configure Color Over Lifetime
In Scale Color module:
- Click the color bar to open curve editor
- Set gradient:
- 0%: White/light yellow (255, 255, 200), Alpha 1.0
- 30%: Bright orange (255, 150, 0), Alpha 1.0
- 70%: Red/dark orange (255, 50, 0), Alpha 0.7
- 100%: Dark red (100, 0, 0), Alpha 0.0
Figure: Fire particles shift from hot white/yellow to cool red as they age.
7. Add Renderer
- In Render, ensure Sprite Renderer exists
- Set Material: Your additive fire material
- Or use a default radial gradient material temporarily
8. Test and Refine
- Preview in the Niagara editor
- Adjust spawn rate for density
- Tweak velocity for height
- Modify size curve for shape
- Fine-tune colors for desired look
⚠️ Fire Needs Additive Material
Fire looks wrong with translucent blending—it darkens instead of glows. Always use an additive material for fire, sparks, and magical glow effects. If your fire looks like dark circles, check the material blend mode.
Smoke and Sparks
Fire rarely exists alone. Smoke rises from flames, and sparks fly off. These supporting elements complete the effect and add visual interest.
Smoke Effect
Smoke differs from fire in several ways:
| Property | Fire | Smoke |
|---|---|---|
| Blend Mode | Additive (glows) | Translucent (blocks) |
| Color | Bright: yellow → red | Dark: gray → transparent |
| Size | Small → medium | Medium → large (expands) |
| Speed | Moderate upward | Slow upward, drifting |
| Lifetime | Short (0.5-1.5s) | Longer (2-4s) |
| Spawn Rate | Higher | Lower |
Smoke Settings
- Spawn Rate: 5-15 particles/sec
- Lifetime: 2.0 - 4.0 seconds
- Initial Size: 30-50
- Size Over Life: Grow to 2-3× initial size
- Velocity: (0, 0, 30-60) slow upward
- Color: Dark gray (60, 60, 60) → transparent
- Add Curl Noise: For organic movement
- Material: Translucent, soft circle/puff texture
Spark Effect
Sparks are small, fast, short-lived particles that add energy:
- Spawn Mode: Burst (20-50 at once) or low continuous rate
- Lifetime: Very short (0.3 - 0.8 seconds)
- Initial Size: Small (2-8)
- Velocity: High speed, random directions, upward bias
- Gravity: Normal gravity (-980) so they arc and fall
- Color: Bright orange/yellow, fades quickly
- Material: Additive, star or bright dot texture
Figure: A complete fire effect combines fire, smoke, and spark emitters.
Combining Emitters
To create a complete fire effect:
- Create or open your fire Niagara System
- In System Overview, click + Add Emitter
- Add an empty emitter, rename to "Smoke"
- Configure smoke settings (translucent, slow, expanding)
- Add another emitter, rename to "Sparks"
- Configure spark settings (additive, fast, short-lived)
- All three emitters play together as one system
💡 Render Order Matters
Emitters render in the order they appear in System Overview (top to bottom). For fire, render order should be: Smoke (back) → Fire (middle) → Sparks (front). Drag emitters to reorder them.
Hands-On: Building a Complete Fire Effect
Let's build a professional-quality fire effect with three emitters: flames, smoke, and sparks. This exercise reinforces everything covered in this lesson and gives you a reusable fire system.
🎯 Exercise Goal
Create a complete campfire effect with realistic fire particles, rising smoke, and flying sparks. You'll set up materials, configure three emitters, and combine them into a polished system.
Part 1: Create Materials
Step 1: Create Fire Material
- Right-click in Content Browser → Material
- Name it
M_Particle_Fire - Open and configure Details panel:
- Blend Mode: Additive
- Shading Model: Unlit
- In Material Graph:
- Add Texture Sample node (use a radial gradient or soft circle)
- Add Particle Color node
- Add Multiply node
- Connect: Texture RGB → Multiply A, Particle Color → Multiply B
- Connect: Multiply → Emissive Color
- In Usage section, check Used with Niagara Sprites
- Apply and Save
Step 2: Create Smoke Material
- Right-click → Material, name it
M_Particle_Smoke - Configure:
- Blend Mode: Translucent
- Shading Model: Unlit
- In Material Graph:
- Add Texture Sample (soft circle/puff texture)
- Add Particle Color
- Add Multiply for RGB
- Connect: Texture RGB × Particle Color RGB → Emissive Color
- Add another Multiply for alpha
- Connect: Texture Alpha × Particle Color Alpha → Opacity
- Check Used with Niagara Sprites, Apply and Save
Step 3: Create Spark Material
- Duplicate
M_Particle_Fire - Rename to
M_Particle_Spark - Optionally change texture to a star or bright dot
- Keep Additive blend mode
✅ Texture Tip
If you don't have particle textures, you can use the default white texture and rely on color alone for testing. Or check Starter Content → Particles for ready-made textures.
Part 2: Create the Fire Emitter
Step 4: Create Niagara System
- Right-click → FX → Niagara System
- Select New system from selected emitter(s)
- Choose Empty template
- Name it
NS_Campfire - Open the editor
Step 5: Configure Fire Emitter Spawn
- Rename the emitter to
Fire - In Emitter Update, add Spawn Rate
- Set Spawn Rate:
35
Step 6: Configure Fire Particle Spawn
- In Particle Spawn, add Initialize Particle
- Configure:
- Lifetime: Uniform Random (0.6 - 1.0)
- Sprite Size Mode: Random Uniform
- Sprite Size Min: 15
- Sprite Size Max: 30
- Color: Leave default (will use Scale Color)
- Add Add Velocity module
- Configure velocity:
- Velocity: (0, 0, 80) — or use Add Velocity in Cone
- If using cone: Speed 60-100, Cone Angle 15°, Axis (0,0,1)
- Add Sphere Location module (optional, for spawn area)
- Set Sphere Radius: 20
Step 7: Configure Fire Particle Update
- In Particle Update, add Gravity Force
- Set Gravity: (0, 0, -100) — light downward pull, fire still rises
- Add Drag module, set Drag: 1.0
- Add Scale Color module
- Configure color gradient:
- Click the color bar to open curve editor
- Add keys at 0%, 25%, 60%, 100%
- 0%: RGB (255, 255, 200), Alpha 1.0 — hot white/yellow
- 25%: RGB (255, 180, 50), Alpha 1.0 — orange
- 60%: RGB (255, 80, 0), Alpha 0.8 — red-orange
- 100%: RGB (100, 20, 0), Alpha 0.0 — dark red, faded
- Add Scale Sprite Size module
- Configure size curve: Start at 0.5, peak at 1.2 around 30%, end at 0.3
Step 8: Configure Fire Renderer
- In Render, select Sprite Renderer
- Set Material: M_Particle_Fire
- Enable Sort Particles if available
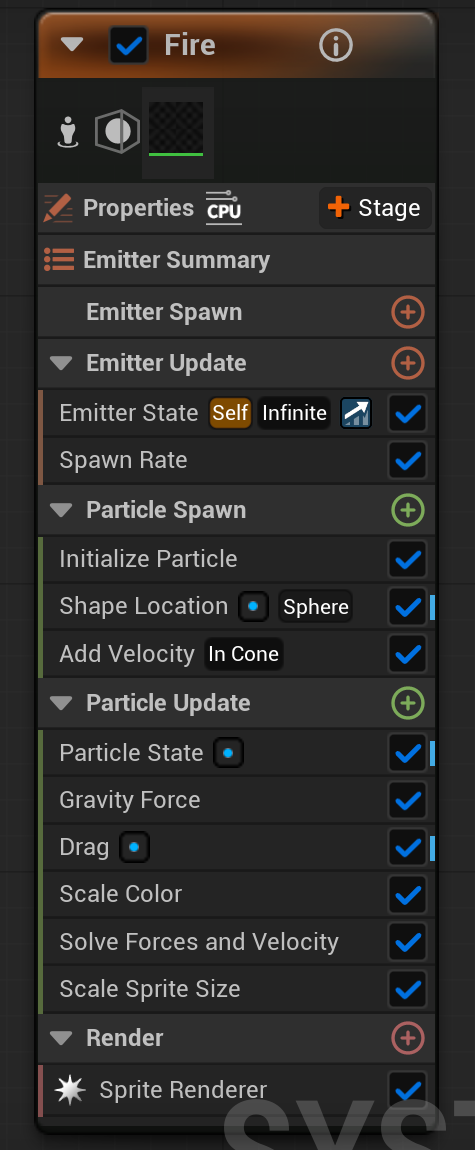
Figure: the real module stack for a Fire emitter in the Niagara System Overview · Emitter Update sets the Spawn Rate, Particle Spawn runs Initialize Particle · Shape Location · Add Velocity, then Particle Update layers Gravity Force, Drag, Scale Color and Scale Sprite Size before the Sprite Renderer draws each particle.
Part 3: Create the Smoke Emitter
Step 9: Add Smoke Emitter
- In System Overview, click + Add Emitter
- Select Empty template
- Rename to
Smoke - Drag it above the Fire emitter (renders behind)
Step 10: Configure Smoke
- Emitter Update:
- Add Spawn Rate:
8
- Add Spawn Rate:
- Particle Spawn:
- Initialize Particle: Lifetime 2.5-3.5s, Size 30-50
- Add Velocity: (0, 0, 40) slow upward
- Initial Color: RGB (80, 80, 80), Alpha 0.6
- Particle Update:
- Gravity Force: (0, 0, 20) — slight upward buoyancy
- Drag: 0.5
- Curl Noise Force: Strength 30-50 (for organic motion)
- Scale Sprite Size: Grow from 1.0 to 2.5 over lifetime
- Scale Color: Gray → Transparent (Alpha 0.6 → 0.0)
- Render:
- Sprite Renderer with M_Particle_Smoke material
Part 4: Create the Sparks Emitter
Step 11: Add Sparks Emitter
- Add another Empty emitter
- Rename to
Sparks - Position at the bottom (renders on top)
Step 12: Configure Sparks
- Emitter Update:
- Add Spawn Rate:
5(continuous trickle) - Or use Spawn Burst with timer for periodic bursts
- Add Spawn Rate:
- Particle Spawn:
- Initialize Particle: Lifetime 0.4-0.8s, Size 2-5
- Add Velocity in Cone: Speed 150-250, Cone Angle 45°, Axis (0,0,1)
- Initial Color: RGB (255, 200, 50), Alpha 1.0
- Particle Update:
- Gravity Force: (0, 0, -980) — normal gravity, sparks fall
- Drag: 2.0 — air resistance
- Scale Color: Bright yellow → orange → transparent
- Render:
- Sprite Renderer with M_Particle_Spark material
Part 5: Test and Refine
Step 13: Preview in Editor
- Watch all three emitters working together
- Use timeline to scrub and see full lifecycle
- Rotate view to check from all angles
Step 14: Balance the Effect
Adjust these if needed:
- If fire looks too thin: Increase spawn rate or size
- If smoke is too dense: Reduce spawn rate or alpha
- If sparks don't fly high enough: Increase initial velocity
- If effect is too tall: Reduce velocity or lifetime
Step 15: Place in Level
- Save the Niagara System
- Drag
NS_Campfireinto your level - Position it where you want fire
- Play to test in-game
✅ Exercise Complete!
You've built a complete fire effect with:
- Fire emitter: Additive, color-shifting flames
- Smoke emitter: Translucent, rising, expanding smoke
- Sparks emitter: Fast, falling, short-lived particles
- Custom materials: Proper blend modes for each type
This system can be duplicated and modified for torches, explosions, and more!
Troubleshooting
⚠️ Common Issues
Fire looks like dark circles:
- Material blend mode is Translucent instead of Additive
- Change to Additive in material settings
Particles are invisible:
- Check that material is assigned in Sprite Renderer
- Verify "Used with Niagara Sprites" is checked in material
- Check particle size isn't 0
Colors don't change over lifetime:
- Ensure Scale Color module exists in Particle Update
- Check that the color curve has multiple keys
- Verify Particle Color node exists in material
Smoke renders in front of fire:
- Reorder emitters in System Overview
- Smoke should be above Fire (renders first/behind)
Sparks go straight up instead of arcing:
- Add or increase Gravity Force
- Use normal gravity (-980) for realistic arcs
Bonus Challenges
- Embers: Add a fourth emitter with slowly rising, fading orange dots
- Light: Add a Light Renderer to fire for dynamic illumination
- Wind: Add a lateral force to make fire lean in one direction
- Size Variation: Create small, medium, and large fire variants
- Looping Sound: Add an Audio Component with fire crackling
- Blueprint Control: Expose parameters to control fire intensity
Summary
In this lesson, you've learned to create particle effects from scratch. Understanding the building blocks—spawning, movement, appearance, and materials—empowers you to build any effect you can imagine.
Key Concepts
Effect Building Blocks: Every particle effect combines spawning (how particles are created), movement (velocity and forces), and appearance (size, color, material). Master these fundamentals to create any effect.
Spawning: Use Spawn Rate for continuous effects (fire, rain), Spawn Burst for instant effects (explosion), or Spawn Per Unit for movement-based spawning (footsteps). Location modules control where particles appear.
Movement: Initial velocity sets direction and speed. Forces like Gravity, Drag, and Curl Noise modify movement over time. Balance these for realistic or stylized motion.
Materials: Blend mode is crucial—Additive for glowing effects (fire, sparks, magic), Translucent for blocking effects (smoke, dust). Always connect Particle Color node to receive color from Niagara.
Fire Effect: Upward velocity, color gradient from white/yellow to red/transparent, additive material. Combined with smoke (translucent, slow, expanding) and sparks (fast, gravity-affected, short-lived) for complete effect.
Module Quick Reference
| Module | Stage | Purpose |
|---|---|---|
| Spawn Rate | Emitter Update | Continuous particle creation |
| Spawn Burst | Emitter Update | Instant particle burst |
| Initialize Particle | Particle Spawn | Lifetime, size, initial values |
| Add Velocity | Particle Spawn | Initial movement direction |
| Sphere/Box Location | Particle Spawn | Spawn area shape |
| Gravity Force | Particle Update | Downward (or any) pull |
| Drag | Particle Update | Slow particles over time |
| Curl Noise Force | Particle Update | Organic swirling motion |
| Scale Color | Particle Update | Color/alpha over lifetime |
| Scale Sprite Size | Particle Update | Grow/shrink over lifetime |
Effect Recipes
| Effect | Key Settings |
|---|---|
| Fire | Additive, upward velocity, yellow→red gradient, short lifetime |
| Smoke | Translucent, slow upward, gray→transparent, grows over time |
| Sparks | Additive, high velocity + gravity, very short lifetime, small size |
| Explosion | Burst spawn, outward velocity, fire + smoke + debris |
| Magic Glow | Additive, curl noise, vibrant colors, soft edges |
| Dust | Translucent, slow movement, brown/tan, low alpha |
Best Practices
- Match blend mode to effect: Additive for glowing, Translucent for obscuring
- Use Particle Color node: Required for Niagara to control material color
- Balance spawn rate and lifetime: Together they determine particle count
- Layer multiple emitters: Combine simple emitters for complex effects
- Reach for Lightweight Emitters when it scales: for effects spawned in large numbers or targeting mobile, build them as Lightweight (stateless) emitters · they skip compilation and cost far less at runtime (see Lesson 9.1)
- Order emitters correctly: Background renders first (top of list)
- Test with and without materials: Debug behavior before appearance
- Use curves for organic feel: Avoid linear changes for natural motion
- Start with templates: Modify existing effects to learn faster
Figure: Four-step process for creating any particle effect.
What's Next?
Now that you can create particle effects, the next lesson covers Triggering VFX. You'll learn to spawn effects from Blueprints, respond to gameplay events, and control effects at runtime—essential skills for integrating VFX into actual gameplay.
Knowledge Check
Question 1
What blend mode should you use for fire particles?
Correct answer: C — Additive blend mode adds color to the scene, creating a glowing effect. Fire, sparks, magic, and other luminous effects need Additive to look right. Translucent would make fire look like dark circles.
Question 2
Why is the "Particle Color" node essential in particle materials?
Correct answer: B — The Particle Color node receives color and alpha values from Niagara's Scale Color module. Without it, your particles won't respond to color changes set in the emitter, and color-over-lifetime effects won't work.
Question 3
What's the formula for approximate particle count at any moment?
Correct answer: B — Particle count ≈ Spawn Rate × Lifetime. If you spawn 50 particles per second and each lives 2 seconds, you'll have roughly 100 particles visible at once. This helps balance visual density and performance.
Question 4
Which module adds organic, swirling motion to particles?
Correct answer: C — Curl Noise Force adds organic, turbulent motion that makes effects like smoke look natural rather than mechanical. It uses noise functions to create pseudo-random swirling patterns.
Question 5
In a fire effect with multiple emitters, what should the render order be (top to bottom in System Overview)?
Correct answer: C — Emitters render in order from top to bottom, meaning top renders first (behind). Smoke should be behind fire, and sparks should be in front. So: Smoke (top) → Fire (middle) → Sparks (bottom).
Question 6
What makes smoke particles different from fire particles?
Correct answer: B — Smoke uses Translucent blend mode (blocks/darkens rather than glows), moves slower than fire, has longer lifetime, and typically grows larger over its lifetime. These differences create the characteristic look of rising smoke.
Question 7
What should you check in the material's Usage settings for Niagara particles?
Correct answer: C — "Used with Niagara Sprites" must be checked in the material's Usage settings for the material to work with Niagara particle systems. Without this, the material won't render on sprite particles.