📋 Menus and Navigation
Every game needs menus—a main menu to start, a pause menu to take breaks, settings to customize the experience. But menus are more than buttons on screen. They need to handle input modes, support keyboard and gamepad navigation, manage focus, and transition smoothly between screens. In this lesson, you'll learn to create professional menu systems that feel polished and responsive.
🎯 Learning Objectives
By the end of this lesson, you will be able to:
- Create main menus with proper input handling
- Build pause menus that freeze gameplay
- Implement settings screens with working controls
- Support keyboard and gamepad navigation
- Manage widget focus for accessible navigation
- Transition between menu screens smoothly
Estimated Time: 55-65 minutes
Prerequisites: Lesson 7.2 (Creating Widgets), Lesson 7.3 (HUD Elements)
In This Lesson
Creating a Main Menu
The main menu is often the first thing players see. It needs to be visually appealing, easy to navigate, and functional. Let's build a proper main menu from scratch.
Main Menu Structure
A typical main menu includes:
- Game title/logo
- Menu buttons (Play, Options, Credits, Quit)
- Background (image, video, or 3D scene)
- Optional: Version number, copyright text
Creating the Widget
- Create Widget Blueprint:
WBP_MainMenu - Add Canvas Panel as root
Background
- Add Image to Canvas Panel
- Set anchors to Stretch (fills entire screen)
- Set all offsets to 0
- Set Image to your background texture (or solid color)
- Rename to
BackgroundImage
Title
- Add Text Block to Canvas Panel
- Set anchors to Top-Center
- Set Text to your game title
- Set Font Size large (48-72)
- Position appropriately (Y: 100-150)
- Rename to
TitleText
Button Container
- Add Vertical Box to Canvas Panel
- Set anchors to Center
- Set Alignment to 0.5, 0.5 (centers the box)
- Rename to
ButtonContainer
Menu Buttons
Add buttons to the Vertical Box (or use your reusable button from Lesson 7.2):
- Add Button with child Text Block "Play"
- Add Button with child Text Block "Options"
- Add Button with child Text Block "Quit"
- For each button, set Padding in the Slot section (e.g., 10 on all sides)
- Style buttons consistently (size, colors, font)
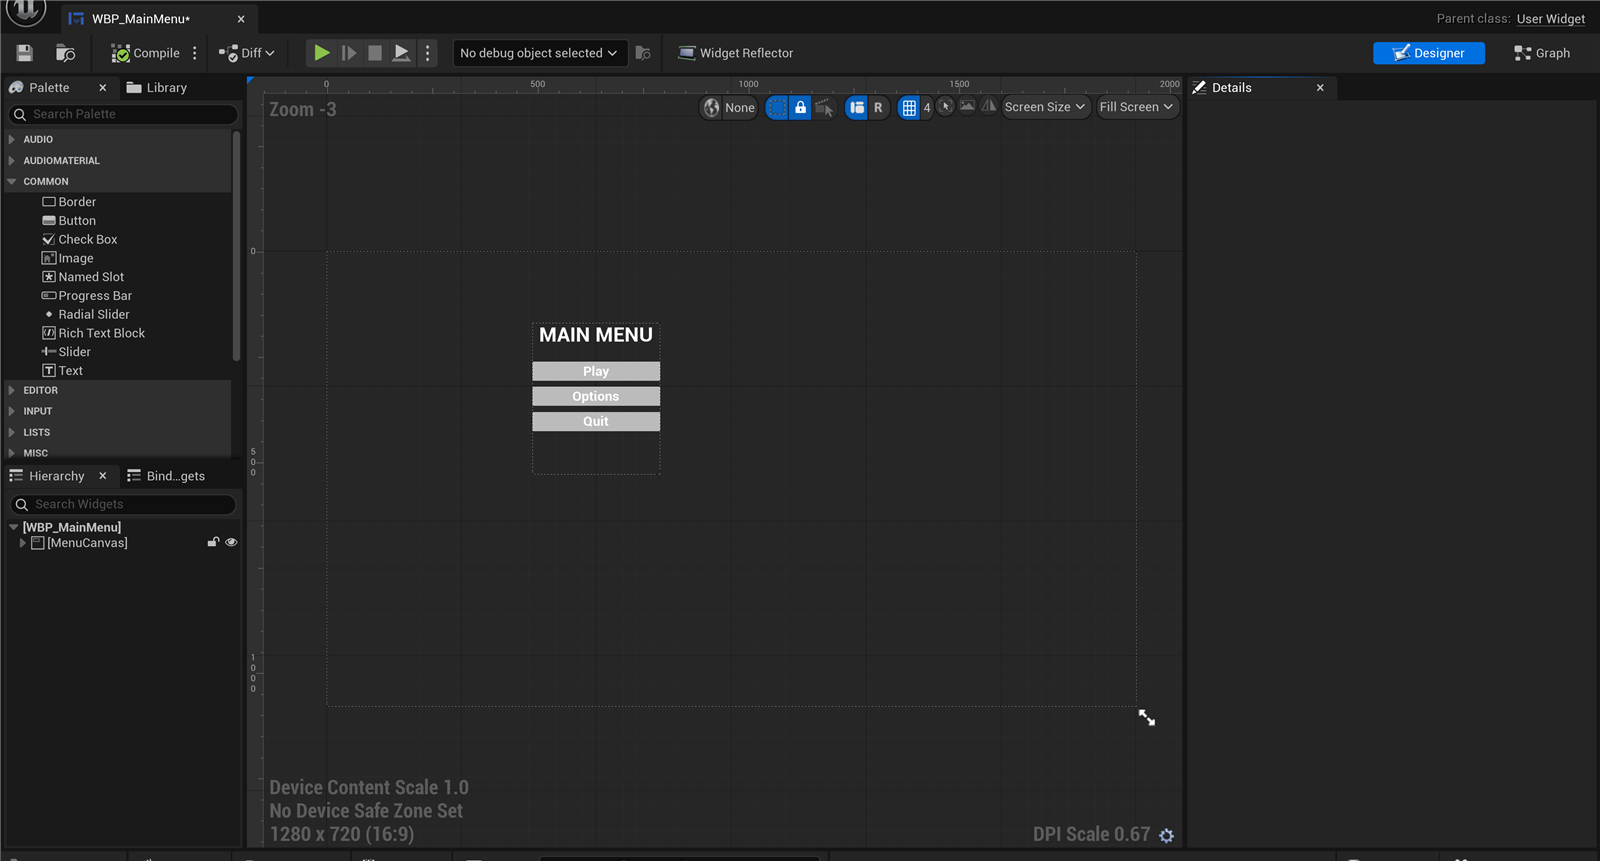
Figure: A main menu in the UMG Designer · a centered title over a VerticalBox of Play / Options / Quit buttons.
Button Click Handlers
For each button, create click event handlers:
Play Button
- Select Play button, in Details find Events → On Clicked
- Click + to create handler
- In the handler:
Open Levelnode with your gameplay level name- Or use
Remove from Parentif menu is in the game level
Options Button
- Create click handler
- Options:
- Switch to options screen (if using Widget Switcher)
- Create and show Options widget
- Or set visibility of options panel
Quit Button
- Create click handler
- Add
Quit Gamenode - Set Specific Player to Player Controller
Displaying the Main Menu
Main menus are typically shown from a dedicated menu level or on game start:
Option 1: Menu Level
- Create a level for your main menu (MainMenu_Level)
- In Level Blueprint, on Event BeginPlay:
- Create Widget (WBP_MainMenu)
- Add to Viewport
- Get Player Controller → Set Input Mode UI Only
- Set Show Mouse Cursor: True
- Set this level as the default/startup level in Project Settings
Option 2: Game Instance
For more complex games, manage menus through a Game Instance that persists across levels.
Setting Initial Focus
For keyboard/gamepad support, set focus to the first button:
- In the menu widget's Event Construct:
- Get reference to Play button
- Call
Set Keyboard Focuson it
- Or in Level Blueprint when creating the widget:
- Pass the Play button to "In Widget to Focus" parameter
Figure: Set keyboard focus to enable immediate controller navigation.
Adding Menu Animations
Polished menus have entrance animations. UMG supports widget animations:
- Open your menu widget
- At bottom of Designer, find Animations panel
- Click + Animation, name it "FadeIn"
- In the animation timeline:
- Add a track for the Canvas Panel's Render Opacity
- At frame 0: Set opacity to 0
- At frame 0.5 (half second): Set opacity to 1
- In Event Construct, call
Play Animationwith your FadeIn animation
Common menu animations:
- Fade In: Opacity 0 → 1
- Slide In: Position offset → 0
- Scale In: Scale 0.8 → 1.0
- Staggered Buttons: Each button animates in sequence
💡 Animation Tips
Keep menu animations short (0.2-0.5 seconds). Players will see them repeatedly, so long animations become annoying. Add animation curves (ease in/out) for smoother motion. Consider letting players skip animations with a button press.
Hands-On: Complete Menu System
Let's build a complete menu system with a main menu, pause menu, and a simple options screen. This exercise ties together everything we've learned about menus, input modes, focus, and navigation.
🎯 Exercise Goal
Create a functional menu system with: a main menu that starts the game, a pause menu accessible during gameplay, an options screen with volume control, and proper keyboard/gamepad navigation throughout. All menus will properly handle input modes and focus.
Part 1: Create the Main Menu
Step 1: Create the Widget
- Create Widget Blueprint:
WBP_MainMenu - Open it in the Widget Editor
Step 2: Build the Layout
- The root Canvas Panel should already exist
- Add Image for background:
- Anchors: Stretch (all corners)
- Offsets: All 0
- Color: Dark blue (#1a237e) or your preference
- Rename:
Background
- Add Text Block for title:
- Anchors: Top-Center
- Position Y: 80
- Alignment X: 0.5
- Text: "ADVENTURE GAME" (or your title)
- Font Size: 48
- Rename:
TitleText
- Add Vertical Box for buttons:
- Anchors: Center
- Alignment: 0.5, 0.5
- Rename:
ButtonContainer
Step 3: Add Menu Buttons
Inside ButtonContainer, add three buttons:
- Play Button:
- Add Button to ButtonContainer
- Add Text child: "Play Game"
- Button size: 200 × 50
- Padding (Slot): 0, 5, 0, 5 (top/bottom margin)
- Style Normal Tint: #667eea
- Style Hovered Tint: #8b9cf9
- Style Pressed Tint: #5560d4
- Rename button:
PlayButton - Check Is Variable
- Options Button:
- Same styling as Play
- Text: "Options"
- Rename:
OptionsButton
- Quit Button:
- Same styling as Play
- Text: "Quit"
- Rename:
QuitButton
Figure: Main menu widget hierarchy and preview.
Step 4: Add Button Click Events
Switch to Graph view:
- Play Button Handler:
- Select PlayButton in Hierarchy
- In Details → Events → On Clicked, click +
- In the event handler, add:
Open Levelnode- Level Name: "GameLevel" (your gameplay level)
- Quit Button Handler:
- Create On Clicked event for QuitButton
- Add
Quit Gamenode
- Options Button: (We'll complete this after creating options menu)
Step 5: Set Initial Focus
- In Graph, add Event Construct
- Drag
PlayButtonfrom Variables - Add
Set Keyboard Focusnode - Connect PlayButton to Target
Part 2: Create the Main Menu Level
- Create a new Level: File → New Level → Empty Level
- Save as
MainMenu_Level - Open Level Blueprint (Blueprints → Open Level Blueprint)
- Add the following on Event BeginPlay:
Create Widget(Class: WBP_MainMenu)Add to ViewportGet Player Controller(index 0)Set Input Mode UI OnlySet Show Mouse Cursor: True
Figure: Level Blueprint setup for main menu.
Part 3: Create the Pause Menu
Step 1: Create the Widget
- Create Widget Blueprint:
WBP_PauseMenu
Step 2: Build the Layout
- Add Image for overlay:
- Anchors: Stretch
- Color: Black with 0.7 alpha (semi-transparent)
- Rename:
Overlay
- Add Vertical Box for content:
- Anchors: Center
- Alignment: 0.5, 0.5
- Rename:
MenuContainer
- Inside MenuContainer, add:
- Text Block: "PAUSED" (Font Size: 36)
- Spacer: Height 30
- Button: "Resume" →
ResumeButton(Is Variable ✓) - Button: "Options" →
PauseOptionsButton - Button: "Main Menu" →
MainMenuButton - Button: "Quit" →
PauseQuitButton
- Style all buttons consistently (same as main menu)
Step 3: Create Event Dispatcher
The pause menu needs to tell the Player Controller when to close:
- In Graph, go to My Blueprint panel
- Under Event Dispatchers, click +
- Name it
OnResumeClicked
Step 4: Add Button Events
- Resume Button:
- On Clicked → Call
OnResumeClicked(dispatcher)
- On Clicked → Call
- Main Menu Button:
- On Clicked →
Open Level: "MainMenu_Level"
- On Clicked →
- Quit Button:
- On Clicked →
Quit Game
- On Clicked →
Step 5: Set Initial Focus
- On Event Construct → Set Keyboard Focus to ResumeButton
Part 4: Set Up Player Controller
- Create (or open) your Player Controller Blueprint:
BP_PlayerController
Step 1: Add Variables
PauseMenuRef(Type: WBP_PauseMenu, Object Reference)bIsGamePaused(Type: Boolean, Default: False)
Step 2: Create OpenPauseMenu Function
- Create new function:
OpenPauseMenu - Add nodes:
Create Widget(Class: WBP_PauseMenu, Owning Player: Self)Set PauseMenuRefto return valueAdd to Viewport(Target: PauseMenuRef)Set Game Paused: TrueSet Input Mode UI Only(In Widget to Focus: PauseMenuRef)Set Show Mouse Cursor: TrueSet bIsGamePaused: True- Drag PauseMenuRef →
Bind Event to OnResumeClicked - Create custom event:
HandleResume
Step 3: Create ClosePauseMenu Function
- Create new function:
ClosePauseMenu - Add nodes:
Is Validcheck on PauseMenuRef- If valid:
Remove from Parent(Target: PauseMenuRef) Set PauseMenuRef: None (clear reference)Set Game Paused: FalseSet Input Mode Game OnlySet Show Mouse Cursor: FalseSet bIsGamePaused: False
Step 4: Handle HandleResume Event
- From the HandleResume custom event created earlier
- Call
ClosePauseMenu
Step 5: Handle Pause Input
- In Event Graph, add input for Escape key (or create Input Action)
- On Escape Pressed:
Branchon bIsGamePaused- True → Call ClosePauseMenu
- False → Call OpenPauseMenu
Figure: Player Controller handles pause menu toggle.
Part 5: Create Simple Options Menu
Step 1: Create the Widget
- Create Widget Blueprint:
WBP_OptionsMenu
Step 2: Build the Layout
- Add Image for background (same as main menu or semi-transparent)
- Add Vertical Box (centered) for content
- Inside Vertical Box:
- Text Block: "OPTIONS" (title)
- Spacer: Height 20
- Horizontal Box: Volume control
- Text Block: "Master Volume"
- Slider:
VolumeSlider(Is Variable ✓) - Text Block:
VolumePercent(Is Variable ✓) "100%"
- Spacer: Height 20
- Button: "Back" →
BackButton
Step 3: Add Event Dispatcher
- Create Event Dispatcher:
OnBackClicked
Step 4: Add Slider Logic
- Select VolumeSlider
- In Details → Events → On Value Changed, click +
- In the event handler:
- Get the Value parameter
- Multiply by 100, round to integer
- Format as text with "%"
- Set VolumePercent text
- (Optional) Apply to audio: Get Sound Mix → Set Sound Mix Class Override
Step 5: Back Button
- On BackButton Clicked → Call
OnBackClickeddispatcher
Part 6: Connect Options to Menus
Now connect the Options button in both menus:
Main Menu Options Button:
- In WBP_MainMenu Graph
- Create variable:
OptionsMenuRef(Type: WBP_OptionsMenu) - On OptionsButton Clicked:
- Create Widget (WBP_OptionsMenu)
- Set OptionsMenuRef
- Add to Viewport
- Set Self Visibility: Collapsed (hide main menu)
- Bind to OnBackClicked → Create custom event "HandleOptionsBack"
- On HandleOptionsBack:
- Remove OptionsMenuRef from Parent
- Set Self Visibility: Visible
- Set Keyboard Focus to PlayButton
Part 7: Set Game Mode
- Open Project Settings → Maps & Modes
- Set Default GameMode to one that uses your BP_PlayerController
- Or create a Game Mode Blueprint that specifies BP_PlayerController
- Set Editor Startup Map to MainMenu_Level
- Set Game Default Map to MainMenu_Level
Part 8: Test Everything
- Test Main Menu:
- Play the MainMenu_Level
- Verify mouse cursor is visible
- Click buttons to test hover states
- Use arrow keys to navigate between buttons
- Press Enter to activate focused button
- Test Options opens and Back returns
- Test Quit exits (in standalone, not editor)
- Test Gameplay:
- Click Play to start game level
- Verify mouse cursor is hidden
- Verify character can move (if applicable)
- Test Pause Menu:
- Press Escape during gameplay
- Verify game pauses (movement stops)
- Verify mouse cursor appears
- Test Resume closes menu and unpauses
- Test Main Menu returns to main menu level
- Test Escape key closes pause menu
✅ Exercise Complete!
You've built a complete menu system with:
- Main menu with Play, Options, and Quit buttons
- Pause menu with Resume, Options, Main Menu, and Quit
- Simple options screen with volume slider
- Proper input mode handling (UI Only vs Game Only)
- Keyboard/gamepad navigation with focus
- Game pause functionality
- Menu transitions with Event Dispatchers
This foundation can be expanded with more options, confirmation dialogs, and visual polish!
Troubleshooting
⚠️ Common Issues
Can't click buttons:
- Verify Input Mode is set to UI Only
- Check that Show Mouse Cursor is True
- Ensure buttons aren't blocked by other widgets
Can't use keyboard to navigate:
- Set Keyboard Focus to the first button
- Ensure buttons have Is Focusable checked (default for buttons)
Game doesn't pause:
- Verify Set Game Paused is being called
- Check that the Player Controller is being used
ESC doesn't work:
- Verify input event is set up in Player Controller
- Check that the Game Mode uses your Player Controller
Options menu doesn't return:
- Verify Event Dispatcher is being called on Back button
- Check that parent widget binds to the dispatcher
Bonus Challenges
- Add Menu Animations: Fade in the main menu on level load, slide buttons in
- Add Sound Effects: Play sounds on button hover and click
- Add Confirmation Dialog: Confirm before quitting or returning to main menu
- Add More Settings: Graphics quality, fullscreen toggle, mouse sensitivity
- Save Settings: Use Save Game to persist options between sessions
- Add Loading Screen: Show a loading widget when transitioning between levels
Summary
In this lesson, you've learned how to create professional menu systems that handle input properly, support multiple input devices, and integrate smoothly with gameplay. Menus are where players spend significant time, so getting them right is essential for a polished game experience.
Key Concepts
Input Modes: Three modes control where input goes—Game Only for gameplay, UI Only for menus, and Game and UI for hybrid situations. Always set the appropriate mode when showing or hiding menus.
Widget Focus: Focus determines which widget receives keyboard/gamepad input. Set initial focus when opening menus to enable immediate navigation. Buttons are focusable by default; other widgets can be made focusable as needed.
Navigation: UMG automatically handles directional navigation between focusable widgets. Override navigation explicitly when automatic behavior doesn't work well for your layout.
Game Pause: Use Set Game Paused to freeze gameplay during pause menus. Remember that UI widgets continue to function while the game is paused.
Main Menu: Typically in a dedicated level, displays on BeginPlay, sets Input Mode UI Only. Contains buttons for Play, Options, and Quit with appropriate handlers.
Pause Menu: Created and shown during gameplay, toggled with ESC/Start. Requires pausing the game, changing input mode, and showing cursor. Resume button restores gameplay state.
Event Dispatchers: Enable child menus (like Options) to communicate back to parent menus. The child calls the dispatcher; the parent binds and handles the response.
Menu Transitions: Use visibility changes, Widget Switcher, or create/destroy widgets to move between menu screens. Maintain focus and input state during transitions.
Input Mode Quick Reference
| Situation | Input Mode | Cursor | Game Paused |
|---|---|---|---|
| Normal Gameplay | Game Only | Hidden | No |
| Main Menu | UI Only | Visible | N/A |
| Pause Menu | UI Only | Visible | Yes |
| Inventory (gameplay continues) | Game and UI | Visible | Optional |
| HUD Only | Game Only | Hidden | No |
Menu System Checklist
| When Opening Menu | When Closing Menu |
|---|---|
| Create/Show widget | Remove from Parent/Hide widget |
| Add to Viewport | Clear widget reference |
| Set Input Mode UI Only | Set Input Mode Game Only |
| Show Mouse Cursor = True | Show Mouse Cursor = False |
| Set Game Paused = True (if pause menu) | Set Game Paused = False |
| Set Keyboard Focus to first button | — |
Best Practices
- Always set initial focus: Enable immediate keyboard/gamepad navigation without requiring a click first
- Match input mode to context: UI Only for menus, Game Only for gameplay—don't leave in wrong state
- Handle both mouse and controller: Test navigation with keyboard, then gamepad—both should work smoothly
- Use Event Dispatchers for sub-menus: Keep menu logic encapsulated; communicate through dispatchers
- Add confirmation for destructive actions: Quit and Return to Main Menu should confirm to prevent accidents
- Keep animations short: 0.2-0.5 seconds max—players see menus repeatedly
- Test pause functionality: Verify game actually freezes—physics, AI, timers should all stop
- Clear references when closing: Set widget references to None after Remove from Parent to prevent stale references
- Consider audio: Add button hover/click sounds; pause music or lower volume during pause menu
Figure: Complete menu system showing relationships between levels, menus, and the Player Controller.
What's Next?
With your menu system complete, the next lesson covers Data Binding and Events in more depth. You'll learn advanced techniques for connecting UI to game systems, including property binding optimizations, event-based UI updates, and creating truly dynamic interfaces that respond to complex game state changes.
Knowledge Check
Question 1
What input mode should you use when displaying a full-screen pause menu?
Correct answer: B — UI Only ensures that input goes to the menu widgets and not to the game. This prevents the player from accidentally moving or shooting while navigating the menu. Combined with Set Game Paused, the game freezes while the menu is open.
Question 2
Why is it important to set keyboard focus when opening a menu?
Correct answer: B — Setting initial focus allows players using keyboard or gamepad to immediately navigate with arrow keys/D-pad without needing to click a button first. This is essential for controller support and accessibility.
Question 3
What three things should you typically do when closing a pause menu?
Correct answer: A — When closing a pause menu: (1) Remove from Parent to hide the widget, (2) Set Input Mode Game Only so the player can control the game again, (3) Set Game Paused False to resume gameplay. Also hide the mouse cursor with Set Show Mouse Cursor False.
Question 4
How do sub-menus (like Options) typically communicate back to parent menus?
Correct answer: C — Event Dispatchers are the proper way for sub-menus to communicate with parents. The Options menu calls OnBackClicked dispatcher; the parent (Main Menu or Pause Menu) binds to it and handles closing the options and restoring focus.
Question 5
Where is the best place to handle the ESC key for toggling the pause menu?
Correct answer: B — The Player Controller is the best location because it persists throughout gameplay, has access to input, and is responsible for managing the player's UI state. It can track whether the menu is open and toggle appropriately.
Question 6
What happens if you forget to call Set Game Paused False when closing a pause menu?
Correct answer: B — The game state remains paused even after the menu is removed. The player can see the game world but nothing moves—physics, AI, and animations all stay frozen. Always pair Set Game Paused True with a corresponding False.
Question 7
Which widgets are focusable by default in UMG?
Correct answer: C — Interactive widgets that respond to input (Button, Check Box, Slider, Editable Text) are focusable by default. Display-only widgets like Text Block, Image, and Progress Bar are not focusable by default but can be made focusable in their properties.