🏠 Interior Lighting
Interior lighting is a different beast from outdoor environments. Instead of one dominant light source (the sun), you're working with multiple localized lights—ceiling fixtures, lamps, windows, screens—each contributing to the overall atmosphere. A well-lit interior guides players through spaces, creates mood, and makes environments feel believable. In this lesson, you'll learn to use Point, Spot, and Rect lights effectively, master IES profiles for realistic light patterns, and develop strategies for lighting indoor spaces that feel both natural and intentional.
🎯 Learning Objectives
By the end of this lesson, you will be able to:
- Use Point Lights effectively for general room illumination
- Configure Spot Lights for focused, directional interior lighting
- Apply Rect Lights for realistic window and panel lighting
- Implement IES profiles for photometrically accurate light distribution
- Create dynamic lighting effects using Light Functions
- Light a complete interior room with proper mood and functionality
Estimated Time: 55-65 minutes
Prerequisites: Lesson 4.2 - The Directional Light and Sky
In This Lesson
Interior Lighting Principles
Before diving into specific light types, let's establish some fundamental principles that guide all interior lighting work. These concepts come from real-world lighting design and cinematography, and they'll help you make better decisions throughout this lesson.
The Three-Point Lighting Concept
While originally from film and photography, the three-point lighting concept provides a useful framework for thinking about interior spaces:
Key Light: The main, brightest light source that establishes the primary direction of illumination. In interiors, this might be a window, a prominent ceiling fixture, or a focused lamp.
Fill Light: Secondary lighting that softens shadows created by the key light. Ambient bounce from walls, secondary fixtures, or indirect lighting serve this role.
Accent/Rim Light: Lights that highlight specific objects or create separation. Track lighting on artwork, under-cabinet lights, or backlit features.
Figure: Three-point lighting concepts applied to an interior space.
Practical vs. Motivated Lighting
Practical Lights: Light sources that are visible in the scene—lamps, ceiling fixtures, candles, screens. These "justify" the lighting and make it feel grounded in reality.
Motivated Lighting: Additional lights placed to enhance the effect of practicals or create specific looks. The viewer accepts them because they seem to come from visible sources, even if the actual game light is positioned differently.
In game environments, you'll often place a decorative lamp mesh (the practical) and then position an actual Point or Spot Light near it (motivated by the practical) to create the illumination effect.
Light Layering Strategy
Professional interior lighting uses layers:
- Ambient Layer: Base illumination that prevents pure black shadows. Often from indirect lighting, skylights, or very soft fill lights.
- Primary Layer: Main light sources that define the space—overhead fixtures, windows, prominent lamps.
- Accent Layer: Focused lights that draw attention—spotlights on art, under-cabinet lighting, decorative fixtures.
- Effects Layer: Dynamic or atmospheric lighting—flickering candles, TV glow, lightning flashes.
flowchart TB
    subgraph Layers["Interior Light Layers (Bottom to Top)"]
        direction TB
        L1["🌫️ Ambient Layer
Soft base illumination
Prevents black shadows"]
        L2["💡 Primary Layer
Main fixtures & windows
Defines space character"]
        L3["✨ Accent Layer
Spotlights & highlights
Draws attention"]
        L4["⚡ Effects Layer
Dynamic & atmospheric
Adds life"]
    end

    L1 --> L2 --> L3 --> L4

    style L1 fill:#607d8b,color:#fff
    style L2 fill:#f1c40f,color:#333
    style L3 fill:#e91e63,color:#fff
    style L4 fill:#9c27b0,color:#fff
Figure: Building interior lighting in layers from ambient base to dynamic effects.
Color Temperature in Interiors
Real interior spaces often mix light sources with different color temperatures:
Warm (2700K-3000K): Incandescent bulbs, candles, tungsten. Creates cozy, residential feel.
Neutral (3500K-4500K): Halogen, some LEDs. Clean, professional appearance.
Cool (5000K-6500K): Daylight, fluorescent, modern LEDs. Clinical, modern, or industrial.
Mixing temperatures creates visual interest and realism—warm interior lights contrasting with cool daylight from windows is a classic cinematic look.
✅ Pro Tip: Start Dark, Add Light
When lighting interiors, start with all lights off or very dim. Add lights one at a time, observing the contribution of each. This prevents "light soup" where too many overlapping lights create flat, uninteresting illumination. Each light should have a purpose and visible effect.
Point Lights for Room Illumination
Point Lights emit light equally in all directions from a single point—like a bare light bulb. They're the workhorse of interior lighting, perfect for ceiling fixtures, lamps, chandeliers, and any omnidirectional light source.
Placing and Configuring Point Lights
Placement: Place Actors → Lights → Point Light, or right-click → Lights → Point Light.
Position the Point Light at the location of your practical light source—inside a lamp shade, at the center of a ceiling fixture, at candle flame height.
Essential Point Light Settings
Light Section
Intensity: Brightness of the light. For interior lights, values vary widely:
- Candle: 10-50 lumens
- Table lamp: 200-800 lumens
- Ceiling fixture: 800-3000 lumens
- Bright overhead: 3000-10000 lumens
Light Color: Set directly or use Temperature. Warm whites (2700-3000K) for residential, cooler for commercial/industrial.
Attenuation Radius: How far the light reaches. Beyond this radius, the light has zero contribution. Set this based on the logical reach of your light source—a small lamp might have radius of 300-500 units, a bright ceiling light 1000-2000 units.
Source Radius: Simulates the physical size of the light source for soft shadows. Larger values = softer shadow edges. A small bulb might be 5-10 units; a frosted globe fixture 20-50 units.
Figure: Point Light settings control intensity, reach (attenuation), and shadow softness (source radius).
Shadows
Cast Shadows: Enable for lights that should cast shadows. Disable for fill lights or where performance is critical.
Point Light shadows use cubemap shadow maps—the scene is rendered from 6 directions to create omnidirectional shadows. This makes Point Light shadows more expensive than Spot Light shadows.
⚠️ Watch Out: Point Light Shadow Cost
Because Point Lights render shadows in all 6 directions, they're significantly more expensive than Spot Lights for shadows. In performance-critical scenarios:
- Disable shadows on decorative/fill lights
- Use Spot Lights where you only need shadows in one direction
- Consider baking shadows for static lights
Point Light Use Cases
Ceiling fixtures: Position at the fixture location. Adjust attenuation to cover the room appropriately. Multiple fixtures in a large room.
Table/Floor lamps: Place inside or just above the lampshade. Smaller attenuation radius. Warm color temperature for residential feel.
Chandeliers: Can use one Point Light for the whole fixture (simple) or multiple for each candle/bulb (detailed). Consider performance vs. visual quality.
Candles/Flames: Very small attenuation radius, warm orange color (1800-2200K), optionally add flicker with Light Functions or Blueprint.
Ambient fill: Large radius, very low intensity, no shadows. Placed to fill shadow areas without creating additional shadow-casting sources.
Practical + Point Light Pattern
The most common interior lighting pattern combines a visual mesh (the practical) with a Point Light:
- Place your lamp/fixture mesh
- Add a Point Light at the bulb location
- If the fixture mesh blocks light, either make the mesh not cast shadows on self, or place the light just outside the fixture's blocking geometry
- Add an emissive material to the bulb part of the mesh so it appears to glow
Figure: Combine a visible lamp mesh with a Point Light for realistic fixtures.
Spot Lights for Focused Lighting
Spot Lights emit light in a cone shape, making them perfect for directional interior lighting—recessed ceiling lights, track lighting, flashlights, car headlights, stage spotlights, and any fixture that focuses light in a particular direction.
Spot Light Configuration
Placement: Position the Spot Light at the light source and rotate it to aim where you want the light to fall. The light emits along the negative X-axis (forward) of the actor.
Key Settings
Inner Cone Angle: The angle of full-intensity illumination. Everything within this cone receives maximum light.
Outer Cone Angle: The angle where light falls to zero. The area between inner and outer cones has a smooth falloff. Larger difference = softer edge.
Attenuation Radius: Maximum distance the light travels. Same concept as Point Lights.
Source Radius/Length: For soft shadows. Source Length turns the point into a line (like a fluorescent tube).
Figure: Spot Light cones define full-intensity zone (inner) and falloff zone (outer).
Spot Light Use Cases
Recessed ceiling lights (can lights): Point downward from ceiling. Inner cone 20-40°, outer cone 30-50°. Creates focused pools of light on surfaces below.
Track lighting: Aimed at artwork, displays, or walls. Narrow cones (15-30°) for focused accent, wider for wall washing.
Desk/Task lights: Angled toward work surface. Provides focused illumination for specific areas.
Architectural lighting: Uplights (pointing up walls), downlights (ceiling pointing down), wall washers (angled to graze wall surfaces).
Dramatic effect: Single harsh spotlight creates theatrical, noir, or horror atmospheres.
Spot Lights vs. Point Lights for Performance
When you only need light in one direction, Spot Lights are more efficient than Point Lights:
Figure: Spot Lights need only one shadow map; Point Lights need six.
✅ Pro Tip: Recessed Light Pattern
For recessed ceiling lights (common in modern interiors):
- Inner Cone: 25-35°
- Outer Cone: 40-50°
- Position flush with ceiling geometry
- Add a small emissive circle/ring material where the fixture would be visible
- Consider disabling shadows for fill lights, enabling only for key lights
Spot Light IES Preview
Spot Lights work especially well with IES profiles (covered in detail soon). The cone angles provide a baseline shape, and the IES profile adds realistic distribution patterns on top.
Rect Lights for Area Lighting
Rect Lights (Rectangle Lights) emit light from a rectangular surface rather than a point. This creates the most physically accurate representation of real-world light sources like windows, TV screens, fluorescent panels, and softbox lighting.
Why Rect Lights Matter
Real light sources have physical size. A window isn't a point—it's a large rectangular opening. This size affects how shadows look:
Point/Spot Lights: Create sharp shadows because light comes from a single point (or appears to).
Rect Lights: Create soft shadows with penumbra (partially shadowed edges) because light comes from many points across the surface.
The larger the Rect Light relative to the objects it illuminates, the softer the shadows become. This matches real-world physics.
Figure: Rect Lights create physically accurate soft shadows due to their area nature.
Rect Light Configuration
Placement: Place and orient the Rect Light to match your light source. For a window, align the rectangle with the window opening facing inward.
Key Settings
Source Width / Source Height: The dimensions of the emitting rectangle. Match these to your actual light source size (window dimensions, screen size, panel size).
Barn Door Angle/Length: Optional settings to add "barn door" falloff at the edges, limiting light spread (like theatrical lighting).
Attenuation Radius: How far the light reaches. For windows, this should cover the interior space affected by the window.
Intensity: Typically higher than point lights because you're simulating larger sources. A bright window might need 50,000+ lumens depending on your scene's exposure.
Rect Light Use Cases
Windows: The primary use case. Place Rect Lights at window positions facing into the room. Size matches window dimensions. Creates realistic soft shadows from daylight.
TV/Monitor screens: Emitting colored light into a dark room. The screen's glow on nearby surfaces and characters.
Fluorescent panels: Ceiling-mounted rectangular fixtures common in offices, hospitals, commercial spaces.
Lightboxes/Signs: Illuminated displays, backlit signage, photography softboxes.
Practical large sources: Any rectangular light-emitting surface—illuminated wall panels, ceiling skylights, etc.
⚠️ Watch Out: Rect Light Performance
Rect Lights are the most expensive light type for shadows because they compute area shadows rather than point shadows. Use them strategically:
- Use for key window lights and important soft sources
- Consider Point/Spot Lights for less critical soft lighting
- Reduce shadow resolution for distant or less important Rect Lights
- Bake Rect Light shadows where possible
Window Lighting Setup
Windows are the most common Rect Light application. Here's a typical setup:
- Measure your window dimensions in Unreal units
- Place a Rect Light just inside the window opening, facing into the room
- Set Source Width/Height to match window size
- Color: Match your exterior sky (blue-white for daylight)
- Intensity: Start high (10,000-100,000 lux) and adjust based on auto-exposure
- Attenuation: Should cover the room depth affected by the window
For best results, combine the Rect Light with a Directional Light (sun) that can cast directional shadows through the window.
flowchart TD
    A["Interior Light Needed"] --> B{"Light Direction?"}

    B -->|"All directions"| C["Point Light"]
    B -->|"Focused cone"| D["Spot Light"]
    B -->|"Large area source"| E["Rect Light"]

    C --> C1["Lamps, bulbs,
chandeliers, candles"]
    D --> D1["Recessed lights,
track lights, flashlights"]
    E --> E1["Windows, screens,
panels, skylights"]

    C1 --> F{"Need soft shadows?"}
    D1 --> F
    E1 --> G["Already soft!"]

    F -->|Yes| H["Increase Source Radius"]
    F -->|No| I["Keep Source Radius small"]

    style C fill:#f1c40f,color:#333
    style D fill:#e91e63,color:#fff
    style E fill:#2196F3,color:#fff
Figure: Choose light type based on the real-world source you're simulating.
IES Profiles
IES profiles bring real-world photometric accuracy to your lights. An IES file (named for the Illuminating Engineering Society) is a small text file, published by lighting manufacturers, that records exactly how one physical fixture throws light into space: its hotspot, its falloff, and the secondary lobes that a plain mathematical cone or sphere can never reproduce.
When you apply an IES profile to a Point or Spot Light, Unreal shapes the light using that measured distribution. The difference is dramatic: a generic pool of light becomes one that reads as a real recessed can, a wall sconce, or a street lamp.
What an IES Profile Describes
A photometric file encodes the intensity of a fixture measured at many angles around it, forming a 3D pattern often called the photometric web. Common distribution shapes include:
Spot / narrow beam: A tight, concentrated pool. Typical of track heads and focused downlights.
Flood: A wide, even spread for general-purpose fixtures and work lights.
Wall wash: An asymmetric throw that pushes light forward and down to graze a vertical surface evenly.
Batwing: Twin lobes that spread light sideways to cover a room with fewer fixtures, common in office troffers.
Figure: Four common IES distribution shapes, each measured from a real fixture.
Importing an IES File
IES files are widely available for free from manufacturer websites and photometric libraries. To bring one into your project:
- Obtain a
.iesfile from a manufacturer or a photometric library - Drag it into the Content Browser, or use Import and choose the file
- Unreal creates a Texture Light Profile asset that stores the distribution
Applying an IES Profile to a Light
Select a Point or Spot Light and open its Details panel. Under the Light Profiles category you will find three settings:
- Set the IES Texture slot to your imported profile
- Enable Use IES Intensity to drive brightness from the file's real photometric values, or leave it off to keep your manual Intensity and borrow only the profile's shape
- Adjust IES Intensity Scale to boost or trim the profile's contribution
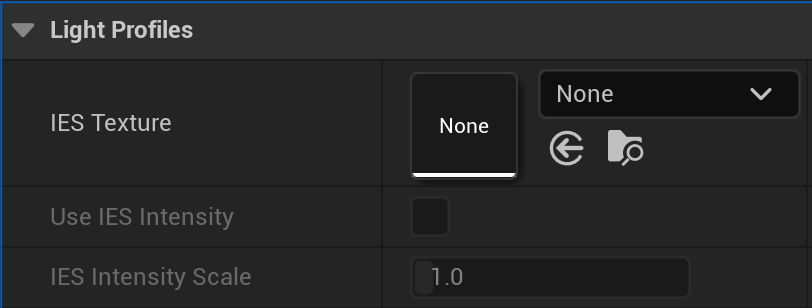
Figure: The Light Profiles category on a Point or Spot Light · assign a .ies asset to IES Texture, then tune with Use IES Intensity and IES Intensity Scale.
The light in the viewport immediately takes on the fixture's real distribution, including any hotspot and falloff baked into the measurement.
When to Use IES Profiles
Architectural visualization: The single biggest win. Real product IES files make rendered interiors match the actual fixtures a client will install.
Recessed and track lighting: Adds the subtle scallops and hotspots that sell a ceiling full of downlights.
Street and area lighting: Roadway and parking fixtures have very specific, wide throws that IES captures faithfully.
Any hero fixture: Wherever a light is on camera and its shape matters, an IES profile earns its place for almost no runtime cost.
✅ Pro Tip: Shape First, Brightness Second
Leave Use IES Intensity off while you block out a scene. You keep full artistic control of brightness through the light's own Intensity value and still get the realistic shape of the profile. Switch it on later only when you specifically want the fixture's real-world lumen output to drive exposure.
Light Functions
Light Functions let you project a material onto a light, modulating its output as it leaves the source. Instead of a flat, uniform beam, the light is masked or tinted by a material you author. This opens the door to flickering fires, rippling water caustics, projected gobo patterns (window blinds, foliage, stained glass), and animated color shifts.
A Light Function is simply a Material whose Material Domain is set to Light Function. Unreal reads that material's Emissive output as a mask that scales the light's brightness across its projection: white passes full light, black blocks it, and grays dim it.
Creating a Light Function Material
- In the Content Browser, create a new Material
- Open it and, in the Details panel, set Material Domain to Light Function
- Build your effect and connect it to the Emissive Color output, the only output a Light Function reads
- A value of 1 passes full light, 0 blocks it, and values in between dim it
A Simple Flicker
The fireplace in this lesson's exercise uses a classic flicker graph. The idea is to sample animated noise over time and remap it into a gentle brightness range so the light pulses without ever fully going dark:
flowchart LR
    T["Time"] --> N["Noise / Panner"]
    N --> L["Lerp
0.5 to 1.0"]
    L --> E["Emissive Color"]
    style T fill:#455A64,color:#fff
    style N fill:#1976D2,color:#fff
    style L fill:#7B1FA2,color:#fff
    style E fill:#E65100,color:#fff
Figure: A minimal flicker Light Function · animated noise driven by Time, remapped so brightness oscillates between roughly 0.5 and 1.0.
Applying a Light Function to a Light
Select the target light, which must be set to Movable mobility since the effect changes every frame. In its Details panel, open the Light Function category:
- Assign your material to the Light Function Material slot
- Use Light Function Scale to size the projected pattern in the world
- Set Fade Distance and Disabled Brightness to control how the effect falls back at a distance or when the function is disabled
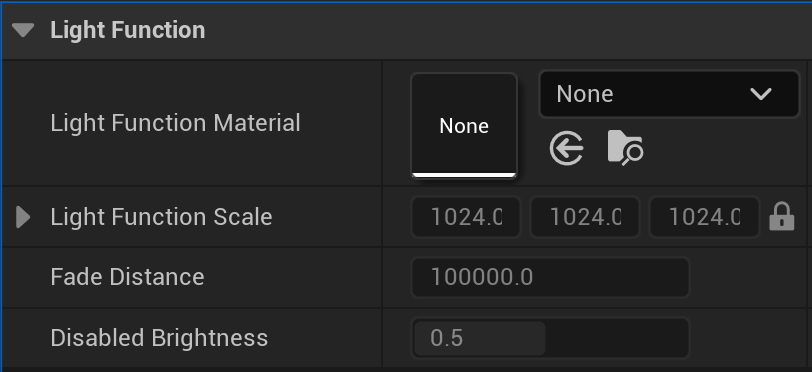
Figure: The Light Function category on a light · drop a Light Function material into Light Function Material and size it with Light Function Scale.
⚠️ Watch Out: Movable Only, and Not Free
Light Functions work only on Movable lights, because Static and Stationary lights bake their illumination and cannot change at runtime. They also add real shader cost: the function is evaluated across the light's projection every frame. Keep the material cheap, and reserve Light Functions for the handful of lights where the effect truly reads.
Light Function Use Cases
Flickering fire and candles: Noise-driven brightness gives warm light a living, unsteady quality.
Projected patterns (gobos): A texture mask throws the shadow of window blinds, leaves, or stained glass across a room.
Caustics: A panning ripple texture simulates light bouncing off moving water onto nearby walls.
Failing fluorescents: A sharp, irregular flicker sells a broken or buzzing tube for horror and industrial scenes.
Television glow: Shifting colors and brightness mimic the changing light a screen casts into a dark room.
✅ Pro Tip: Animate with Time, Not Tick
Drive animation inside the Light Function material itself using the Time node rather than pushing values from Blueprint every frame. The material updates on the GPU for free, keeps your Blueprint graphs clean, and stays smooth regardless of frame rate.
Hands-On: Lighting a Complete Interior Room
Now let's bring everything together by lighting a complete interior space. We'll work through a living room scenario, applying the layered lighting approach with multiple light types, IES profiles, and dynamic effects.
🎯 Exercise Goal
Create a realistic, atmospheric living room with: window daylight, ceiling fixtures, table lamps, accent lighting on artwork, and a flickering fireplace. The result should feel warm, inviting, and cinematically lit.
Step 1: Set Up Your Room
Start with a basic room structure. You can use BSP brushes, a Starter Content room, or any interior mesh:
- Create or open a level with an enclosed room (walls, floor, ceiling)
- Add a window opening on one wall
- Place basic furniture: couch, coffee table, side table, bookshelf
- Add a fireplace area (can be simple geometry)
- Place a picture or artwork on one wall
Don't worry about perfect decoration—focus on having surfaces to receive light and objects to cast shadows.
Figure: Example room layout showing furniture placement and planned light source locations.
Step 2: Establish Ambient Layer (Start Dark)
Begin with everything dark to build up light intentionally:
- Remove or disable any default Directional Light and Sky Light in your level
- Your room should now be completely black
- Add a Sky Light with very low intensity (0.1-0.3) to provide minimal ambient fill
- Set Sky Light to Stationary or Movable
This ambient layer prevents pure black shadows while keeping the room dark enough to see our lights' contributions clearly.
Step 3: Add Window Light (Primary Layer - Daylight)
The window will be our key light, providing the strongest illumination:
- Place a Rect Light at the window opening, facing into the room
- Set Source Width and Source Height to match window dimensions
- Set Light Color to cool daylight (Temperature: 6000-6500K, or light blue-white)
- Set Intensity high: start around 20,000-50,000 lumens
- Set Attenuation Radius to cover the room depth (1500-3000 units)
- Enable Cast Shadows
- Set Mobility to Stationary for good quality with reasonable performance
Adjust intensity until the window-side of the room is well-lit with soft shadows. The couch and table should have clear, soft-edged shadows from the window light.
✅ Checkpoint
At this point, your room should have: bright area near window, soft shadows on furniture, darker areas away from window, and slight ambient fill preventing pure black. The contrast should feel cinematic—bright window side, moody shadow side.
Step 4: Add Ceiling Fixture (Primary Layer - Artificial)
Add a practical ceiling light to fill the center of the room:
- Place a ceiling light mesh (or simple sphere) in the center of the room
- Add a Point Light at the fixture location
- Set Light Color to warm (Temperature: 2700-3000K)
- Set Intensity moderate: 1500-3000 lumens
- Set Attenuation Radius to cover most of the room (1000-1500 units)
- Set Source Radius to 10-20 for slightly soft shadows
- Consider disabling shadows for this fill light, or keep them subtle
If you have an IES profile for a ceiling fixture, apply it now for more realistic distribution.
Step 5: Add Table Lamp (Primary/Accent Layer)
The table lamp adds warmth and creates a focal point:
- Place a lamp mesh on the side table
- Add a Point Light inside or just above the lampshade
- Set Light Color warm (Temperature: 2700K—incandescent feel)
- Set Intensity lower: 400-800 lumens (table lamps aren't super bright)
- Set Attenuation Radius small: 400-600 units
- Set Source Radius to 15-25 for soft shadows
- Disable shadows or keep them soft—this is accent lighting
- Add an emissive material to the lamp's bulb so it glows
The lamp should create a warm pool of light on the table and nearby surfaces, contrasting with the cooler window light.
Step 6: Add Accent Light on Artwork (Accent Layer)
Draw attention to the artwork with a focused spot:
- Place a Spot Light above and in front of the artwork, angled down at it
- Set Inner Cone Angle to 15-20°
- Set Outer Cone Angle to 25-35°
- Set Light Color neutral (3500-4000K) or slightly warm
- Set Intensity to make the art clearly visible: 2000-5000 lumens
- Disable shadows—this is purely for highlighting
- Optionally apply a track light IES profile
The spotlight should make the artwork "pop" without harsh shadows on the wall.
Step 7: Add Fireplace Glow (Effects Layer)
Create a dynamic, flickering fireplace effect:
- Place a Point Light at the fireplace opening
- Set Light Color to warm orange (Temperature: 1800-2200K, or manually set orange)
- Set Intensity moderate: 1000-2500 lumens
- Set Attenuation Radius to 500-800 units
- Set Mobility to Movable (required for Light Functions)
- Create a Light Function material for flickering (Time → Noise → Lerp 0.5-1.0)
- Apply the Light Function to the fireplace light
- Optionally add a second, dimmer Point Light with slightly different flicker timing for complexity
The fireplace should cast dancing, warm light on the nearby floor and furniture, creating a cozy atmosphere.
Figure: All lighting layers working together to create a rich, atmospheric interior.
Step 8: Fine-Tune and Balance
With all lights in place, adjust for balance:
- Check exposure: Use Post Process Volume auto-exposure or manually adjust to ensure nothing is blown out or too dark
- Balance temperatures: Verify the warm/cool contrast between window (cool) and interior lights (warm) reads well
- Shadow quality: Ensure key shadows (from window) are sharp enough to read while fill lights don't create confusing secondary shadows
- Disable unnecessary shadows: Fill lights and accent lights usually don't need shadows
- Check from multiple angles: Walk through the room in Play mode to verify lighting works from different viewpoints
Step 9: Build Lighting (If Using Static/Stationary)
If you're using Static or Stationary lights:
- Go to Build → Build Lighting Only
- Start with Preview quality for fast iteration
- Once satisfied, build at Production quality for final results
- Review the lighting build log for any errors or warnings
🎨 Creative Challenge
Try these variations to practice:
- Night scene: Turn off window light, increase lamp and fireplace intensity
- Morning light: Use warmer, lower-angle window light (orange tint)
- Overcast day: Cool, diffuse window light with less contrast
- Dramatic mood: Reduce fill lights, increase contrast, add volumetric fog
Final Checklist
flowchart LR
    subgraph Ambient["1️⃣ Ambient Layer"]
        A1["Sky Light
Very low intensity"]
    end

    subgraph Primary["2️⃣ Primary Layer"]
        P1["Window Rect Light
Cool daylight"]
        P2["Ceiling Point Light
Warm artificial"]
    end

    subgraph Accent["3️⃣ Accent Layer"]
        AC1["Table Lamp
Warm pool"]
        AC2["Art Spotlight
Focused highlight"]
    end

    subgraph Effects["4️⃣ Effects Layer"]
        E1["Fireplace
Flickering warmth"]
    end

    Ambient --> Primary --> Accent --> Effects

    style Ambient fill:#455A64,color:#fff
    style Primary fill:#1976D2,color:#fff
    style Accent fill:#7B1FA2,color:#fff
    style Effects fill:#E65100,color:#fff
Figure: Complete interior lighting follows the four-layer approach from ambient base to dynamic effects.
Summary
In this lesson, you've learned to light interior spaces using Unreal Engine 5's lighting tools. Interior lighting requires a thoughtful, layered approach that combines multiple light types to create realistic, atmospheric environments.
Key Concepts
Interior Lighting Principles: Adapt three-point lighting for interiors using key, fill, and accent lights. Use practical lights (visible fixtures) with motivated lighting (actual light sources). Build lighting in layers: Ambient → Primary → Accent → Effects.
Point Lights: Emit light in all directions from a single point. Perfect for ceiling fixtures, table lamps, chandeliers, and candles. Control intensity, attenuation radius, source radius, and color temperature. Shadows use expensive cubemap rendering—disable on fill lights.
Spot Lights: Emit light in a cone shape. Ideal for recessed ceiling lights, track lighting, flashlights, and dramatic accents. Configure inner/outer cone angles for edge softness. More efficient shadows than Point Lights (single shadow map vs. six).
Rect Lights: Emit from a rectangular surface, creating physically accurate soft shadows. Essential for windows, TV screens, and fluorescent panels. Larger source = softer shadows. Most expensive for shadow computation—use strategically.
IES Profiles: Industry-standard files defining real fixture light distribution. Import .ies files and apply to Point/Spot Lights for photometrically accurate patterns. Minimal performance cost for significant realism improvement.
Light Functions: Material-based light modifiers for dynamic effects. Create flickering, pulsing, projected patterns, and color variations. Requires Movable mobility. Use Time + Noise nodes for organic animation.
Best Practices
- Start dark, add light: Build up lighting intentionally rather than fighting "light soup"
- Mix color temperatures: Warm interiors + cool daylight creates cinematic contrast
- Disable shadows selectively: Only key lights need shadows; fill and accent usually don't
- Use practical + light combos: Place visible fixtures with actual light sources nearby
- Match IES to fixture type: Use appropriate profiles for each fixture style
- Consider performance: Rect > Point for shadow cost; Light Functions add shader overhead
Figure: The five key tools for interior lighting in Unreal Engine 5.
Knowledge Check
Question 1
Which light type is most appropriate for simulating a window that casts soft, realistic shadows into a room?
Correct answer: C — Rect Lights emit from a rectangular surface, accurately simulating large area sources like windows. Their physical size creates soft shadows with proper penumbra, matching how real window light behaves.
Question 2
Why are Point Light shadows more expensive to render than Spot Light shadows?
Correct answer: B — Point Lights emit in all directions, requiring the engine to render six shadow maps (cubemap faces) to capture shadows from every angle. Spot Lights only need a single shadow map since they emit in one direction.
Question 3
What is the purpose of an IES profile?
Correct answer: B — IES (Illuminating Engineering Society) profiles contain data from real lighting fixtures that describes how they distribute light in 3D space, including hotspots, falloff patterns, and secondary lobes. This creates photometrically accurate lighting.
Question 4
In the four-layer lighting approach, which layer should you build first?
Correct answer: D — Start with the Ambient Layer to establish a minimal base fill that prevents pure black shadows. Then add Primary (main sources), Accent (highlights), and finally Effects (dynamic) layers, building up intentionally.
Question 5
What mobility setting is required for Light Functions to work?
Correct answer: C — Light Functions require Movable mobility because they dynamically modify light output at runtime. Static and Stationary lights bake their illumination and cannot change during gameplay.