☀️ The Directional Light and Sky
Nothing defines the mood of an outdoor environment more than the sky. The warm golden light of sunrise, the harsh shadows of midday, the soft purple hues of dusk—all come from how sunlight interacts with our atmosphere. In this lesson, you'll learn to recreate these natural phenomena in Unreal Engine, building a complete outdoor sky system from the ground up. By the end, you'll have the skills to light any exterior environment convincingly.
🎯 Learning Objectives
By the end of this lesson, you will be able to:
- Configure a Directional Light to simulate the sun with proper settings
- Set up the Sky Atmosphere component for physically accurate skies
- Use Exponential Height Fog to add depth and atmosphere
- Configure a SkyLight for proper ambient illumination
- Create dynamic time-of-day systems that transition smoothly
- Build a complete outdoor lighting setup from scratch
Estimated Time: 50-60 minutes
Prerequisites: Lesson 4.1 - Lighting Fundamentals
In This Lesson
Creating a Sun with Directional Light
The Directional Light is the foundation of outdoor lighting. It simulates light from an infinitely distant source—perfect for representing the sun or moon. Because the source is so far away, all light rays are parallel, which is exactly how sunlight behaves on Earth.
Placing a Directional Light
There are several ways to add a Directional Light to your level:
Method 1 - Quick Add Menu: In the viewport, right-click → Lights → Directional Light. Click to place it.
Method 2 - Place Actors Panel: Go to Window → Place Actors (or press Ctrl+Shift+1). Under Lights, drag Directional Light into the viewport.
Method 3 - Content Browser: Search for "Directional Light" in Place Actors and drag it in.
Once placed, you'll see the light represented by an arrow indicating the direction light travels. The light's position in the world doesn't matter—only its rotation determines where shadows fall.
✅ Pro Tip: One Sun Rule
In most cases, you should have only one Directional Light in your outdoor scene representing the sun. Multiple directional lights create confusing double shadows and are rarely physically accurate. The exception is stylized or fantasy environments where multiple suns might be intentional.
Essential Directional Light Settings
Select your Directional Light and examine the Details panel. Here are the key settings you'll use:
Light Section
Intensity: Controls the brightness of the light. For outdoor sun, values between 3-10 lux (with proper exposure) work well. Default is often fine as a starting point.
Light Color: The color of the sunlight. Pure white (1,1,1) for midday sun. Warm orange (1.0, 0.95, 0.85) for sunrise/sunset. Cool blue tint for overcast days.
Temperature: Alternative way to set color using Kelvin temperature scale. Enable "Use Temperature" checkbox to use this. 6500K is neutral daylight; lower values (3000K) are warmer, higher values (10000K) are cooler/bluer.
Figure: Color temperature ranges from warm (low K) to cool (high K). Daylight is around 5500-6500K.
Source Angle: Controls the angular size of the sun disk, which affects shadow softness. Larger values create softer shadows. Real sun is about 0.5°. Use 1-5° for softer, more forgiving shadows.
Source Soft Angle: Additional softening beyond Source Angle. Adds a gradual falloff to shadow edges.
Atmosphere and Cloud Section
Atmosphere Sun Light: Enable this to make this light interact with the Sky Atmosphere component. Essential for realistic sky colors at sunrise/sunset.

Figure: The Atmosphere Sun Light checkbox in the DirectionalLight Details panel (UE 5.8), enabled · this links the sun to the Sky Atmosphere so sky colors track its rotation.
Cast Shadows on Clouds: When using Volumetric Clouds, this allows the sun to cast shadows on cloud layers.
Cast Cloud Shadows: Allows clouds to cast shadows on the ground (requires Volumetric Clouds).
Cascaded Shadow Maps
Directional lights use Cascaded Shadow Maps (CSM)—a technique that renders multiple shadow maps at different resolutions for different distances from the camera. This provides sharp shadows nearby and acceptable shadows at distance without enormous texture memory.
Dynamic Shadow Distance MovableLight: How far shadows render for movable objects. Higher values mean shadows visible at greater distances but lower quality per-distance.
Num Dynamic Shadow Cascades: Number of shadow map cascades (usually 3-5). More cascades = better quality distribution but higher cost.
Cascade Distribution Exponent: Controls how cascade distances are distributed. Higher values concentrate detail near camera. Value of 3 is common.
Figure: Each cascade covers a larger area with progressively lower resolution shadow maps.
Setting the Sun Position
The Directional Light's Rotation determines the sun's position in the sky. The most important rotation axis is Pitch (up/down):
Pitch -90°: Sun directly overhead (noon)
Pitch -45°: Sun at 45° angle (morning/afternoon)
Pitch 0° to -10°: Sun near horizon (sunrise/sunset)
Pitch above 0°: Sun below horizon (night)
The Yaw rotation determines the compass direction of the sun—which direction shadows are cast.
💡 Quick Sun Positioning
With the Directional Light selected, hold Ctrl+L and drag in the viewport to interactively rotate the sun position. This gives immediate visual feedback of how the lighting changes—extremely useful for finding the perfect sun angle.
Mobility for Directional Lights
Your choice of mobility affects what's possible:
Static: Sun position fixed. All shadows baked. Zero runtime cost but no time-of-day changes possible.
Stationary: Sun position fixed, but color/intensity can change at runtime. Indirect lighting baked, direct lighting dynamic. Good for fixed sun with weather changes.
Movable: Full flexibility—sun can move for time-of-day systems. Required for dynamic day/night cycles. With Lumen, maintains full GI. Without Lumen, loses baked indirect lighting.
flowchart LR
    A["Add Directional
Light"] --> B["Set Rotation
(Sun Position)"]
    B --> C["Adjust Intensity
& Color"]
    C --> D["Configure
Shadows"]
    D --> E{"Time of Day
Needed?"}
    E -->|Yes| F["Set Movable
+ Use Lumen"]
    E -->|No| G["Set Stationary
+ Build Lighting"]
    F --> H["Link to Sky
Atmosphere"]
    G --> H

    style A fill:#667eea,color:#fff
    style H fill:#4CAF50,color:#fff
Figure: Basic workflow for setting up a Directional Light as the sun.
Sky Atmosphere Component
The Sky Atmosphere component simulates Earth's atmosphere—how light scatters through air to create blue skies, orange sunsets, and the gradient from horizon to zenith. It works in conjunction with your Directional Light to create physically accurate sky rendering.
How Atmospheric Scattering Works
In the real world, the sky isn't simply "blue." Its color comes from Rayleigh scattering—sunlight bouncing off tiny air molecules. Blue light scatters more than red, which is why:
- The sky appears blue during the day (blue light scattered toward us)
- Sunsets are orange/red (light travels through more atmosphere, blue scattered away)
- The horizon is often lighter/hazier than the zenith (more atmosphere to look through)
Unreal's Sky Atmosphere calculates all of this in real-time, responding to your Directional Light's position.
Figure: Blue light scatters toward the observer; red/orange light passes through at low sun angles.
Adding Sky Atmosphere
Method 1: Place Actors panel → Visual Effects → Sky Atmosphere
Method 2: Right-click in viewport → Place Actor → Sky Atmosphere
Once placed, the Sky Atmosphere automatically finds your Directional Light (if it has "Atmosphere Sun Light" enabled) and generates the sky based on the light's direction.
📖 Definition
Sky Atmosphere: A component that simulates single-scattering of light through a planetary atmosphere, producing realistic sky colors, aerial perspective, and sun disk rendering based on physical models of atmospheric optics.
Key Sky Atmosphere Settings
Atmosphere Section
Ground Radius: Radius of the planet (default matches Earth at 6360 km). Changing this affects the curvature visible at horizons.
Atmosphere Height: Thickness of the atmosphere layer. Default is 60 km. Thicker atmospheres create more scattering and hazier horizons.
Rayleigh Scattering
Rayleigh Scattering Scale: Overall intensity of small-particle scattering (air molecules). Higher values = more blue sky, more colorful sunsets.
Rayleigh Scattering: The RGB color of Rayleigh scattering. Default blue values create Earth-like skies. Adjust for alien planet atmospheres.
Rayleigh Exponential Distribution: How quickly Rayleigh scattering decreases with altitude. Higher values concentrate scattering at lower altitudes.
Mie Scattering
Mie Scattering simulates larger particles like dust, pollution, and water droplets. This creates:
- The bright halo around the sun
- Hazy, milky-looking horizons
- The "glow" in the direction of the sun
Mie Scattering Scale: Intensity of large-particle scattering. Increase for hazier, more polluted atmospheres.
Mie Anisotropy: Controls the directionality of Mie scattering. Higher values (0.8+) create a brighter, more concentrated sun glow. Lower values spread the glow wider.
Figure: Rayleigh scatters uniformly (blue sky); Mie scatters forward (sun glow/haze).
Art Direction
Sky Luminance Factor: Multiplier for overall sky brightness. Useful for artistic control without affecting atmosphere calculations.
Aerial Perspective View Distance Scale: Controls how quickly distant objects fade into atmospheric haze. Important for open-world scenes with long view distances.
Linking to Directional Light
The Sky Atmosphere needs to know which light represents the sun. By default, it auto-detects any Directional Light with Atmosphere Sun Light enabled. You can also manually specify the light in the Sky Atmosphere's "Atmosphere Sun Light" property.
When properly linked:
- Rotating the Directional Light changes sky colors (sunrise/sunset effects)
- The sun disk appears in the sky matching the light direction
- Aerial perspective matches the sun's position
⚠️ Watch Out: Multiple Directional Lights
If you have multiple Directional Lights with "Atmosphere Sun Light" enabled, the Sky Atmosphere may produce unexpected results or only respond to one. For most scenes, ensure only your main sun has this checkbox enabled.
Creating Alien Atmospheres
By adjusting Rayleigh and Mie scattering colors, you can create non-Earth atmospheres:
Mars-like (thin, dusty): Reduce Rayleigh scale, increase Mie scale, use orange/brown Mie color
Thick alien atmosphere: Increase Atmosphere Height, boost Rayleigh scale, use exotic colors
No atmosphere (moon-like): Set scales very low, sky will be mostly black with visible sun disk
Exponential Height Fog
Exponential Height Fog adds atmospheric depth to your scenes—that sense of distance where faraway objects fade into haze. It simulates how air scatters light over distance, making environments feel vast and grounded in reality.
Adding Exponential Height Fog
Place Actors → Visual Effects → Exponential Height Fog
Once placed, you'll immediately see fog affecting your scene. The fog density increases exponentially below a certain height (the "fog plane") and decreases above it.
Key Height Fog Settings
Exponential Fog
Fog Density: Overall thickness of the fog. Start low (0.01-0.02) and increase as needed. Even small values have significant visual impact.
Fog Height Falloff: How quickly fog decreases with altitude. Higher values = fog concentrated at ground level. Lower values = fog extends higher into the sky.
Fog Max Opacity: Maximum opacity the fog can reach at distance. Set below 1.0 to always see some detail in distant objects.
Start Distance: How far from camera before fog begins. Useful to keep nearby objects clear.
Figure: Exponential Height Fog creates depth by fading distant objects, concentrated at lower altitudes.
Fog Inscattering Color
Fog Inscattering Color: The color of the fog itself. Match this to your sky/ambient color for natural results. Warm sunset scenes need warm fog; overcast days need gray fog.
Directional Inscattering Color: Color of fog when looking toward the sun. Creates that bright glow when you look toward the light source through fog.
Directional Inscattering Exponent: How tight the directional glow is. Higher values = more concentrated toward sun direction.
Volumetric Fog
Enable Volumetric Fog for dramatically improved fog quality, especially with local lights. Volumetric fog allows:
- Light shafts (god rays) through fog
- Local lights illuminating fog particles
- Shadows within the fog volume
- More physically accurate scattering
Volumetric Fog Scattering Distribution: Controls the forward-scattering of volumetric fog. Higher values create stronger light shafts.
Volumetric Fog Albedo: Color of the fog when illuminated by lights.
Volumetric Fog Extinction Scale: How quickly light is absorbed by the fog. Higher = denser fog.
✅ Pro Tip: God Rays
To achieve dramatic god rays (light shafts):
- Enable Volumetric Fog on your Exponential Height Fog
- On your Directional Light, enable "Light Shaft Occlusion" and "Light Shaft Bloom"
- Increase Fog Density slightly
- Ensure sun is at a low angle (dawn/dusk work best)
- Have some geometry (trees, buildings) to create partial occlusion
Fog and Performance
Standard exponential fog has minimal performance cost. However:
Volumetric Fog: Moderate to high cost depending on settings. The "View Distance" and "Volume Size" under Volumetric Fog settings control quality vs. performance.
Reduce Volumetric Fog View Distance to limit the depth calculated. Reduce Volumetric Fog Detail (in scalability settings) for better performance at the cost of some visual quality.
SkyLight for Ambient Illumination
While the Directional Light provides direct sunlight and the Sky Atmosphere creates the visual sky, neither fully addresses ambient lighting—the soft, omnidirectional light that fills shadows and illuminates areas not directly hit by the sun. That's where the SkyLight comes in.
What the SkyLight Does
The SkyLight captures the lighting from your sky (or a specified cubemap) and applies it as ambient illumination to your entire scene. Think of it as the light that comes from the entire sky dome, not just the sun. On a clear day, even objects in shadow are lit by blue light from the sky above.
Without a SkyLight, shadows would be nearly black, and your scene would lack the subtle environmental lighting that makes outdoor environments feel natural.
Figure: The SkyLight provides ambient illumination from the entire sky, filling shadows with color.
Adding a SkyLight
Place Actors → Lights → SkyLight
Position doesn't matter much for sky capture—the SkyLight samples the entire sky hemisphere. However, you may want to place it at a memorable location for easy selection.
SkyLight Source Types
The SkyLight has two source modes:
SLS Captured Scene (Default)
The SkyLight captures the actual sky visible in your level—your Sky Atmosphere, clouds, and surrounding environment. This is the most common and recommended mode for outdoor scenes.
Real Time Capture: When enabled, the SkyLight continuously updates to match sky changes. Essential for dynamic time-of-day. Has performance cost.
Recapture Sky: Button to manually update the capture. Use when Real Time Capture is off and you've changed the sky.
SLS Specified Cubemap
Instead of capturing the scene, use a pre-made cubemap texture for ambient lighting. Useful for:
- Interior scenes with stylized lighting
- Matching a specific reference image
- Performance-critical scenarios where capture is too expensive
When using a cubemap, assign it to the Cubemap property. The Source Cubemap Angle rotates the cubemap to align with your scene.
Key SkyLight Settings
Light Section
Intensity Scale: Multiplier for the captured sky's brightness. Adjust to balance ambient vs. direct light. Values around 1.0 are typical; increase for brighter ambient, decrease for more contrast.
Volumetric Scattering Intensity: How much this light contributes to volumetric fog. Increase for more ambient fog illumination.
Light Color
Lower Hemisphere Is Solid Color: When enabled (default), the bottom half of the sky capture is replaced with a solid color. This prevents ground reflections from affecting your lighting—usually desirable for outdoor scenes.
Lower Hemisphere Color: The color used for the lower hemisphere. Match this roughly to your ground color for natural results (dark green for grass, brown for dirt, etc.).
Distance Field Ambient Occlusion
DFAO uses mesh distance fields to add soft ambient occlusion specifically for skylight. This darkens crevices and areas where geometry meets, adding depth and grounding objects in the scene.
Occlusion Max Distance: How far the AO effect reaches. Higher values = softer, larger-scale occlusion.
Contrast: Sharpness of the occlusion effect.
Min Occlusion: Limits how dark AO can get. Keep above 0 to prevent pure black in corners.
flowchart TD
    A["Add SkyLight"] --> B{"Source Type?"}

    B -->|"Captured Scene"| C["Uses actual sky"]
    B -->|"Specified Cubemap"| D["Uses texture"]

    C --> E{"Dynamic sky?"}
    E -->|"Yes"| F["Enable Real Time Capture"]
    E -->|"No"| G["Capture once, disable real-time"]

    D --> H["Assign cubemap texture"]

    F --> I["Configure Intensity"]
    G --> I
    H --> I

    I --> J["Set Lower Hemisphere Color"]
    J --> K["Enable DFAO for grounding"]

    style A fill:#667eea,color:#fff
    style K fill:#4CAF50,color:#fff
Figure: SkyLight configuration workflow based on your scene's needs.
SkyLight Mobility
Static: Captures sky once during lighting build. Zero runtime cost. Cannot update for time-of-day changes.
Stationary: Same as Static for SkyLights. Baked during lighting build.
Movable: Can update at runtime. Required for Real Time Capture. Higher performance cost but necessary for dynamic skies.
✅ Pro Tip: SkyLight Recapture Optimization
Real Time Capture on SkyLight can be expensive. For time-of-day systems, consider:
- Capturing only every few seconds instead of every frame
- Using Blueprint to call "Recapture Sky" at specific intervals
- Blending between pre-captured cubemaps for different times of day
SkyLight vs. Lumen
With Lumen enabled, you might wonder if SkyLight is still necessary. The answer is nuanced:
Lumen handles GI from all lights, including sky contribution through the atmosphere. In pure Lumen workflows, some developers skip the SkyLight entirely.
However, SkyLight still adds value:
- Provides faster ambient response than Lumen's GI propagation
- DFAO from SkyLight works independently and can enhance Lumen's AO
- Easier artistic control over ambient color
- Fallback if Lumen has issues in certain areas
For most outdoor scenes, including a SkyLight alongside Lumen produces the most robust and visually pleasing results.
Time-of-Day Setups
Dynamic time-of-day systems—where the sun moves across the sky, colors shift from dawn to dusk to night—create immersive, living worlds. Unreal Engine 5 with Lumen makes this easier than ever, with real-time global illumination that responds instantly to sun position changes.
Components of a Time-of-Day System
A complete time-of-day system typically includes:
- Directional Light (Movable): Represents the sun, rotates through the day
- Sky Atmosphere: Updates sky colors based on sun position
- SkyLight (Movable + Real Time Capture): Updates ambient to match sky
- Exponential Height Fog: Color/density may change with time
- Post Process: Exposure and color grading adjustments
- Blueprint/Controller: Drives the rotation over time
Figure: A time-of-day system coordinates multiple lighting components through a central controller.
Basic Time-of-Day Blueprint
The simplest approach rotates the Directional Light over time. Here's the conceptual setup:
Step 1: Create a new Actor Blueprint (call it BP_TimeOfDayController).
Step 2: Add a variable TimeOfDay (Float, 0-24 representing hours).
Step 3: Add a variable SunLight (Directional Light Component reference or actor reference).
Step 4: In the Event Graph, on Event Tick (or a timer for better performance):
- Increment TimeOfDay by Delta Time × Speed multiplier
- Wrap TimeOfDay to stay within 0-24
- Convert TimeOfDay to sun rotation:
Pitch = (TimeOfDay / 24) × 360 - 90 - Apply rotation to the Directional Light
Step 5: Optionally, create curves for sun color, intensity, fog color that sample based on TimeOfDay.
Figure: Conceptual Blueprint flow for rotating the sun based on time of day.
Using Curves for Smooth Transitions
Rather than calculating everything mathematically, Unreal's Curve assets let you define smooth, artist-friendly transitions:
Float Curve: For single values (sun intensity, fog density)
Color Curve: For colors (sun color, fog inscattering color)
Create curve assets in Content Browser (right-click → Miscellaneous → Curve). Plot values across the 0-24 hour range, then sample the curve in Blueprint using Get Float Value or Get Linear Color Value with your TimeOfDay as the input.
This approach gives artists direct control over the feel of each time of day without touching Blueprint logic.
Night Considerations
When the sun drops below the horizon (TimeOfDay roughly 18:00-6:00), you'll need to handle:
Moon Light: Add a second Directional Light for moonlight. Rotate it opposite to the sun. Much dimmer (1-5% of sun intensity), cooler color (slight blue tint).
Stars: Use a star texture/mesh behind the Sky Atmosphere, or a dedicated star sphere. Fade in as sky darkens.
Artificial Lights: Street lights, building windows, etc. should turn on at dusk. Use visibility or intensity curves keyed to TimeOfDay.
Exposure: Auto-exposure will try to brighten the dark scene. Consider exposure compensation curves or switching to manual exposure at night.
⚠️ Watch Out: Lighting Build and Time-of-Day
If you're using baked lighting (Static/Stationary lights), you cannot have true dynamic time-of-day—the baked lighting is fixed to whatever sun position existed during the build. For dynamic time-of-day, you must use:
- Movable Directional Light
- Lumen (for dynamic GI)
- Movable SkyLight with Real Time Capture
Performance Optimization for Time-of-Day
SkyLight Capture Frequency: Real Time Capture every frame is expensive. Capture every 0.5-1 seconds, or only when the time changes significantly.
Lumen Quality Settings: Reduce Lumen quality for faster GI updates during rapid time changes. Return to higher quality when time is stable.
Level of Detail: Distant objects that depend on lighting can use lower shadow quality or simplified materials.
Time Speed: Very fast time progression (minute = real second) is harder on performance than slow progression. Consider capping progression speed or using time-skip transitions.
flowchart TD
    A["Time-of-Day Active"] --> B{"Performance Target?"}

    B -->|"High-End"| C["Full Lumen
Real-time SkyLight
Every-frame update"]
    B -->|"Mid-Range"| D["Lumen Software RT
Periodic SkyLight capture
0.5s intervals"]
    B -->|"Performance Critical"| E["Lower Lumen quality
Blend cubemaps
Pre-calculated colors"]

    C --> F["Best visual quality"]
    D --> G["Good balance"]
    E --> H["Stable frame rate"]

    style C fill:#4CAF50,color:#fff
    style D fill:#FF9800,color:#fff
    style E fill:#f44336,color:#fff
Figure: Balance time-of-day visual quality with performance targets.
Hands-On: Set Up an Outdoor Daytime Sky
Time to put everything together! In this exercise, you'll create a complete outdoor lighting setup from scratch—a sunny afternoon scene with realistic sky, atmospheric fog, and proper ambient lighting. By the end, you'll have a reusable template for outdoor environments.
🏋️ Exercise: Sunny Afternoon Environment
Goal: Create a complete outdoor lighting setup with sun, sky, fog, and ambient light.
Time: 20-30 minutes
What you'll practice:
- Configuring a Directional Light as the sun
- Setting up Sky Atmosphere for realistic sky rendering
- Adding Exponential Height Fog for depth
- Configuring SkyLight for ambient illumination
- Fine-tuning the overall lighting balance
Part 1: Create a New Level
Step 1: Create a new level: File → New Level → Empty Level. Save it as L_OutdoorLighting_Test.
Step 2: Add some ground geometry so we have surfaces to see lighting on. Place a large plane or landscape:
- Quick option: Place Actors → Basic → Plane. Scale it to (100, 100, 1).
- Better option: Create a simple Landscape (Landscape Mode → Create New).
Step 3: Add some vertical geometry for shadow testing. Place a few cubes or cylinders at different positions. These will help us see how shadows fall.
Step 4: Apply a basic material to your geometry so it's not default gray. A simple grass or ground texture works well.
💡 Hint: Quick Ground Setup
If you have Starter Content enabled, you can use M_Ground_Grass material on your plane. Otherwise, create a simple material with a green base color (0.1, 0.3, 0.05) and roughness around 0.8.
Part 2: Add the Directional Light (Sun)
Step 5: Place Actors → Lights → Directional Light. This will be our sun.
Step 6: Select the Directional Light and configure these settings in the Details panel:
Transform:
- Rotation: Pitch =
-45, Yaw =-45(afternoon sun from the southwest)
Light:
- Intensity:
10 lux(or leave default if using auto-exposure) - Light Color: Warm white — click the color, set to roughly (255, 250, 235) or use Temperature
- Use Temperature: Enable, set to
5800 K(warm afternoon sun) - Source Angle:
1.0(slightly soft shadows)
Atmosphere and Cloud:
- Atmosphere Sun Light:
✓ Enabled(critical!)
Cascaded Shadow Maps:
- Dynamic Shadow Distance:
20000(200 meters) - Num Dynamic Shadow Cascades:
4
Mobility:
- Set to
Movable(for Lumen compatibility) orStationary(for baked GI)
Step 7: Verify the light direction by looking at shadows on your geometry. Adjust rotation with Ctrl+L drag if needed.
Part 3: Add Sky Atmosphere
Step 8: Place Actors → Visual Effects → Sky Atmosphere.
Step 9: Immediately, you should see a blue sky appear! The Sky Atmosphere automatically connects to your Directional Light (because we enabled Atmosphere Sun Light).
Step 10: Configure Sky Atmosphere settings (most defaults are good, but verify):
Atmosphere:
- Ground Radius:
6360km (Earth default) - Atmosphere Height:
60km (Earth default)
Rayleigh Scattering:
- Rayleigh Scattering Scale:
1.0(default)
Mie Scattering:
- Mie Scattering Scale:
0.003996(default) — increase slightly for hazier atmosphere - Mie Anisotropy:
0.8(default) — controls sun halo tightness
Step 11: Test by rotating your Directional Light. Watch how the sky colors change as you move the sun toward the horizon (sunset colors) or overhead (blue sky).
✅ Checkpoint: What You Should See
At this point, you should have:
- A visible sun disk in the sky matching your Directional Light rotation
- Blue sky with gradient from horizon to zenith
- Warm colors near the sun position
- Direct shadows from your geometry
If the sky is black or the sun isn't visible, check that "Atmosphere Sun Light" is enabled on your Directional Light.
Part 4: Add Exponential Height Fog
Step 12: Place Actors → Visual Effects → Exponential Height Fog.
Step 13: Configure the fog settings:
Exponential Height Fog:
- Fog Density:
0.02(start subtle) - Fog Height Falloff:
0.2 - Fog Max Opacity:
0.9 - Start Distance:
1000(keep nearby objects clear)
Fog Inscattering Color:
- Set to a light blue-gray: (180, 200, 220) or sample from your sky at the horizon
Directional Inscattering:
- Directional Inscattering Exponent:
8 - Directional Inscattering Start Distance:
10000 - Directional Inscattering Color: Warm white matching sun
Volumetric Fog (Optional but recommended):
- Volumetric Fog:
✓ Enabled - Scattering Distribution:
0.9 - Albedo: White (1, 1, 1)
Step 14: Look at your scene. Distant objects should now fade slightly into atmospheric haze, adding depth perception.
Part 5: Add SkyLight
Step 15: Place Actors → Lights → SkyLight.
Step 16: Configure the SkyLight:
Light:
- Source Type:
SLS Captured Scene - Intensity Scale:
1.0 - Real Time Capture:
✓ Enabled(if using Movable sun)
Light Color:
- Lower Hemisphere Is Solid Color:
✓ Enabled - Lower Hemisphere Color: Dark green (0.05, 0.1, 0.03) to simulate ground bounce
Distance Field Ambient Occlusion:
- Cast DFAO (if available):
✓ Enabled - Occlusion Max Distance:
500
Mobility:
- Set to
Movable(required for Real Time Capture)
Step 17: If Real Time Capture is off or Mobility is Static/Stationary, click Recapture Sky button to update the capture.
Part 6: Verify and Fine-Tune
Step 18: Walk around your scene and observe:
- Do shadows look natural? (Adjust sun Source Angle if too harsh)
- Are shadow areas too dark? (Increase SkyLight Intensity Scale)
- Is the scene too bright/washed out? (Check auto-exposure or reduce light intensities)
- Does distance fade feel right? (Adjust fog density)
Step 19: Test different sun positions using Ctrl+L drag. Notice how Sky Atmosphere and SkyLight respond.
Step 20: If using Lumen, observe how indirect light fills shadows and bounces color. If not using Lumen, consider building lighting (Build → Build Lighting Only) to see baked indirect lighting.
Figure: Your completed outdoor lighting setup with all four components working together.
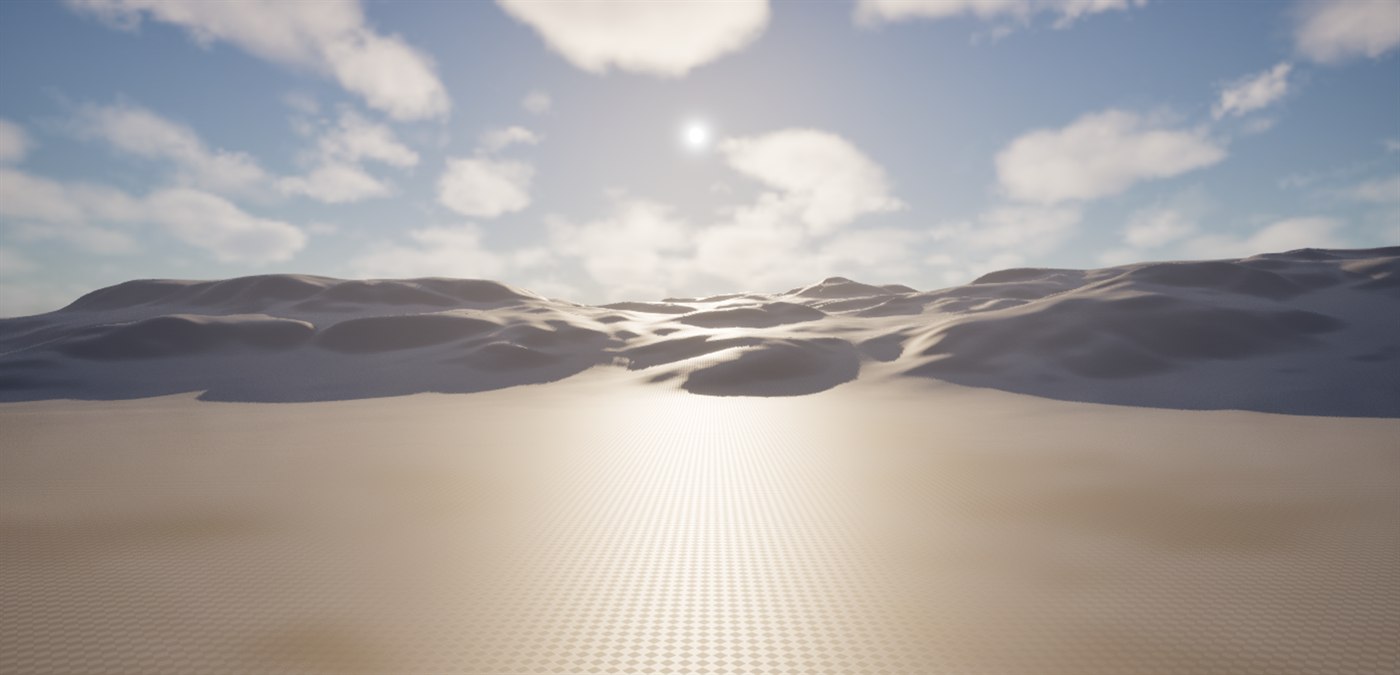
Figure: The same setup rendered live in UE 5.8 · Directional Light (sun disk and dune shadows), Sky Atmosphere (blue gradient and clouds), SkyLight (ambient fill in shadow), and Exponential Height Fog (horizon haze) working together.
🔧 Troubleshooting: Common Issues
Sky is black or missing:
- Ensure Sky Atmosphere is placed in the level
- Check "Atmosphere Sun Light" is enabled on Directional Light
- Verify Directional Light isn't pointed straight down (sun below horizon)
Scene is too dark:
- Increase Directional Light intensity
- Increase SkyLight Intensity Scale
- Check if auto-exposure is underexposing (add Post Process Volume with fixed exposure)
Shadows are pitch black:
- Ensure SkyLight is present and capturing
- If using baked lighting, rebuild lighting
- Enable Lumen for dynamic indirect lighting
No atmospheric haze/depth:
- Increase Exponential Height Fog density
- Check Start Distance isn't set too high
- Enable Volumetric Fog for more visible effect
SkyLight not updating with sun rotation:
- Set SkyLight Mobility to Movable
- Enable "Real Time Capture"
- Or manually click "Recapture Sky" after each change
Bonus Challenge: Sunset Scene
Duplicate your level and modify it to create a sunset scene:
- Rotate Directional Light to Pitch = -5° to -10° (sun near horizon)
- Change sun Temperature to 3000K-3500K (warmer orange)
- Increase Mie Scattering Scale slightly for more haze
- Update Fog Inscattering Color to warm orange
- Observe how Sky Atmosphere automatically creates sunset colors
The same four components create dramatically different moods just by adjusting sun position and color!
Summary
You've now mastered the fundamentals of outdoor lighting in Unreal Engine 5. Let's recap the essential components and concepts:
🎯 Key Takeaways
Directional Light is your sun or moon—an infinitely distant light source with parallel rays. Key settings include rotation (sun position), color/temperature, source angle (shadow softness), and "Atmosphere Sun Light" to link with Sky Atmosphere.
Sky Atmosphere simulates planetary atmospheric scattering, creating realistic blue skies and colorful sunsets. It automatically responds to your Directional Light's rotation. Rayleigh scattering creates blue sky; Mie scattering creates sun halos and haze.
Exponential Height Fog adds depth and distance to your scenes. Fog density increases exponentially at lower altitudes. Enable Volumetric Fog for god rays and light interaction. Match fog color to your sky for natural blending.
SkyLight provides ambient illumination by capturing light from the sky dome. Use Real Time Capture for dynamic skies. The Lower Hemisphere Color simulates ground bounce. Distance Field Ambient Occlusion adds subtle shadowing in crevices.
Time-of-Day systems coordinate all four components through a controller. Movable lights + Lumen enable fully dynamic transitions. Use curves for artist-friendly control over colors and intensities throughout the day.
Outdoor Lighting Quick Reference
The Complete Outdoor Setup Workflow
flowchart LR
    A["1. Create Level
Add ground/objects"] --> B["2. Directional Light
Set rotation + color"]
    B --> C["3. Sky Atmosphere
Link to sun"]
    C --> D["4. Height Fog
Add depth"]
    D --> E["5. SkyLight
Ambient fill"]
    E --> F["6. Fine-tune
Balance & test"]

    style A fill:#667eea,color:#fff
    style B fill:#f1c40f,color:#333
    style C fill:#2196F3,color:#fff
    style D fill:#9C27B0,color:#fff
    style E fill:#4CAF50,color:#fff
    style F fill:#e91e63,color:#fff
Figure: The standard workflow for setting up outdoor lighting.
What's Next?
With outdoor lighting mastered, the next lesson focuses on Interior Lighting—a completely different challenge. You'll learn to use Point Lights, Spot Lights, and Rect Lights to illuminate indoor spaces, work with IES profiles for realistic light falloff patterns, and create mood through strategic light placement.
The skills you've learned here—understanding how light components work together, balancing direct and ambient light, and using atmospheric effects—will directly transfer to interior work. You'll just be applying them in enclosed spaces with more localized light sources.