🖥️ The Unreal Editor Interface
The Unreal Editor is your creative workspace—a powerful yet intuitive environment where ideas become reality. This lesson provides a comprehensive tour of every major component, teaching you advanced navigation, customization, and productivity techniques that will make you efficient and confident in your work.
🎯 Learning Objectives
By the end of this lesson, you will be able to:
- Master advanced viewport navigation and camera controls
- Understand all viewport visualization modes and when to use them
- Use the Content Browser like a professional asset manager
- Organize complex scenes with the Outliner
- Efficiently modify object properties using the Details Panel
- Customize the editor layout for your personal workflow
- Utilize essential keyboard shortcuts to speed up development
- Work with multiple viewports simultaneously
- Use the Quick Access toolbar effectively
Estimated Time: 60-75 minutes
Prerequisites: Lesson 1.3: Your First Project (project created and opened)
In This Lesson
Interface Overview
Before we dive deep into individual components, let's understand the philosophy behind Unreal Engine's interface design and how everything fits together.
Design Philosophy
Unreal Engine's interface is built around three core principles:
- Context-Awareness: Panels and tools adapt to what you're doing—editing a material shows material-specific options, selecting an actor shows actor properties
- Non-Destructive Workflow: Most actions can be undone (Ctrl + Z), and the editor auto-saves to prevent data loss
- Flexibility: Almost everything can be moved, resized, docked, or hidden to suit your workflow
The Five Core Areas
The editor is organized into five main areas, each serving a distinct purpose:
Commands and Quick Actions] A --> C[2. Viewport
3D Scene Visualization] A --> D[3. Content Browser
Asset Management] A --> E[4. Outliner
Scene Hierarchy] A --> F[5. Details Panel
Object Properties] style B fill:#3b82f6,stroke:#1e40af,color:#fff style C fill:#10b981,stroke:#059669,color:#fff style D fill:#fbbf24,stroke:#d97706,color:#000 style E fill:#ef4444,stroke:#b91c1c,color:#fff style F fill:#8b5cf6,stroke:#6d28d9,color:#fff
| Area | Primary Function | When You Use It |
|---|---|---|
| Menu Bar & Toolbar | Access commands, settings, and quick actions | Opening files, changing settings, building, playing |
| Viewport | See and interact with your 3D scene | 90% of your time—placing, moving, and viewing objects |
| Content Browser | Manage project assets and files | Finding materials, importing assets, creating new content |
| Outliner | List and organize scene objects | Selecting hard-to-click objects, organizing large scenes |
| Details Panel | View and edit properties of selected objects | Fine-tuning object settings, adjusting transforms |
💡 Mental Model: The Production Pipeline
Think of the interface as stages in a production pipeline:
- Content Browser: Your warehouse—where all materials and tools are stored
- Viewport: Your workshop—where you assemble and arrange things
- Outliner: Your inventory list—keeping track of everything in the workshop
- Details Panel: Your control panel—adjusting specific settings for each item
- Toolbar: Your quick-access tools—frequently used actions at your fingertips
Figure: The default Unreal Editor layout showing all five core interface areas.
Interface Modes
The editor has different operational modes that change how the interface behaves:
- Edit Mode (Default): Building and arranging your level—selecting, moving, editing objects
- Play Mode: Testing your level as a player would experience it—viewport becomes game window
- Simulate Mode: Similar to Play but without possessing a player character—useful for testing physics and AI
- Blueprint Edit Mode: Opens when editing Blueprints—specialized interface for visual scripting
📖 PIE - Play In Editor
PIE (Play In Editor) refers to testing your level directly within the Unreal Editor viewport. It's the fastest way to test gameplay without packaging your project. When you press the Play button, you're entering PIE mode.
Viewport Deep Dive
The viewport is your window into the 3D world—the single most important part of the interface. Let's master every aspect of it.
Advanced Navigation Techniques
You learned basic navigation in the previous lesson. Now let's explore advanced techniques that professionals use:
Navigation Modes
| Mode | Controls | Best For | Speed Tip |
|---|---|---|---|
| Fly Camera | Right Mouse + WASD | General navigation, large scenes | Hold Shift to fly faster |
| Orbit Camera | Alt + Left Mouse | Examining single objects | Orbits around last clicked point |
| Pan Camera | Middle Mouse or Alt + Middle Mouse |
Sliding view without rotation | Useful for precise positioning |
| Zoom | Scroll Wheel | Quick distance adjustment | Zooms toward mouse cursor position |
| Focus Object | F (with object selected) | Finding lost objects quickly | Centers view and adjusts distance |
Speed Modifiers
Control your navigation speed with these modifiers:
- Right Mouse + Scroll Wheel - Adjust fly speed on the fly
- Shift (while flying) - Move faster (4x speed)
- Ctrl (while flying) - Move slower (0.25x speed)
- Mouse wheel while holding Right Mouse - Precise speed adjustment
✅ Pro Navigation Workflow
Professional level designers use this pattern:
- Click object to select it
- Press F to frame it
- Alt + Left Mouse to orbit and examine
- Make adjustments to the object
- Right Mouse + WASD to fly to next object
Practice this sequence until it becomes muscle memory!
Figure: The three primary viewport navigation modes with their keyboard/mouse controls.
Viewport Visualization Modes
The viewport can display your scene in many different ways. Each mode reveals different information:
View Modes (Click the "Lit" dropdown in top-left of viewport)
| Mode | What You See | When to Use | Hotkey |
|---|---|---|---|
| Lit | Full lighting, materials, shadows—realistic view | Default mode, final look preview | Alt + 4 |
| Unlit | No lighting or shadows, only material colors | Seeing base colors, working in dark areas | Alt + 3 |
| Wireframe | Only mesh edges, see-through objects | Checking mesh complexity, finding hidden objects | Alt + 2 |
| Detail Lighting | Only lighting contribution, no base color | Debugging lighting issues | - |
| Lighting Only | Only light intensity, no materials | Analyzing light placement and coverage | - |
| Shader Complexity | Color-coded by rendering cost (green=fast, red=slow) | Performance optimization | - |
💡 Quick Experiment: View Modes
Right now, try switching between view modes:
- Press Alt + 4 for Lit mode (default)
- Press Alt + 3 for Unlit—notice how everything brightens
- Press Alt + 2 for Wireframe—see the mesh structure
- Press Alt + 4 to return to Lit
Get comfortable switching—you'll use these constantly!
Figure: The four most commonly used viewport view modes and what each reveals.
Show Flags: Controlling Visibility
The Show menu in the viewport lets you toggle visibility of specific element types:
Common Show Flags
- Lighting Features:
- Dynamic Shadows - Toggle real-time shadows
- Fog - Show/hide atmospheric fog
- Sky Lighting - Toggle skylight contribution
- Scene Elements:
- Static Meshes - Hide/show 3D models
- Landscape - Toggle terrain visibility
- Particles - Show/hide visual effects
- Translucency - Toggle transparent materials
- Editor Helpers:
- Grid - Show/hide viewport grid
- Collision - Display collision boundaries
- Bounds - Show object bounding boxes
- Navigation - Display nav mesh for AI pathfinding
⚠️ Accidentally Hidden Everything?
If objects disappear unexpectedly, you may have toggled a Show flag:
- Click Show in the viewport toolbar
- Look for unchecked items (especially "Static Meshes")
- Re-enable them by clicking
- Or use Show → Show All to reset everything
Viewport Types and Perspectives
The viewport can display from different perspectives:
| View Type | Description | Use Case |
|---|---|---|
| Perspective | 3D view with depth—objects get smaller with distance | Default, natural view |
| Top (Orthographic) | Looking straight down, no perspective distortion | Aligning objects, level layout |
| Front (Orthographic) | Looking from front, flat view | Vertical alignment, height adjustment |
| Side (Orthographic) | Looking from side, flat view | Precise placement along one axis |
Switch perspective by clicking the Perspective dropdown in the top-left of the viewport.
Multiple Viewports
You can split the viewport to see from multiple angles simultaneously:
- Click the viewport options button (three horizontal lines)
- Select Layouts
- Choose layout: 2x2, Vertical Split, Horizontal Split, etc.
- Each sub-viewport can have its own view mode and perspective
✅ When to Use Multiple Viewports
Professional level designers use multiple viewports for:
- Precise Placement: Perspective + Top view to align objects perfectly
- Architecture: Multiple orthographic views for building construction
- Animation: Different angles to check character movement
For beginners, a single perspective viewport is usually sufficient. Add more as needed!
Viewport Statistics and Performance
The viewport can display performance statistics:
- Press ` (backtick/tilde key) to open console
- Type
stat fpsto show frames per second - Type
stat unitto show detailed timing information - Type
stat noneto hide all stats
Alternatively, enable permanently in Editor Preferences → Performance → Show Frame Rate and Memory
Content Browser Mastery
The Content Browser is your asset management system—think of it as Windows Explorer or Mac Finder, but specifically designed for game assets. Mastering it is crucial for staying organized.
Content Browser Anatomy
The Content Browser has several distinct areas:
Left Panel] A --> C[2. Asset View
Main Area] A --> D[3. Search Bar
Top Center] A --> E[4. Filters
Top Right] A --> F[5. Path Bar
Below Search] B --> B1[Navigate folders] C --> C1[Thumbnail/list view] D --> D1[Find assets quickly] E --> E1[Filter by type] F --> F1[Current location] style B fill:#3b82f6,stroke:#1e40af,color:#fff style C fill:#10b981,stroke:#059669,color:#fff style D fill:#fbbf24,stroke:#d97706,color:#000
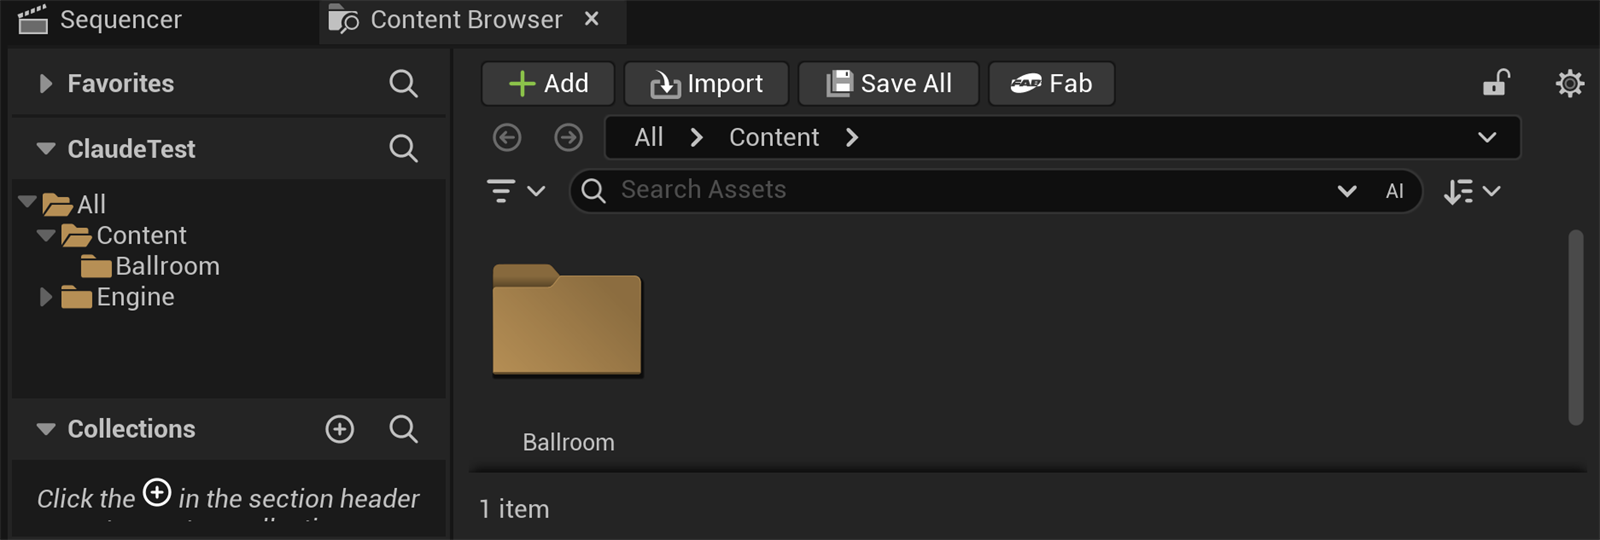
Figure: The Content Browser in UE 5.8 · folder tree (left), asset view (center), the search and filter bar, and the toolbar with Add, Import, Save All, and the Fab button.
Navigation and Organization
Folder Tree (Left Panel)
- Content: Root folder containing all project assets
- Right-click folders: Create new, rename, delete, move
- Drag and drop: Move assets between folders
- Color coding: Assign colors to folders for organization
Asset View Modes
Change how assets are displayed using the view options (bottom-right corner):
| View Mode | Best For | Details Shown |
|---|---|---|
| Tile View | Visual assets (textures, materials, models) | Large thumbnails |
| List View | Many assets, finding specific names | Name, type, size in rows |
| Column View | Sorting by properties | Customizable columns with metadata |
Adjust thumbnail size with the slider at the bottom (Tile view only).
Searching and Filtering
Search Bar Features
- Basic Search: Type asset name—results appear instantly
- Partial Matching: Type "char" to find "Character", "CharacterBP", "CharControl", etc.
- Search All: Searches entire Content folder by default
- Clear Search: Click X to clear
Filters
Click the Filters button to narrow results by asset type:
- Blueprint Class - Visual scripts
- Static Mesh - 3D models
- Material - Surface appearances
- Texture - Image files
- Sound - Audio files
- Particle System - Visual effects
- And dozens more...
Click multiple filters to combine them (e.g., show only Blueprints AND Materials).
Working with Assets
Common Asset Operations
| Action | How To | Shortcut |
|---|---|---|
| Open Asset | Double-click thumbnail | - |
| Rename | Right-click → Rename or F2 | F2 |
| Duplicate | Right-click → Duplicate or Ctrl + D | Ctrl + D |
| Delete | Right-click → Delete or Delete key | Delete |
| Show in Explorer | Right-click → Show in Explorer | - |
| Find References | Right-click → Reference Viewer | - |
Creating New Assets
Right-click in empty space of Content Browser to see the New Asset menu:
- Blueprint Class - Create visual script
- Material - Create new surface material
- Level - Create new map/level
- Folder - Organize assets
- Many specialized types under "Materials", "Blueprints", etc.
💡 Asset Naming Conventions
Professional teams use consistent naming conventions. Consider adopting these:
- Prefixes by type:
BP_- Blueprints (e.g., BP_PlayerCharacter)M_- Materials (e.g., M_Metal_Rusty)T_- Textures (e.g., T_Wood_Diffuse)SM_- Static Meshes (e.g., SM_Chair_01)SK_- Skeletal Meshes (e.g., SK_Character)
- Descriptive names: Avoid "Untitled", "New", "Test"
- No spaces: Use underscores or CamelCase
- Version numbers: Chair_01, Chair_02 for variations
Good naming makes finding assets much easier as projects grow!
Asset Collections
Collections let you create custom asset groupings without moving files:
- Creating Collections:
- Bottom of Content Browser, click "Collections" tab
- Right-click → New Collection
- Name it (e.g., "Level_01_Assets", "Player_Materials")
- Adding to Collections:
- Drag assets from Asset View onto collection name
- Or right-click asset → Add to Collection
- Benefits:
- Quick access to frequently used assets
- Organize assets by function, not location
- Assets can be in multiple collections
Sources Panel
The Sources panel (left side, below folder tree) provides quick access to:
- Content: Your project assets (default)
- C++ Classes: C++ code classes (if using C++)
- Engine Content: Built-in engine assets (usually hidden—enable in View Options)
- Plugin Content: Assets from installed plugins
⚠️ Engine Content: Use with Caution
You can enable "Show Engine Content" in View Options to see built-in assets. However:
- ⚠️ Very cluttered—thousands of assets
- ⚠️ Easy to accidentally use engine assets that make your project dependent on them
- ✅ Better to copy assets you need to your Content folder
- ✅ Good for reference and learning how Epic builds things
Import and Export
Importing Assets
Bring external files into your project:
- Drag and Drop: Drag files from Windows Explorer directly into Content Browser
- Import Button: Click "Import" in Content Browser toolbar → browse to file
- Supported Formats:
- 3D Models: FBX, OBJ
- Textures: PNG, JPG, TGA, EXR, HDR
- Audio: WAV, MP3
- Video: MP4, AVI
Exporting Assets
- Right-click asset → Asset Actions → Export
- Useful for taking assets to other software for editing
- Note: Some assets (like Blueprints) can't be exported—they're Unreal-specific
Content Browser Shortcuts
| Action | Shortcut |
|---|---|
| Open Content Browser | Ctrl + Space |
| Focus search bar | Ctrl + F |
| Rename asset | F2 |
| Duplicate asset | Ctrl + D |
| Delete asset | Delete |
| Sync to asset in viewport | Ctrl + B |
Outliner
The Outliner is your hierarchical list of every object (called "Actors" in Unreal) currently in your level. Think of it as the "Layers" panel in Photoshop or the "Hierarchy" in Unity—it shows everything in your scene.
Understanding Actors
📖 Actors
Actors are any objects that can be placed in a level. This includes 3D models (Static Meshes), lights, cameras, triggers, character spawn points, sound emitters, and more. If it exists in your 3D scene, it's an Actor.
Outliner Interface
The Outliner has several components:
- Search Bar (Top): Quickly find actors by name
- Actor List (Main Area): Hierarchical list of all actors
- Eye Icons: Toggle actor visibility in viewport
- Type Icons: Visual indicators of actor type (mesh, light, camera, etc.)
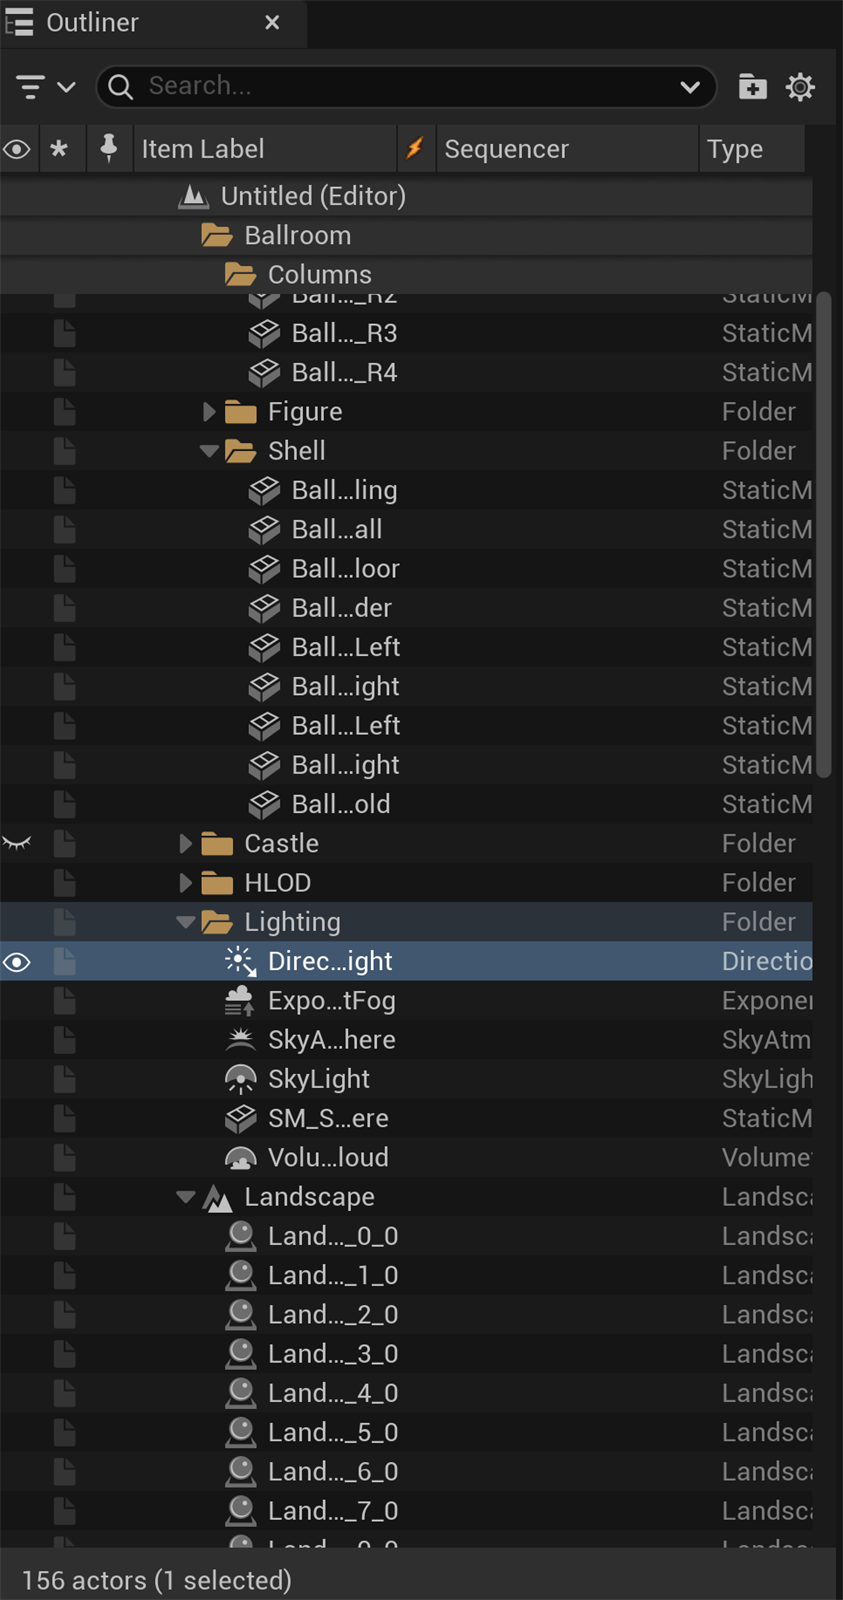
Figure: The Outliner in UE 5.8 · the level's actors grouped in folders, with the Type column, visibility eye icons, and the selected DirectionalLight highlighted.
Basic Operations
Selecting Actors
| Action | How To | Result |
|---|---|---|
| Select Single | Click actor name | Selects in Outliner and viewport |
| Multi-Select | Ctrl + Click | Add to selection |
| Range Select | Shift + Click | Select all between clicks |
| Select All | Ctrl + A | Select everything in level |
| Deselect All | Esc | Clear selection |
Visibility Controls
- Eye Icon (👁️): Click to hide/show actor in viewport (editor only—doesn't affect gameplay)
- Hidden Actors: Shown in gray text with eye icon crossed out
- Temporary Hiding: Great for working on crowded scenes
- Show All: Right-click → Show All to unhide everything
💡 Visibility vs. Selection
Hidden actors can still be selected and edited—they just don't appear in the viewport. This is useful when you want to:
- Edit properties of an object blocking your view
- Work on background elements without foreground clutter
- Focus on specific areas of a complex scene
Organizing with Folders
For complex scenes with hundreds of actors, folders are essential:
Creating Folders
- Right-click in the Outliner
- Select Create Folder
- Name it descriptively (e.g., "Environment", "Lighting", "Props_Level01")
Using Folders
- Drag actors into folders to organize
- Collapse/Expand: Click arrow next to folder name
- Select Folder Contents: Click folder, then Ctrl + A
- Hide Entire Folder: Click eye icon on folder itself
- Nest Folders: Drag folder into another folder for hierarchies
✅ Professional Folder Structure
Organize your level like this:
- Lighting - All lights (Directional, Point, Spot, etc.)
- Environment
- Architecture - Buildings, walls, floors
- Nature - Trees, rocks, vegetation
- Gameplay - Player starts, triggers, volumes
- Props - Furniture, decorative objects
- Audio - Sound emitters, ambient audio
- Effects - Particles, post-process volumes
Search and Filtering
Search Bar
- Type name: Instantly filters to matching actors
- Partial matching: Type "light" to find "DirectionalLight", "PointLight1", etc.
- Clear search: Click X or press Esc
Type Filters
Click the filter icon in the Outliner to show only specific actor types:
- Static Meshes only
- Lights only
- Blueprints only
- And more...
Actor Parenting (Attachment)
Actors can be attached to other actors, creating parent-child relationships:
Creating Attachments
- Drag and drop: Drag one actor onto another in the Outliner
- Result: Child actor indents under parent
- Behavior: When parent moves/rotates, children move with it
When to Use Attachments
| Scenario | Example |
|---|---|
| Complex objects made of parts | Lamp (base + bulb + shade) |
| Moving platforms with objects | Elevator platform with props on it |
| Character equipment | Weapon attached to character's hand |
| Vehicle with parts | Car body with attached wheels |
💡 Try It: Create a Lamp
- Place a Cylinder from Place Actors (lamp base)
- Place a Point Light above it
- In the Outliner, drag the Point Light onto the Cylinder
- Now move the Cylinder—the light moves with it!
Context Menu Actions
Right-click any actor in the Outliner for powerful options:
- Edit: Opens appropriate editor (Blueprint editor, material editor, etc.)
- Select → All Descendants: Select actor and all its children
- Visibility: Show/hide selected actors
- Pilot Actor: Control viewport camera from actor's perspective
- Snap to: Alignment tools
- Convert to: Change actor type
Outliner Settings
Click the settings icon (three dots) in the Outliner for customization:
- Show Only Selected: Hide unselected actors from list
- Show Actor Components: Show sub-components (advanced)
- Show Only Current Level: In multi-level projects, hide actors from other levels
- Sort Alphabetically: Or by type, or creation order
Details Panel
The Details Panel is your control center for modifying any selected object. When you select an actor, the Details Panel populates with every property, setting, and option available for that object.
Understanding the Details Panel
The Details Panel is context-sensitive—it changes based on what you have selected:
- Nothing selected: Empty or shows level settings
- One actor selected: Shows that actor's properties
- Multiple actors selected: Shows common properties, grays out different values
- Different actor types: Each type has unique properties
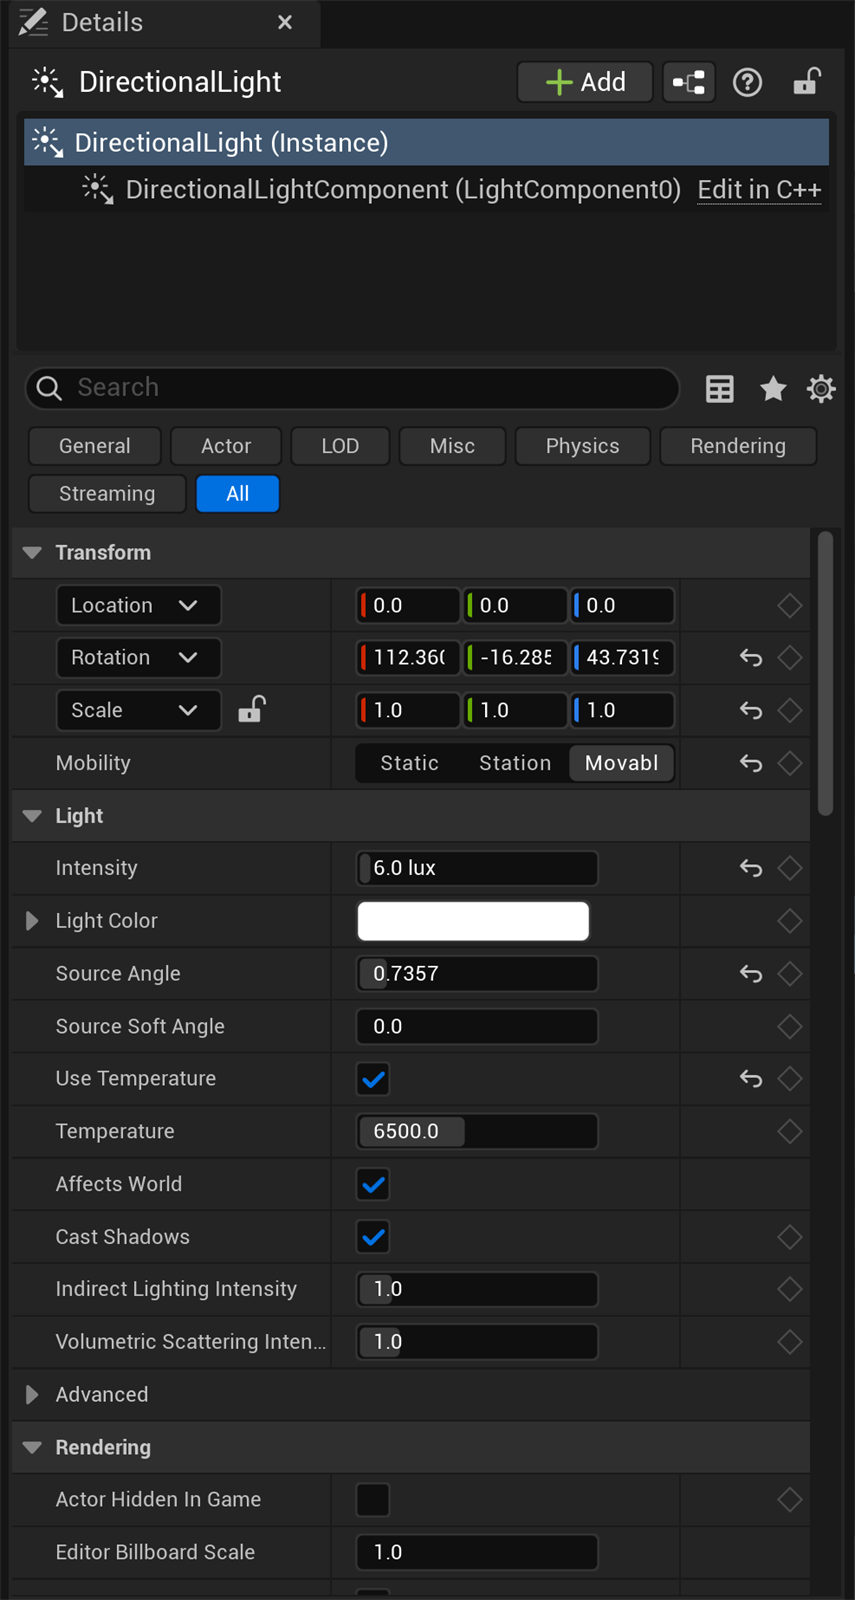
Figure: The Details panel is context-sensitive · here it shows the selected DirectionalLight's Transform and Light properties, grouped into expandable categories.
Common Property Categories
Most actors share these property categories (expandable sections):
Transform
Controls position, rotation, and scale:
| Property | Values | What It Does |
|---|---|---|
| Location | X, Y, Z (in centimeters) | Position in 3D space |
| Rotation | Roll, Pitch, Yaw (in degrees) | Object orientation |
| Scale | X, Y, Z (1.0 = 100%) | Size multiplier |
💡 Coordinate System
Unreal uses a left-handed Z-up coordinate system:
- X (Forward): Red axis, typically "forward" direction
- Y (Right): Green axis, left/right
- Z (Up): Blue axis, vertical height
Units are in centimeters by default (100 units = 1 meter).
Static Mesh (for Static Mesh Actors)
- Static Mesh: Which 3D model to display (dropdown to change)
- Materials: Array of materials applied to mesh (Element 0, Element 1, etc.)
- Override Materials: Temporarily change material without affecting asset
Rendering
- Visible: Toggle visibility in game (not just editor)
- Cast Shadow: Whether object casts shadows
- Receive Decals: Can decals project onto this object?
- Custom Depth: Advanced rendering features
Collision
- Collision Presets: Quick settings (Block All, No Collision, etc.)
- Collision Enabled: Physics collision on/off
- Object Type: What category (WorldStatic, WorldDynamic, Pawn, etc.)
- Collision Responses: How it interacts with other objects
Physics
- Simulate Physics: Enable gravity and physics simulation
- Mass: Object weight (in kg)
- Linear Damping: Air resistance for movement
- Angular Damping: Air resistance for rotation
Tags
- Actor Label: Display name in editor (doesn't affect gameplay)
- Tags: Custom labels for gameplay logic (e.g., "Enemy", "Collectible")
- Component Tags: Tags for sub-components
Editing Properties
Value Types and Input Methods
| Property Type | How to Edit | Tips |
|---|---|---|
| Numbers | Click and type, or drag label left/right | Hold Ctrl while dragging for precise control |
| Checkboxes | Click to toggle on/off | Grayed = mixed values in multi-select |
| Dropdowns | Click to see options, select one | Some support typing to search |
| Color Pickers | Click color swatch to open picker | Can eyedropper from viewport |
| Asset References | Drag asset from Content Browser, or use dropdown | Arrow button navigates to asset |
| Arrays | + to add elements, - to remove | Can reorder by dragging |
Special Input Features
- Copy/Paste Values: Right-click property → Copy/Paste
- Reset to Default: Yellow arrow resets property to default value
- Drag Labels: Drag number field labels left/right to scrub values
- Lock Values Together: Chain icon locks X/Y/Z together (for scale)
✅ Pro Workflow: Copying Properties
When you need multiple objects with the same settings:
- Set up first object perfectly
- Select all objects (Ctrl + Click in Outliner)
- Modify shared properties—all objects update
- Or: Right-click property → Copy, then paste to other objects
Search and Filter
For actors with many properties, use the search bar at the top of the Details Panel:
- Type property name to filter (e.g., "shadow")
- Only matching properties show
- Highlights matching text in property names
- Great for finding specific settings in complex blueprints
Details Panel Favorites
Pin frequently-used properties to the top:
- Click the star icon next to any property
- Property moves to "Favorites" section at top
- Quick access without scrolling
- Persists across sessions
Components (Advanced)
Some actors have multiple Components—sub-objects that provide functionality:
- Static Mesh Component: The visible 3D model
- Collision Component: Physics boundaries
- Light Component: Light emission
- Audio Component: Sound playback
Click component name in Details Panel to view its specific properties.
⚠️ Be Careful with Multi-Select Edits
When multiple actors are selected:
- Changes apply to ALL selected actors
- Properties with different values show "Multiple Values"
- Easy to accidentally modify many objects at once
- Always check what's selected before editing!
World Settings
When nothing is selected, you can access World Settings from the toolbar:
- Click Settings button → World Settings
- Or press Alt + 8
- Shows level-wide settings:
- Lighting quality
- Default game mode
- Global post-processing
- Physics simulation settings
Toolbar and Menus
The top bar of the editor contains two key areas: the Menu Bar (File, Edit, Window, etc.) and the Main Toolbar (with buttons for common actions). Let's explore both in detail.
Menu Bar Breakdown
The menu bar provides access to all editor commands, organized by category:
File Menu
| Command | What It Does | Shortcut |
|---|---|---|
| New Level | Create new empty level or from template | Ctrl + N |
| Open Level | Open existing level from Content folder | Ctrl + O |
| Save Current Level | Save the currently open level | Ctrl + S |
| Save All | Save all modified assets and levels | Ctrl + Shift + S |
| Open Recent | Quick access to recently opened levels | - |
| Package Project | Build executable for distribution | - |
Edit Menu
| Command | What It Does | Shortcut |
|---|---|---|
| Undo | Reverse last action | Ctrl + Z |
| Redo | Reapply undone action | Ctrl + Y |
| Cut/Copy/Paste | Standard clipboard operations | Ctrl + X/C/V |
| Duplicate | Create copy of selected actors | Ctrl + D |
| Delete | Remove selected actors | Delete |
| Editor Preferences | Configure editor settings | - |
| Project Settings | Configure project-specific settings | - |
Window Menu
- Panel Toggles: Show/hide Content Browser, Outliner, Details, etc.
- Layout Management: Save, load, or reset editor layouts
- Developer Tools: Output Log, Message Log, Class Viewer
- Cinematics: Sequencer for creating cutscenes
Help Menu
- Documentation: Opens official Unreal Engine docs
- Tutorials: In-editor guided tutorials
- Forums: Links to community forums
- Answer Hub: Community Q&A site
- About Unreal Editor: Version info and credits
Main Toolbar
The main toolbar provides quick access to frequently used actions. Here's what each button does:

Figure: The UE 5.8 Main Toolbar · Save and Open, the Selection Mode dropdown, the Add / Blueprints / Cinematics menus, and the Play simulation controls.
Toolbar Button Details
| Button | Function | Quick Tip |
|---|---|---|
| 💾 Save | Quick save current level and assets | Click dropdown for Save All, Save As |
| 📁 Content | Open Content Browser | Or press Ctrl + Space |
| 🛒 Fab | Browse Fab (fab.com), Epic's content library | Opens from the Content Browser toolbar |
| ⚙️ Settings | Quick access to project and editor settings | Dropdown shows both options |
| ▶️ Play | Test level in Play In Editor mode | Alt + P or click dropdown for more options |
| 🔨 Build | Build lighting, navigation, and other systems | Dropdown shows build options |
| 🔄 Source Control | Version control integration | Requires setup (Perforce, Git, etc.) |
| 🎬 Cinematics | Open Sequencer for creating cutscenes | Advanced feature for cinematics |
Play Mode Options
The Play button dropdown reveals several testing options:
- Play (Default): Test in viewport window
- New Editor Window: Opens separate window for testing
- Standalone Game: Launches as if packaged (more accurate)
- Simulate: Like Play but without player control (for physics/AI testing)
- Number of Players: Test multiplayer locally with 2-4 clients
💡 Advanced: Simulate Mode
Simulate Mode is incredibly useful for testing without possessing a player character:
- Physics simulations run while you fly camera around
- AI behaviors execute without player interference
- Perfect for debugging systems independently
- Press Esc to stop, just like regular Play mode
Build Options
The Build dropdown offers several build types:
- Build Lighting Only: Recalculate lights and shadows (most common)
- Build Reflection Captures: Update reflections
- Build Navigation: Regenerate AI pathfinding data
- Build All Levels: Build everything in project
- Build Lighting Quality:
- Preview - Fast, low quality (seconds)
- Medium - Good balance (minutes)
- High - Production quality (hours for large levels)
- Production - Final quality (many hours)
Customization and Layouts
Unreal Engine's interface is highly customizable. You can arrange panels, save layouts, and create workspace configurations tailored to specific tasks.
Moving and Docking Panels
How to Rearrange Panels
- Click and drag the tab at the top of any panel
- Dock indicators appear showing where you can place it:
- Center of panel = tabbed with existing panel
- Top/Bottom/Left/Right = split and dock beside
- Release mouse when hover over desired location
- Floating panels: Drag away from dock areas to create floating window
📊 Panel Docking Zones
Green zones: Dock beside | Orange center: Create tab group
Resizing Panels
- Hover over the border between panels—cursor changes to resize arrows
- Click and drag to resize
- Both panels adjust proportionally
Saving and Loading Layouts
Once you've arranged panels perfectly, save the layout for future use:
Saving a Layout
- Arrange all panels exactly how you want them
- Go to Window → Save Layout
- Give it a descriptive name (e.g., "Level Design", "Blueprint Editing", "Animation")
- Click Save
Loading a Layout
- Window → Load Layout → choose saved layout
- All panels snap to saved positions instantly
- Or right-click toolbar → Layouts → select layout
Resetting to Default
- Window → Load Layout → Default Editor Layout
- Restores original panel arrangement
- Useful if you've messed something up
✅ Recommended Layouts for Different Tasks
Consider creating specialized layouts:
- "Level Design": Large viewport, Content Browser prominent, Outliner visible
- "Blueprint Work": Maximize Blueprint editor, Details on right, minimal viewport
- "Material Creation": Material editor full-screen, small preview viewport
- "Animation": Sequencer bottom, viewport top, Details right
Switch between layouts as you change tasks for maximum efficiency!
Multi-Monitor Setup
If you have multiple monitors, take advantage of extra screen space:
- Drag panels to other monitors: Undock panel and drag to second screen
- Suggested multi-monitor setup:
- Primary Monitor: Large viewport for level editing
- Secondary Monitor: Content Browser, Outliner, Details Panel
- Save multi-monitor layouts: Layout positions save monitor information
Panel-Specific Customization
Content Browser
- View Options: Bottom-right gear icon → customize thumbnail size, show type, etc.
- Show/Hide Folders: Toggle folder tree visibility
- Color Code Folders: Right-click folder → Set Color
Viewport
- Viewport Options: Top-left icon → Grid settings, snap settings, camera speed
- Show Flags: Toggle specific element visibility
- Realtime Toggle: Disable real-time updates to save GPU (animation won't play)
Outliner
- Settings Menu: Three dots → sort options, filter settings
- Column Customization: Right-click header → add/remove columns
Essential Keyboard Shortcuts
Mastering keyboard shortcuts dramatically speeds up your workflow. Here are the most important shortcuts organized by function.
⌨️ Essential Shortcuts Quick Reference
Complete Shortcut Reference
File Management
| Shortcut | Action |
|---|---|
| Ctrl + S | Save current level |
| Ctrl + Shift + S | Save all |
| Ctrl + N | New level |
| Ctrl + O | Open level |
| Ctrl + P | Open asset picker |
Viewport Controls
| Shortcut | Action |
|---|---|
| Right Mouse + WASD | Fly camera (hold Shift to speed up) |
| Alt + Left Mouse | Orbit around focus point |
| Middle Mouse | Pan camera |
| F | Frame selected object |
| G | Toggle game view (hides editor icons) |
| Alt + 2 | Wireframe view mode |
| Alt + 3 | Unlit view mode |
| Alt + 4 | Lit view mode (default) |
Transform Tools
| Shortcut | Action |
|---|---|
| W | Move/Translate mode |
| E | Rotate mode |
| R | Scale mode |
| Spacebar | Cycle through transform modes |
| Ctrl + W/E/R | Toggle World/Local space |
Selection
| Shortcut | Action |
|---|---|
| Left Click | Select object |
| Ctrl + Left Click | Add to selection |
| Ctrl + A | Select all |
| Esc | Deselect all |
| Shift + E | Select all actors using same mesh |
Editing
| Shortcut | Action |
|---|---|
| Ctrl + D | Duplicate selected |
| Alt + Drag | Duplicate while moving |
| Delete | Delete selected |
| Ctrl + Z | Undo |
| Ctrl + Y | Redo |
| Ctrl + C | Copy |
| Ctrl + V | Paste |
| Ctrl + X | Cut |
| End | Snap object to ground |
Play and Simulation
| Shortcut | Action |
|---|---|
| Alt + P | Play in editor (PIE) |
| Esc | Stop playing/simulating |
| Alt + S | Simulate physics |
| Pause | Pause game |
| F8 | Eject from player (PIE only) |
Panels and Windows
| Shortcut | Action |
|---|---|
| Ctrl + Space | Open Content Browser |
| Ctrl + Shift + O | Focus Outliner |
| Ctrl + B | Find selected in Content Browser |
| Ctrl + K | Open Asset Picker |
| ~ (backtick) | Open console command line |
| F11 | Toggle fullscreen |
| Ctrl + Tab | Cycle through open editors |
✅ Top 10 Shortcuts to Memorize First
Focus on these core shortcuts to see immediate productivity gains:
- Ctrl + S - Save (muscle memory!)
- Right Mouse + WASD - Fly camera
- F - Frame selected object
- W / E / R - Move / Rotate / Scale
- Ctrl + D - Duplicate
- Ctrl + Z - Undo
- Alt + P - Play
- Esc - Deselect / Stop Playing
- Ctrl + Space - Content Browser
- End - Snap to ground
Customizing Shortcuts
You can rebind any shortcut to your preference:
- Go to Edit → Editor Preferences
- Navigate to General → Keyboard Shortcuts
- Search for the command you want to rebind
- Click on the current binding
- Press your desired key combination
- Click "Accept" to save
⚠️ Tip: Print a Cheat Sheet
While learning, keep a printed shortcuts reference nearby. Most developers have common shortcuts memorized within 1-2 weeks of regular use. The shortcuts become second nature quickly!
Summary
Congratulations! You've completed an in-depth tour of the Unreal Editor interface. You now have the knowledge to navigate efficiently, customize your workspace, and work like a professional.
🎉 Key Takeaways
- Viewport Mastery: Multiple navigation modes (fly, orbit, pan), view modes (Lit, Unlit, Wireframe), and Show flags for controlling visibility.
- Content Browser: Your asset library—use search, filters, and collections to stay organized. Follow naming conventions for scalability.
- Outliner: Hierarchical list of all actors—use folders for organization, visibility toggles for complex scenes, and parenting for compound objects.
- Details Panel: Context-sensitive property editor—Transform controls, rendering settings, collision, physics, and more. Use search and favorites for efficiency.
- Toolbar: Quick access to Save, Play, Build, Settings, and Content Browser. Dropdown menus reveal additional options.
- Customization: Drag panels to rearrange, save layouts for different tasks, and optimize for multi-monitor setups.
- Keyboard Shortcuts: Master the top 10 shortcuts first, then gradually add more. Rebind as needed for your workflow.
📚 Skills You've Mastered
| Skill Category | What You Can Now Do |
|---|---|
| Navigation | Fly, orbit, and pan smoothly; switch view modes; frame objects instantly |
| Asset Management | Find, organize, import, and manage thousands of assets efficiently |
| Scene Organization | Use folders, search, and visibility to manage complex levels |
| Property Editing | Modify transforms, materials, physics, and all object properties |
| Workflow Optimization | Use shortcuts, custom layouts, and efficient techniques |
🚀 What's Next?
With interface mastery under your belt, you're ready to start building! The next module will teach you fundamental level design concepts:
- Working with geometry and brushes
- Understanding actors and components
- Lighting your scenes
- Materials and textures basics
- Building your first complete environment
🎓 Interface Expert!
You've graduated from interface beginner to confident user! The editor that once seemed overwhelming is now a familiar workspace. Every professional started exactly where you are. Keep practicing, and soon these skills will be completely automatic!
💪 Practice Challenges
🏋️ Challenge 1: Speed Navigation Drill
Goal: Build navigation muscle memory
- Place 10 cubes randomly throughout your level
- Practice flying to each one using Right Mouse + WASD
- Click each cube, press F to frame it
- Time yourself—try to visit all 10 in under 30 seconds
Success: Smooth, confident navigation without thinking
🏋️ Challenge 2: Asset Organization Master
Goal: Practice Content Browser organization
- Create folders: Props, Materials, Meshes, Textures
- Move 5+ assets from StarterContent into appropriate folders
- Create a Collection called "Level_01_Assets"
- Add 5 assets to the collection
- Use search to find a specific asset quickly
Success: Clean, organized project structure
🏋️ Challenge 3: Outliner Organization
Goal: Master scene hierarchy
- Create folders in Outliner: Lighting, Environment, Props
- Organize all level actors into appropriate folders
- Create a lamp by parenting a Point Light to a Cylinder
- Hide the Environment folder—notice viewport clears
- Show all again
Success: Well-organized, easy-to-navigate scene
🏋️ Challenge 4: Transform Precision
Goal: Master object manipulation
- Place a cube at exactly X=0, Y=0, Z=100 using Details Panel
- Rotate it exactly 45 degrees on Z axis
- Scale it to 2.0 on all axes (use lock icon)
- Duplicate it and move copy to X=500
- Select both and scale them together to 1.5
Success: Precise control over object properties
🏋️ Challenge 5: Custom Workspace
Goal: Create personalized layout
- Rearrange panels to your preference
- Resize viewport to take up 60% of screen
- Dock Content Browser and Outliner side-by-side at bottom
- Save layout as "My Level Design Layout"
- Reset to default, then load your custom layout
Success: Efficient personalized workspace
🏋️ Challenge 6: Shortcut Speed Test
Goal: Memorize essential shortcuts
- Without looking at reference, try to remember:
- What does W do? E? R?
- How do you duplicate? Undo? Frame selected?
- How do you start playing? Stop playing?
- How do you open Content Browser?
Success: Answer all without checking reference
🤔 Common Questions
Q: The interface feels overwhelming. Is that normal?
Absolutely! Every Unreal developer felt the same way initially. The interface has a lot of panels and options because it's a professional tool. Focus on one panel at a time, and within a few days it will feel natural. Start with viewport, Content Browser, and Outliner—those three cover 90% of daily work.
Q: How long does it take to memorize shortcuts?
Most developers memorize the top 10 essential shortcuts within 1 week of regular use. The full set of 30-40 common shortcuts takes about 2-4 weeks. Don't try to memorize everything at once—learn organically as you work.
Q: Can I use Unreal on a single monitor effectively?
Yes! Most beginners use a single monitor. The default layout works well. If you get a second monitor later, you can expand your workspace, but it's not required. Many professionals still use single monitors.
Q: I accidentally closed a panel. How do I get it back?
Go to Window menu and click the panel name (Content Browser, Outliner, Details, etc.). Or use Window → Load Layout → Default to reset everything.
Q: Should I customize my interface immediately?
No—stick with defaults while learning. After a few weeks, you'll naturally discover what layout works best for you. Then customize and save layouts for different tasks.
📖 Additional Resources
- Official Documentation: Unreal Editor Interface
- Keyboard Shortcuts: Complete Shortcut Reference
- Video Tutorial: Search "Unreal Engine 5 Interface Complete Guide" on YouTube
- Quick Reference Card: Print keyboard shortcut diagrams from this lesson for your desk