📦 Static Meshes and Assets
Static Meshes are the building blocks of your 3D worlds—every object you see in an Unreal game, from characters to props to entire buildings, is composed of these 3D models. In this lesson, you'll learn what Static Meshes are, how to import them from external 3D modeling software, and how to manage your project's assets using the Content Browser.
🎯 Learning Objectives
By the end of this lesson, you will be able to:
- Define what a Static Mesh is and explain how it differs from other geometry types
- Navigate and organize assets in the Content Browser
- Import 3D models from external software (FBX, OBJ formats)
- Understand mesh properties: vertices, edges, polygons, and materials
- Configure import settings for optimal results
- Use the Static Mesh Editor to inspect and modify meshes
- Apply materials and understand UV mapping basics
- Organize assets using folders, naming conventions, and metadata
Estimated Time: 60-75 minutes
Prerequisites: Lesson 2.3 - Blockout Geometry
In This Lesson
What Are Static Meshes?
If you've worked with any 3D software—Blender, Maya, 3ds Max, or even simpler tools—you've created 3D models made of vertices, edges, and faces. When you bring these models into Unreal Engine, they become Static Meshes.
📖 Definition
Static Mesh: A 3D model composed of a fixed arrangement of vertices, edges, and polygons. "Static" means the mesh's geometry doesn't deform or animate—it maintains its shape. Static Meshes are the most common asset type in Unreal Engine and the foundation of almost every 3D scene.
Why "Static"?
The term "static" doesn't mean the object can't move—you can absolutely move, rotate, and scale Static Meshes. "Static" refers to the shape of the geometry itself. The vertices don't change position relative to each other. Think of it like a rigid object:
- ✅ A table is a Static Mesh—its legs, top, and shape never change
- ✅ A rock is a Static Mesh—solid and unchanging
- ✅ A building is made of Static Meshes—walls, doors, windows are all rigid
- ❌ A character's body needs deformation for animation—that's a Skeletal Mesh (covered later)
- ❌ A cloth or flag that flaps in wind—that requires cloth simulation or animation
Figure: Static Meshes maintain their shape (left), while Skeletal Meshes can deform for animation (right).
Static Meshes Are Everywhere
Open any game, and the vast majority of what you see is Static Meshes:
- Environmental props: Trees, rocks, barrels, crates, furniture
- Architecture: Walls, floors, doors, windows, roofs
- Vehicles: The body of a car, truck, or spaceship (though wheels might rotate)
- Weapons: Guns, swords, shields (held by characters)
- User Interface elements: 3D buttons, holographic displays
- Collectibles: Coins, health packs, ammo boxes
Essentially, if it's a rigid 3D object, it's a Static Mesh.
Advantages of Static Meshes
Why do Static Meshes dominate game development? Several key reasons:
- Performance: Because they don't deform, GPUs can render them very efficiently. Modern engines like Unreal can draw thousands of Static Meshes per frame.
- Instancing: You can place the same Static Mesh 1,000 times in a level, but it only loads into memory once. This is called "instancing" and saves massive amounts of memory.
- Optimization: Static Meshes support LODs (Level of Detail), where distant objects use simpler versions to save performance.
- Nanite (UE5): Unreal Engine 5's virtualized-geometry system lets meshes have millions of polygons at almost no performance cost. It began as a Static-Mesh feature and, in UE 5.8, also extends to Skeletal Meshes and foliage.
- Collision: Static Meshes can have simplified collision shapes, making physics calculations fast and efficient.
- Reusability: Create once, use everywhere. A Static Mesh is an asset you can drag into any level, any project.
💡 Nanite in Unreal Engine 5
One of UE5's biggest innovations is Nanite, a virtualized geometry system that gives meshes film-quality detail (millions or even billions of polygons) without the traditional performance cost. A single statue can have more polygons than an entire PS4 game, and Nanite renders it in real time. Nanite started as a Static-Mesh-only feature, and by UE 5.8 it also supports Skeletal Meshes, masked materials, World Position Offset, and foliage. Static Meshes are still where you'll reach for it most.
Static Meshes vs. Other Geometry Types
Let's clarify how Static Meshes differ from other geometry types you might encounter:
| Type | Description | When to Use |
|---|---|---|
| Static Mesh | Rigid 3D model with fixed geometry | 99% of non-character objects (props, buildings, environment) |
| Skeletal Mesh | 3D model with bones/skeleton for animation | Characters, creatures, anything that needs to animate/deform |
| BSP Geometry (legacy) | Editor-created additive/subtractive brushes | Legacy blockout; modern blockout uses Modeling Mode, which outputs Static Meshes directly |
| Procedural Mesh | Geometry generated by code at runtime | Terrain, destructible objects, dynamically generated content |
| Landscape | Specialized terrain system for large outdoor areas | Outdoor environments, hills, mountains (covered in later module) |
For this lesson, we're focused exclusively on Static Meshes—the workhorse of Unreal Engine level design.
The Content Browser
Before we dive into creating and importing Static Meshes, you need to understand where they live: the Content Browser. This is Unreal's asset management system—think of it as a file explorer specifically designed for game assets.
📖 Definition
Content Browser: Unreal's primary interface for browsing, organizing, importing, and managing all project assets. It displays everything in your project: meshes, materials, textures, sounds, blueprints, animations, and more.
Opening the Content Browser
The Content Browser is usually open by default at the bottom of the editor. If you can't see it:
- Go to Window → Content Browser in the menu bar
- Or press Ctrl+Space
- You can have multiple Content Browser tabs open simultaneously
Content Browser Anatomy
Let's break down the different parts of the Content Browser interface:
Figure: The Content Browser interface with folder tree (left) and asset grid view (right).
Navigating the Content Browser
Understanding how to efficiently navigate the Content Browser is crucial for productivity:
Folder Navigation
- Click folders in the left panel to view their contents in the main area
- Expand/collapse folders using the arrows (▸/▾)
- Breadcrumb navigation: Click any folder in the path bar to jump there
- Back/Forward buttons: Navigate your browsing history like a web browser
- Right-click folders: Create new folders, rename, delete, or set folder color
View Modes
The Content Browser offers several view modes to suit different workflows:
- Tile View (⊞): Large thumbnails, best for visual assets like meshes and textures
- List View (☰): Compact list with details, good for lots of assets
- Column View: Multi-column browser-style navigation
Toggle between views using the buttons in the top-right corner.
Searching and Filtering
As your project grows, you'll need to find assets quickly:
- Search bar: Type asset names—results appear instantly
- Filters: Click "Filters" dropdown to show only specific asset types (Static Meshes, Materials, etc.)
- Collections: Create custom collections of frequently-used assets
- Advanced search: Use syntax like
Type=StaticMeshorPath=/Game/MyFolder
Working with Assets
The Content Browser is where you perform most asset operations:
| Action | How To |
|---|---|
| Place in level | Drag asset from Content Browser into viewport |
| Open editor | Double-click asset to open appropriate editor |
| Rename | Right-click → Rename, or press F2 |
| Duplicate | Ctrl+D or right-click → Duplicate |
| Delete | Delete key or right-click → Delete |
| Move to folder | Drag asset onto folder in left panel |
| View references | Right-click → Reference Viewer (see what uses this asset) |
| Export | Right-click → Asset Actions → Export |
✅ Pro Tip: Multiple Content Browsers
You can open multiple Content Browser windows by going to Window → Content Browser multiple times. This is incredibly useful—keep one browser showing your frequently-used assets folder, and use another to navigate around. Professional developers often have 2-3 Content Browsers open simultaneously, each docked in different parts of the screen.
Understanding the Content Folder
All your project's assets live in the Content folder. This folder exists both:
- On disk: In your project directory as
YourProject/Content/ - In the editor: As
/Game/in the Content Browser path
When you see /Game/MyProject/Meshes in Unreal, it corresponds to YourProject/Content/MyProject/Meshes on your hard drive.
⚠️ Warning: Don't Modify Content Folder Externally
Never manually add, delete, or move files in the Content folder using Windows Explorer or other file managers. Unreal maintains an internal database of asset relationships, and external changes can break references. Always use the Content Browser for asset management. If you must import files externally, use the "Import" feature in the Content Browser afterward to register them.
Importing 3D Models
Most Static Meshes are created in external 3D modeling software like Blender, Maya, 3ds Max, or ZBrush, then imported into Unreal. Let's walk through the import process step by step.
Supported File Formats
Unreal Engine supports several 3D file formats for importing meshes:
| Format | Extension | Best For | Notes |
|---|---|---|---|
| FBX | .fbx | Static Meshes, Skeletal Meshes, animations | ✅ Recommended—industry standard, supports materials, UVs, bones |
| OBJ | .obj | Simple Static Meshes | Basic format—no materials, no animations |
| USD | .usd, .usda | High-fidelity assets, film workflows | UE5 feature—supports complex scene hierarchies |
| glTF | .gltf, .glb | Web-based 3D, lightweight assets | Well-supported via Interchange; good for web exports |
| Datasmith | Various | CAD, SketchUp, Revit, 3ds Max, Rhino | Specialized importers for professional workflows |
For this lesson, we'll focus on FBX, the most versatile and widely-supported format.
💡 The Interchange Import Framework (UE 5.8)
Modern Unreal routes imports through Interchange, a unified import pipeline that is gradually replacing the older format-specific importers. It is the default for glTF and is the direction Epic is moving all formats. FBX still opens the familiar FBX Import Options dialog shown below (you can also opt FBX into Interchange in Editor Preferences), so the settings you learn here carry over either way.
Preparing Models for Export (External Software)
Before importing into Unreal, ensure your 3D model follows these guidelines in your modeling software:
- Scale: Export at 1:1 scale. In Blender/Maya, 1 unit = 1 cm for Unreal. If your object is wrong size, scale it in the modeling program before export.
- Origin point: Set the pivot/origin to a sensible location (base center for props, hinge location for doors).
- Rotation: Make sure the object is oriented correctly (typically Z-up in Blender, but FBX handles conversion).
- Apply transformations: Apply all scale, rotation, and position transforms before export (in Blender: Ctrl+A → All Transforms).
- Clean geometry: Remove overlapping faces, duplicate vertices, and non-manifold edges.
- Triangulate (optional): Unreal will triangulate on import, but you can do it manually for more control.
- Materials: Name your materials descriptively—they'll import with the mesh.
- UVs: Ensure your model has UV maps for texturing (covered later this lesson).
💡 Blender to Unreal Quick Guide
If you're using Blender (free and open-source 3D software):
- Select your mesh
- File → Export → FBX (.fbx)
- In export settings: Select "Mesh" only (uncheck Camera, Lights)
- Set Scale to 1.0, Forward to -Y Forward, Up to Z Up
- Check "Apply Transform"
- Export to a location you'll remember
The Import Process
Once you have an FBX file ready, here's how to import it into Unreal:
Method 1: Drag and Drop (Quickest)
- Open the Content Browser
- Navigate to the folder where you want the mesh (e.g.,
Content/Meshes/Props) - Drag the FBX file from Windows Explorer directly into the Content Browser
- The FBX Import Options dialog appears
- Adjust settings (covered next section)
- Click "Import" or "Import All"
Method 2: Import Button
- In Content Browser, click the green "Import" button
- Browse to your FBX file in the file picker
- Select it and click "Open"
- The import dialog appears—configure and import
FBX Import Options
When you import an FBX, Unreal shows an import dialog with many options. Here are the most important settings for Static Meshes:
Figure: The FBX Import Options dialog with key settings highlighted.
Key Import Settings Explained
Mesh Section:
- Import Mesh: Always checked—you're importing a mesh!
- Skeletal Mesh: Should be "Static Mesh" for props/environment. Choose "Skeletal Mesh" only for characters/creatures with bones.
- Auto Generate Collision: ✅ Check this! Unreal will create a simplified collision mesh automatically. Essential for physics and player collision.
- Combine Meshes: If your FBX contains multiple objects, this combines them into one mesh (usually what you want).
Material Section:
- Import Materials: ✅ Check this to bring in material names/slots from your 3D software.
- Import Textures: If your FBX has embedded textures or they're in the same folder, Unreal will import them too.
- Material Import Method: "Create New Materials" makes Unreal create material assets. "Do Not Create Material" leaves slots empty for manual assignment.
Transform Section:
- Import Uniform Scale: Multiplier for the entire mesh. Usually 1.0, but if your model is too small/large, adjust here (or better, fix in modeling software).
- Convert Scene Unit: ✅ Check this—converts from your modeling software's units to Unreal's centimeters.
✅ Recommended Settings for First Import
For beginners, use these settings for most Static Meshes:
- ✅ Import Mesh
- ✅ Auto Generate Collision
- ✅ Import Materials
- ✅ Import Textures
- ✅ Convert Scene Unit
- Import Uniform Scale: 1.0
You can always re-import with different settings later!
After Import: What You Get
After clicking "Import," several assets appear in your Content Browser:
- Static Mesh asset: The 3D model itself (blue icon, typically starts with "SM_")
- Material assets: One for each material slot (gray sphere icons, start with "M_")
- Texture assets: If textures were included (image icons, start with "T_")
You can now drag the Static Mesh from the Content Browser into your level to place it!
⚠️ Common Import Issues
Mesh too small/large: Check scale in modeling software. Unreal expects centimeters—1 unit in Blender should equal 1cm in Unreal.
Wrong orientation: Ensure Z-up export in modeling software, or manually rotate after import.
Black/missing textures: Materials imported but textures didn't. Manually assign textures in Material Editor.
Mesh is invisible: Check if normals are flipped—in modeling software, recalculate normals.
Mesh Anatomy and Properties
To work effectively with Static Meshes, you need to understand their fundamental components. Every 3D model is built from the same basic elements.
The Building Blocks: Vertices, Edges, and Polygons
Static Meshes are composed of three geometric primitives:
📖 Definitions
Vertex (plural: vertices): A point in 3D space with X, Y, Z coordinates. The cornerstone of 3D geometry.
Edge: A line connecting two vertices. Defines the boundaries of shapes.
Polygon (or Face): A flat surface defined by 3 or more vertices connected by edges. In games, almost always triangles.
Figure: The anatomy of a 3D mesh - vertices (points), edges (lines), and polygons (faces).
Polygon Count and Performance
The number of polygons (often called "poly count" or "tri count") directly affects performance. More polygons = more detailed mesh = slower rendering.
| Object Type | Typical Poly Count | Notes |
|---|---|---|
| Simple prop | 100-500 triangles | Boxes, barrels, simple furniture |
| Medium prop | 500-2,000 triangles | Detailed furniture, weapons, vehicles |
| Complex prop | 2,000-10,000 triangles | Hero objects, main characters (body only) |
| Environment piece | 1,000-5,000 triangles | Modular walls, pillars, stairs |
| Nanite mesh (UE5) | 100K-10M+ triangles | Film-quality assets—Nanite handles optimization |
💡 Nanite Changes Everything
Traditional game development required careful poly-count management; you'd never put a one-million-polygon statue in your level. Unreal Engine 5's Nanite system upends those rules: Nanite meshes can carry enormous detail (millions of polys) and render as fast as low-poly meshes. In UE 5.8 Nanite covers Static and Skeletal Meshes, masked materials, World Position Offset, and foliage. The main things it still can't do are translucent materials and morph-target deformation.
Normals and Smoothing
Beyond basic geometry, meshes have additional properties that affect how they're rendered:
📖 Definition
Normal: A vector perpendicular to a surface that tells the rendering engine which direction the surface is facing. Normals determine how light interacts with the mesh—they're crucial for realistic shading.
Each vertex has a normal vector. When you see smooth, rounded surfaces (like spheres) or hard edges (like cubes), it's because of how normals are calculated:
- Hard/Flat Shading: Each face has its own distinct normal—creates sharp edges, faceted look
- Smooth Shading: Normals are averaged across connected faces—creates smooth, rounded appearance
In your 3D modeling software, you can control smoothing groups, auto-smooth angles, and normal recalculation. These settings carry over when you import into Unreal.
Materials and Material Slots
Every Static Mesh has one or more Material Slots—these are where you assign materials (shaders that define the surface appearance). When you import an FBX:
- Each material in your 3D software becomes a material slot in Unreal
- Different parts of the mesh can use different materials (e.g., a sword with metal blade and leather handle)
- You assign materials to slots in the Static Mesh Editor or Details panel
Materials are a huge topic—we'll cover them more in Section 6 and dedicate an entire later module to material creation.
LODs (Level of Detail)
LODs are multiple versions of the same mesh with decreasing polygon counts. The engine automatically switches between LODs based on distance from camera:
- LOD 0: Full detail—used when close to camera
- LOD 1: Medium detail—used at medium distance
- LOD 2: Low detail—used far away
- LOD 3+: Very low detail—distant objects
Unreal can auto-generate LODs, or you can create custom ones in your 3D software for maximum control.
✅ Performance Tip
LODs are one of the most effective performance optimizations. A tree that's 50 pixels tall on screen doesn't need 10,000 polygons—200 would be plenty. Proper LOD setup can double or triple your framerate in complex scenes with no visible quality loss.
The Static Mesh Editor
Every time you double-click a Static Mesh in the Content Browser, it opens in the Static Mesh Editor—a specialized interface for inspecting and configuring meshes.
Opening the Static Mesh Editor
- Navigate to your mesh in the Content Browser
- Double-click the mesh asset
- The Static Mesh Editor window opens
Static Mesh Editor Interface
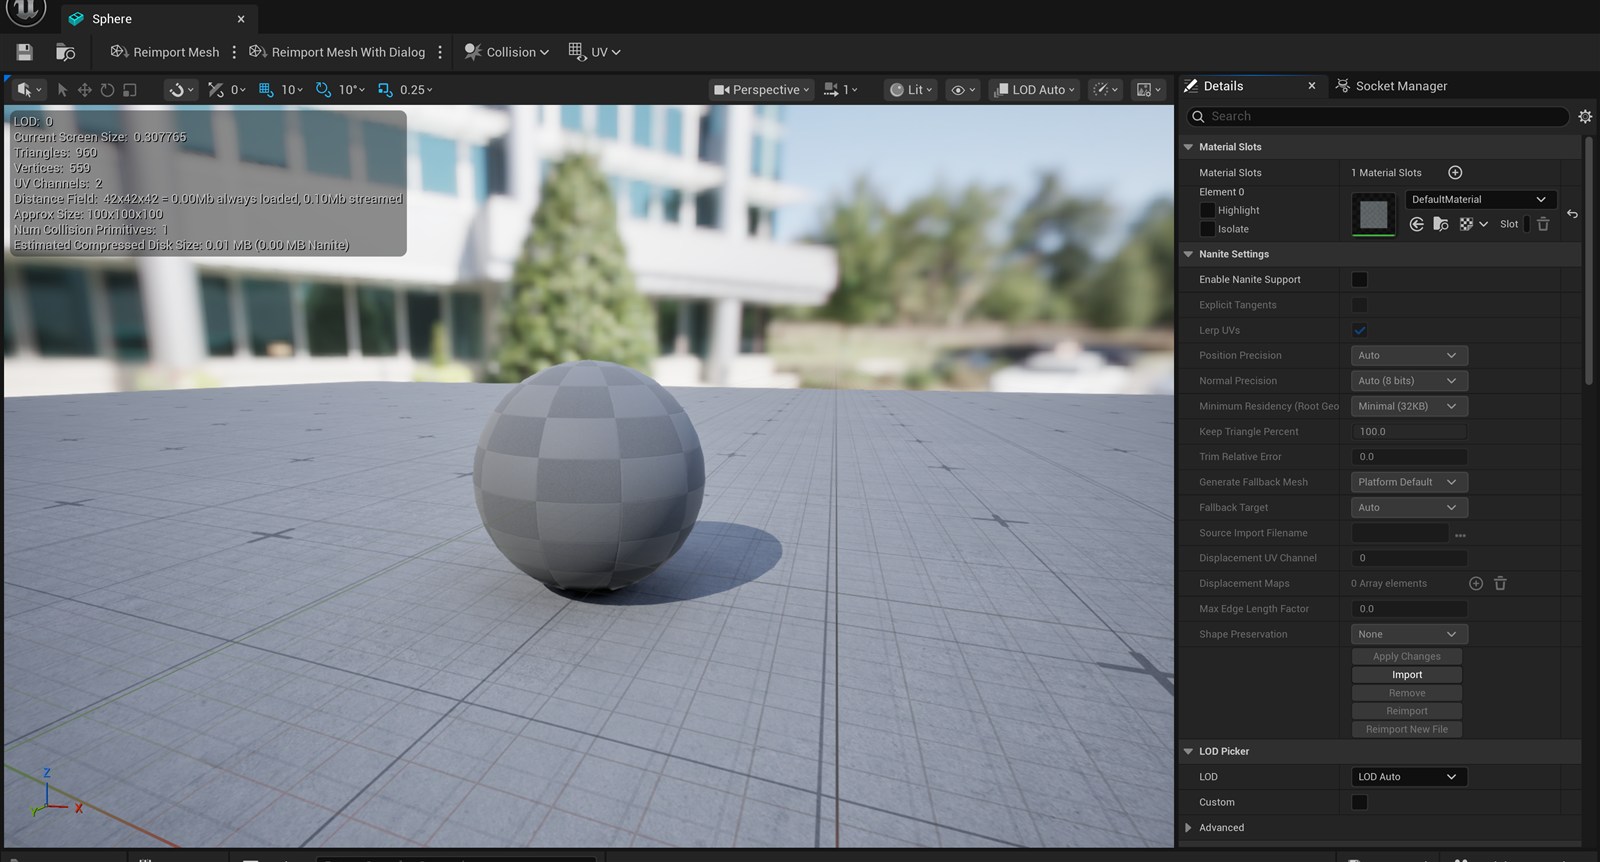
Figure: The Static Mesh Editor · the viewport with its mesh-stats overlay (left) and the Details panel with Material Slots, Nanite Settings, and the LOD Picker (right).
Key Features of the Static Mesh Editor
1. 3D Viewport
The center viewport shows a preview of your mesh:
- Rotate camera: Right-click and drag
- Pan camera: Middle-click and drag
- Zoom: Scroll mouse wheel
- View modes: Switch between Lit, Unlit, Wireframe
- Show collision: Toggle collision mesh visibility
- Stats overlay: See triangle count, vertex count, UV channels
2. Details Panel
The left panel contains all mesh properties and settings:
- LOD Settings: Configure Level of Detail meshes, auto-generation settings
- Materials: Assign materials to material slots
- Collision: Set up collision complexity, presets, custom collision meshes
- Nanite (UE5): Enable/disable Nanite virtualized geometry
- Import Settings: View source file info, re-import with different settings
3. Mesh Details Panel
The right panel shows read-only information about the mesh:
- Geometry stats: Triangle count, vertex count, UV channels
- Bounds: Physical dimensions in centimeters
- Memory usage: How much RAM/disk space the mesh uses
Common Operations in Static Mesh Editor
Assigning Materials
- In Details panel, expand Materials section
- You'll see material slots (0, 1, 2, etc.)
- Click the dropdown next to a slot
- Select a material from your Content Browser, or drag one onto the slot
- The viewport updates immediately to show the new material
Generating Collision
If your mesh doesn't have collision or you want to regenerate it:
- Go to Collision menu in the toolbar
- Choose an auto-generation method:
- Add Box Simplified Collision: Wraps mesh in a box
- Add Sphere Simplified Collision: Wraps in a sphere
- Add Capsule Simplified Collision: Wraps in a capsule
- Auto Convex Collision: Creates convex hull(s) that closely follow the shape
- Toggle "Show Simple Collision" to see the collision mesh (usually green wireframe)
Enabling Nanite (UE5)
For high-detail Static Meshes in Unreal Engine 5:
- In Details panel, find Nanite Settings
- Check "Enable Nanite Support"
- Save the mesh
- Your mesh can now have millions of polygons with minimal performance cost
⚠️ Nanite Limitations
Nanite has grown a lot since UE5 launched. In UE 5.8 it supports Static and Skeletal Meshes, masked materials, World Position Offset (with clamping), foliage, and runtime tessellation. What it still doesn't support is translucent materials and morph-target deformation. It remains ideal for detailed static environment geometry such as rocks, buildings, and statues, which is where you'll use it most.
Generating LODs
- In Details panel, expand LOD Settings
- Set "Number of LODs" to desired count (typically 3-4)
- Click "Apply Changes"
- Unreal auto-generates simplified versions of your mesh
- You can customize reduction percentages per LOD for fine control
Materials and UV Mapping
A mesh without materials is just a gray shape. Materials bring meshes to life with color, texture, reflectivity, and detail. But before materials can work properly, you need UV mapping.
What is UV Mapping?
📖 Definition
UV Mapping: The process of "unwrapping" a 3D mesh into a flat 2D space so that textures (images) can be applied to its surface. Think of it like unwrapping a cardboard box into a flat sheet—each part of the 3D mesh corresponds to a location on the 2D texture.
Figure: UV mapping unwraps a 3D cube into a 2D layout so textures can be applied correctly.
The letters "U" and "V" are used instead of "X" and "Y" to distinguish 2D texture space from 3D world space. UV coordinates range from 0.0 to 1.0:
- U = 0, V = 0: Bottom-left corner of the texture
- U = 1, V = 0: Bottom-right corner
- U = 0, V = 1: Top-left corner
- U = 1, V = 1: Top-right corner
Why UV Mapping Matters
Without proper UVs, textures won't display correctly—they'll be stretched, distorted, or missing entirely. Good UV mapping ensures:
- ✅ Textures apply evenly without stretching
- ✅ Details appear where intended (e.g., wood grain aligned with a plank)
- ✅ Seams are hidden or minimized
- ✅ Texture resolution is distributed appropriately (important areas get more pixels)
UV mapping is done in your 3D modeling software (Blender, Maya, etc.) before exporting. Unreal uses the UVs you created—it doesn't generate them automatically (except for some procedural meshes).
UV Channels
Meshes can have multiple UV channels (typically 2-3):
- UV Channel 0: Main texture coordinates—used for diffuse, normal, roughness maps
- UV Channel 1: Lightmap UVs—special non-overlapping layout for baked lighting (Unreal can auto-generate this)
- UV Channel 2+: Optional additional channels for special effects or detail maps
Materials: What Are They?
📖 Definition
Material: A set of instructions (a shader) that tells the rendering engine how a surface should look—its color, reflectivity, roughness, transparency, and how it responds to light. Materials use textures (images) as input to create realistic or stylized surfaces.
In Unreal, materials are visual programming systems. You connect nodes to define properties like:
- Base Color: The inherent color/texture of the surface
- Metallic: How metallic (0 = non-metal, 1 = pure metal)
- Roughness: How rough/smooth (0 = mirror, 1 = matte)
- Normal: Surface detail/bumps (from a normal map)
- Emissive: Self-illumination/glow
Materials are a deep topic—Module 4 will cover them extensively. For now, just know:
- Meshes have material slots
- You assign materials to those slots in the Static Mesh Editor or Details panel
- Materials use the mesh's UV coordinates to apply textures correctly
💡 Quick Material Assignment
To quickly assign a material to a mesh in your level:
- Select the mesh Actor in the viewport
- In the Details panel, find Materials section
- Drag a material from Content Browser onto a material slot
- The mesh updates instantly with the new material
This is instance-specific—changing the material on one instance doesn't affect others.
Asset Organization Best Practices
As your project grows, you'll accumulate hundreds or thousands of assets. Without proper organization, finding anything becomes a nightmare. Let's look at industry-standard practices for keeping your Content Browser tidy.
Folder Structure
A well-organized project follows a consistent folder hierarchy:
Content/
├── MyProject/
│   ├── Blueprints/
│   │   ├── Characters/
│   │   ├── Gameplay/
│   │   └── UI/
│   ├── Maps/
│   │   ├── Levels/
│   │   └── TestMaps/
│   ├── Meshes/
│   │   ├── Architecture/
│   │   │   ├── Walls/
│   │   │   ├── Floors/
│   │   │   └── Props/
│   │   ├── Characters/
│   │   ├── Vehicles/
│   │   └── Weapons/
│   ├── Materials/
│   │   ├── Master/
│   │   └── Instances/
│   ├── Textures/
│   │   ├── Architecture/
│   │   ├── Characters/
│   │   └── UI/
│   ├── Audio/
│   │   ├── Music/
│   │   ├── SFX/
│   │   └── Dialogue/
│   └── VFX/
│       ├── Particles/
│       └── Niagara/
Naming Conventions
Consistent naming makes assets searchable and recognizable at a glance. Here are industry-standard prefixes:
| Asset Type | Prefix | Example |
|---|---|---|
| Static Mesh | SM_ | SM_Chair_Modern, SM_Wall_Brick_01 |
| Skeletal Mesh | SK_ | SK_Character_Hero, SK_Enemy_Goblin |
| Material | M_ | M_Wood_Oak, M_Metal_Rusty |
| Material Instance | MI_ | MI_Wood_Oak_Light, MI_Metal_Copper |
| Texture | T_ | T_Brick_Diffuse, T_Metal_Normal |
| Blueprint | BP_ | BP_PlayerCharacter, BP_Door_Automatic |
| Level/Map | L_ or MAP_ | L_MainMenu, MAP_Forest_01 |
| Particle System | P_ | P_Fire_Torch, P_Explosion_Large |
| Sound | S_ | S_Footstep_Stone, S_Music_MainTheme |
Additional naming tips:
- Use underscores (_) to separate words, not spaces or hyphens
- Be descriptive but concise:
SM_Chair_Office_Leatheris better thanSM_Thing_01 - Number variants consistently:
_01,_02,_03(not_1,_2) - Group related assets with shared base names:
T_Brick_Diffuse,T_Brick_Normal,T_Brick_Roughness
Asset Metadata and Tags
Unreal allows you to add metadata to assets for better searchability:
- Right-click an asset in Content Browser
- Select Edit Metadata...
- Add tags like "medieval", "interactive", "lowpoly"
- Search for these tags later using the Filters menu
Collections
Collections are custom groups of assets that live outside the folder hierarchy:
- Great for "working sets"—all assets for a specific level or feature
- Assets can be in multiple collections simultaneously
- Collections don't move files—they're just virtual groupings
To create a collection: Right-click in Content Browser → Collections → Create Collection.
✅ Team Workflow Tip
If working in a team, establish naming conventions and folder structures before anyone creates assets. Document them in a style guide. Consistency is 10x more important than the specific conventions you choose. A messy but consistent project is manageable; an inconsistent one is a disaster.
Asset Management Don'ts
Avoid these common mistakes:
- ❌ Don't dump everything in the root Content folder—use subfolders!
- ❌ Don't use generic names like "Mesh1", "Material2", "Test"
- ❌ Don't leave unused assets in your project—delete or archive them
- ❌ Don't manually move files on disk—always use Content Browser to move assets
- ❌ Don't mix personal tests with production assets—use separate folders
- ❌ Don't ignore the Reference Viewer—use it to find dependencies before deleting
🏋️ Hands-On Exercise: Import and Configure Your First Static Mesh
Time to put everything you've learned into practice. In this exercise, you'll import a 3D model, configure its properties, and place it in your level.
Part 1: Organize Your Content
- Open your Unreal project
- In the Content Browser, create a new folder structure:
Content/MyProject/Meshes/Props/Content/MyProject/Materials/Content/MyProject/Textures/
- Use right-click → New Folder to create each directory
Part 2: Obtain a 3D Model
You have several options:
- Option A: Create a simple model in Blender (cube, sphere, or basic furniture) and export as FBX
- Option B: Download a free model from Sketchfab, TurboSquid, or CGTrader (filter for "free" and "FBX")
- Option C: Use Unreal's Starter Content (skip import, use existing meshes)
💡 Blender Quick Export:
If using Blender:
- Create/select your mesh
- File → Export → FBX
- Settings: Scale 1.0, Forward -Y, Up Z, check "Apply Transform"
- Export to a memorable location
Part 3: Import the Mesh
- Navigate to
Content/MyProject/Meshes/Props/in Content Browser - Drag your FBX file from Windows Explorer into the Content Browser
- In the FBX Import Options dialog:
- ✅ Import Mesh
- ✅ Auto Generate Collision
- ✅ Import Materials
- ✅ Convert Scene Unit
- Click "Import"
- Your mesh appears in the Content Browser!
Part 4: Inspect the Static Mesh
- Double-click your imported mesh to open the Static Mesh Editor
- Look at the stats in the Mesh Details panel:
- How many triangles does it have?
- How many UV channels?
- What are its dimensions (X, Y, Z)?
- In the toolbar, click "Show Simple Collision" to see the collision mesh (green wireframe)
- If collision looks wrong, go to Collision → Add Box/Sphere/Capsule Simplified Collision
Part 5: Generate LODs (Optional)
- In the Details panel, expand LOD Settings
- Set "Number of LODs" to 3
- Click "Apply Changes"
- Unreal generates simplified versions for distant viewing
- Save the mesh (Ctrl+S)
Part 6: Place in Level
- Drag your mesh from Content Browser into the viewport
- Use the Move (W), Rotate (E), and Scale (R) gizmos to position it
- Duplicate it a few times (Ctrl+W or Alt+Drag)
- Arrange them in a pleasing layout
Part 7: Assign a Material (Optional)
- Select one of your placed meshes
- In the Details panel, find the Materials section
- Click the dropdown next to Material Slot 0
- Choose a material from Starter Content (if enabled) or Content Browser
- The mesh updates with the new material
✅ Checkpoint: What should you have now?
Your project should contain:
- An organized folder structure in Content Browser
- An imported Static Mesh with proper collision
- The mesh placed in your level (multiple instances)
- Understanding of mesh properties (tri count, UVs, LODs)
Challenge: Create a Simple Scene
Using multiple Static Meshes (imported or from Starter Content):
- Build a small environment (room corner, outdoor area, etc.)
- Use at least 3 different mesh types
- Organize assets in appropriate folders
- Name everything with proper prefixes (SM_)
- Test play the level (Alt+P) and walk through it
Summary
Static Meshes are the foundation of 3D game environments. Understanding how to import, configure, and manage them is essential for any Unreal Engine developer. Let's recap the key concepts:
Key Takeaways
- 📦 Static Meshes are 3D models with fixed geometry—they don't deform, but can move, rotate, and scale
- 🗂️ Content Browser is your asset management hub—learn to navigate it efficiently with folders, search, and filters
- 📥 Importing uses FBX format—always check import settings for collision, materials, and scale conversion
- 🔺 Mesh anatomy: Vertices (points), edges (lines), polygons (faces)—polygon count affects performance
- ⚡ Nanite (UE5) allows millions of polygons with minimal performance cost—revolutionizes detail levels
- 🛠️ Static Mesh Editor is where you configure LODs, materials, collision, and mesh properties
- 🗺️ UV mapping unwraps 3D meshes into 2D space so textures can be applied correctly
- 🎨 Materials define surface appearance—assigned to material slots on meshes
- 📁 Organization matters: Use consistent folder structures, naming conventions, and prefixes
What's Next?
Now that you understand Static Meshes, the next lesson will introduce Lesson 2.5: Materials and Lighting Basics. You'll learn how to create materials from scratch, work with textures, and set up basic lighting to bring your scenes to life.
✅ Self-Check Quiz
Before moving on, make sure you can answer these questions:
- What's the difference between a Static Mesh and a Skeletal Mesh?
- What file format is most commonly used for importing 3D models into Unreal?
- What are the three fundamental components of 3D geometry?
- Why is UV mapping important for texturing?
- What is Nanite and what are its limitations?
- What are LODs and why do they improve performance?
- What prefix should you use when naming a Static Mesh asset?
📝 Show Answers
- Static Meshes have fixed geometry (don't deform) while Skeletal Meshes have bones/skeleton for animation and deformation.
- FBX (.fbx) format—supports geometry, materials, UVs, animations, and bones.
- Vertices (points in 3D space), Edges (connections between vertices), and Polygons/Faces (surfaces defined by vertices and edges).
- UV mapping unwraps the 3D mesh into 2D space so textures (images) can be correctly applied to the surface without stretching or distortion.
- Nanite is UE5's virtualized geometry system allowing millions of polygons with minimal performance cost. In UE 5.8 it supports Static and Skeletal Meshes, masked materials, World Position Offset, and foliage; the main exclusions are translucent materials and morph-target deformation.
- LODs (Level of Detail) are simplified versions of a mesh used at different distances. They improve performance by reducing polygon count for distant objects that don't need full detail.
- SM_ (e.g., SM_Chair_Modern, SM_Rock_Large)